CHAPTER 11
OXYGEN FUEL GAS WELDING PROCEDURES
Section I. WELDING PROCESSES AND TECHNIQUES
11-1. GENERAL GAS WELDING PROCDURES
a. General.
(1) Oxyfuel gas welding (OEW) is a group of welding processes which join metals by heating with a fuel gas flame or flares with or without the application of pressure and with or without the use of filler metal. OFW includes any welding operation that makes use of a fuel gas combined with oxygen as a heating medium. The process involves the melting of the base metal and a filler metal, if used, by means of the flame produced at the tip of a welding torch. Fuel gas and oxygen are mixed in the proper proportions in a mixing chamber which may be part of the welding tip assembly. Molten metal from the plate edges and filler metal, if used, intermix in a common molten pool. Upon cooling, they coalesce to form a continuous piece.
(2) There are three major processes within this group: oxyacetylene welding, oxyhydrogen welding, and pressure gas welding. There is one process of minor industrial significance, known as air acetylene welding, in which heat is obtained from the combustion of acetylene with air. Welding with methylacetone-propadiene gas (MAPP gas) is also an oxyfuel procedure.
b. Advantages.
(1) One advantage of this welding process is the control a welder can exercise over the rate of heat input, the temperature of the weld zone, and the oxidizing or reducing potential of the welding atmosphere.
(2) Weld bead size and shape and weld puddle viscosity are also controlled in the welding process because the filler metal is added independently of the welding heat source.
(3) OFW is ideally suited to the welding of thin sheet, tubes, and small diameter pipe. It is also used for repair welding. Thick section welds, except for repair work, are not economical.
c. Equipment.
(1) The equipment used in OFW is low in cost, usually portable, and versatile enough to be used for a variety of related operations, such as bending and straightening, preheating, postheating, surface, braze welding, and torch brazing. With relatively simple changes in equipment, manual and mechanized oxygen cutting operations can be performed. Metals normally welded with the oxyfuel process include steels, especially low alloy steels, and most nonferrous metals. The process is generally not used for welding refractory or reactive metals.
d. Gases.
(1) Commercial fuel gases have one common property: they all require oxygen to support combustion. To be suitable for welding operations, a fuel gas, when burned with oxygen, must have the following:
(a) High flame temperature.
(b) High rate of flame propagation.
(c) Adequate heat content.
(d) Minimum chemical reaction of the flame with base and filler metals.
(2) Among the commercially available fuel gases, acetylene most closely meets all these requirements. Other gases, fuel such as MAPP gas, propylene, propane, natural gas, and proprietary gases based on these, have sufficiently high flame temperatures but exhibit low flame propagation rates. These gas flames are excessively oxidizing at oxygen-to-fuel gas ratios high enough to produce usable heat transfer rates. Flame holding devices, such as counterbores on the tips, are necessary for stable operation and good heat transfer, even at the higher ratios. These gases, however, are used for oxygen cutting. They are also used for torch brazing, soldering, and many other operations where the demands upon the flame characteristics and heat transfer rates are not the same as those for welding.
e. Base Metal Preparation.
(1) Dirt, oil, and oxides can cause incomplete fusion, slag inclusions, and porosity in the weld. Contaminants must be removed along the joint and sides of the base metal.
(2) The root opening for a given thickness of metal should permit the gap to be bridged without difficulty, yet it should be large enough to permit full penetration. Specifications for root openings should be followed exactly.
(3) The thickness of the base metal at the joint determines the type of edge preparation for welding. Thin sheet metal is easily melted completely by the flame. Thus, edges with square faces can be butted-together and welded. This type of joint is limited to material under 3/16 in. (4.8 mm) in thickness. For thicknesses of 3/16 to 1/4 in. (4.8 to 6.4 mm), a slight root opening or groove is necessary for complete penetration, but filler metal must be added to compensate for the opening.
(4) Joint edges 1/4 in. (6.4 mm) and thicker should be beveled. Beveled edges at the joint provide a groove for better penetration and fusion at the sides. The angle of bevel for oxyacetylene welding varies from 35 to 45 degrees, which is equivalent to a variation in the included angle of the joint from 70 to 90 degrees, depending upon the application. A root face 1/16 in. (1.6 mm) wide is normal, but feather edges are sometimes used. Plate thicknesses 3/4 in. (19 mm) and above are double beveled when welding can be done from both sides. The root face can vary from 0 to 1/8 in. (0 to 3.2 mm). Beveling both sides reduces the amount of filler metal required by approximately one-half. Gas consumption per unit length of weld is also reduced.
(5) A square groove edge preparation is the easiest to obtain. This edge can be machined, chipped, ground, or oxygen cut. The thin oxide coating on oxygen-cut surface does not have to be removed, because it is not detrimental to the welding operation or to the quality of the joint. A bevel angle can be oxygen cut.
f. Multiple Layer Welding.
(1) Multiple layer welding is used when maximum ductility of a steel weld in the as-welded or stress-relieved condition is desired, or when several layers are required in welding thick metal. Multiple layer welding is done by depositing filler metal in successive passes along the joint until it is filled. Since the area covered with each pass is small, the weld puddle is reduced in size. This procedure enables the welder to obtain complete joint penetration without excessive penetration and overheating while the first few passes are being deposited. The smaller puddle is more easily controlled. The welder can avoid oxides, slag inclusions, and incomplete fusion with the base metal.
(2) Grain refinement in the underlying passes as they are reheated increases ductility in the deposited steel. The final layer will not have this refinement unless an extra pass is added and removed or the torch is passed over the joint to bring the last deposit up to normalizing temperature.
g. Weld Quality.
(1) The appearance of a weld does not necessarily indicate its quality. Visual examination of the underside of a weld will determine whether there is complete penetration or whether there are excessive globules of metal. Inadequate joint penetration may be due to insufficient beveling of the edges, too wide a root face, too great a welding speed, or poor torch and welding rod manipulation.
(2) Oversized and undersized welds can be observed readily. Weld gauges are available to determine whether a weld has excessive or insufficient reinforcement. Undercut or overlap at the sides of the welds can usually be detected by visual inspection.
(3) Although other discontinuities, such as incomplete fusion, porosity, and cracking may or may not be apparent, excessive grain growth or the presence of hard spots cannot be determined visually. Incomplete fusion may be caused by insufficient heating of the base metal, too rapid travel, or gas or dirt inclusions. Porosity is a result of entrapped gases, usually carbon monoxide, which may be avoided by more careful flame manipulation and adequate fluxing where needed. Hard spots and cracking are a result of metallurgical characteristics of the weldment.
h. Welding With Other Fuel Gases.
(1) Principles of operation.
(a) Hydrocarbon gases, such as propane, butane, city gas, and natural gas, are not suitable for welding ferrous materials due to their oxidizing characteristics. In some instances, many nonferrous and ferrous metals can be braze welded with care taken in the adjustment of flare and the use of flux. It is important to use tips designed for the fuel gas being employed. These gases are extensively used for brazing and soldering operations, utilizing both mechanized and manual methods.
(b) These fuel gases have relatively low flame propagation rates, with the exception of some manufactured city gases containing considerable amounts of hydrogen. When standard welding tips are used, the maximum flame velocity is so 1ow that it interferes seriously with heat transfer from the flame to the work. The highest flame temperatures of the gases are obtained at high oxygen-to-fuel gas ratios. These ratios produce highly oxidizing flames, which prevent the satisfactory welding of most metals.
(c) Tips should be used having flame-holding devices, such as skirts, counterbores, and holder flames, to permit higher gas velocities before they leave the tip. This makes it possible to use these fuel gases for many heating applications with excellent heat transfer efficiency.
(d) Air contains approximately 80 percent nitrogen by volume. This does not support combustion. Fuel gases burned with air, therefore, produce lower flame temperatures than those burned with oxygen. The total heat content is also lower. The air-fuel gas flame is suitable only for welding light sections of lead and for light brazing and soldering operations.
(2) Equipment.
(a) Standard oxyacetylene equipment, with the exception of torch tips and regulators, can be used to distribute and bum these gases. Special regulators may be obtained, and heating and cutting tips are available. City gas and natural gas are supplied by pipelines; propane and butane are stored in cylinders or delivered in liquid form to storage tanks on the user's property.
(b) The torches for use with air-fuel gas generally are designed to aspirate the proper quantity of air from the atmosphere to provide combustion. The fuel gas flows through the torch at a supply pressure of 2 to 40 psig and serves to aspirate the air. For light work, fuel gas usually is supplied from a small cylinder that is easily transportable.
(c) The plumbing, refrigeration, and electrical trades use propane in small cylinders for many heating and soldering applications. The propane flows through the torch at a supply pressure from 3 to 60 psig and serves to aspirate the air. The torches are used for soldering electrical connections, the joints in copper pipelines, and light brazing jobs.
(3) Applications.
Air-fuel gas is used for welding lead up to approximately 1/4 in. (6.4 mm) in thickness. The greatest field of application in the plumbing and electrical industry. The process is used extensively for soldering copper tubing.
11-2. WORKING PRESSURES FOR WELDING OPERATIONS
The required working pressure increases as the tip orifice increases. The relation between the tip number and the diameter of the orifice may vary with different manufacturers. However, the smaller number always indicates the smaller diameter. For the approximate relation between the tip number and the required oxygen and acetylene pressures, see tables 11-1 and 11-2.
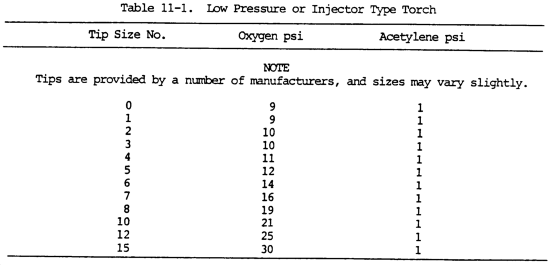
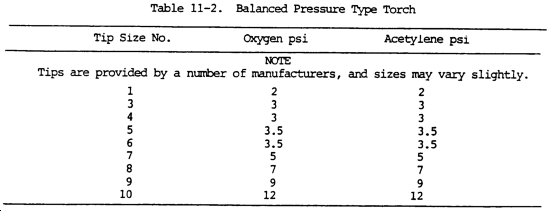
NOTE
Oxygen pressures are approximately the same as acetylene pressures in the balanced pressure type torch. Pressures for specific types of mixing heads and tips are specified by the manufacturer.
11-3. FLAME ADJUSTMENT AND FLAME TYPES
a. General.
(1) The oxyfuel gas welding torch mixes the combustible and combustion-supporting gases. It provides the means for applying the flame at the desired location. A range of tip sizes is provided for obtaining the required volume or size of welding flame which may vary from a short, small diameter needle flame to a flare 3/16 in. (4.8 mm) or more in diameter and 2 in. (51 mm) or more in length.
(2) The inner cone or vivid blue flare of the burning mixture of gases issuing from the tip is called the working flare. The closer the end of the inner cone is to the surface of the metal being heated or welded, the more effective is the heat transfer from flame to metal. The flame can be made soft or harsh by varying the gas flow. Too low a gas flow for a given tip size will result in a soft, ineffective flame sensitive to backfiring. Too high a gas flow will result in a harsh, high velocity flame that is hard to handle and will blow the molten metal from the puddle.
(3) The chemical action of the flame on a molten pool of metal can be altered by changing the ratio of the volume of oxygen to acetylene issuing from the tip. Most oxyacetylene welding is done with a neutral flame having approximately a 1:1 gas ratio. An oxidizing action can be obtained by increasing the oxygen flow, and a reducing action will result from increasing the acetylene flow. Both adjustments are valuable aids in welding.
b. Flare Adjustment.
(1) Torches should be lighted with a friction lighter or a pilot flame. The instructions of the equipment manufacturer should be observed when adjusting operating pressures at the gas regulators and torch valves before the gases issuing from the tip are ignited.
(2) The neutral flame is obtained most easily by adjustment from an excess-acetylene flame, which is recognized by the feather extension of the inner cone. The feather will diminish as the flow of acetylene is decreased or the flow of oxygen is increased. The flame is neutral just at the point of disappearance of the "feather" extension of the inner cone. This flame is actually reducing in nature but is neither carburizing or oxidizing.
(3) A practical method of determining the amount of excess acetylene in a reducing flame is to compare the length of the feather with the length of the inner cone, measuring both from the torch tip. A 2X excess-acetylene flame has an acetylene feather that is twice the length of the inner cone. Starting with a neutral flame adjustment, the welder can produce the desired acetylene feather by increasing the acetylene flow (or by decreasing the oxygen flow). This flame also has a carburizing effect on steel.
(4) The oxidizing flame adjustment is sometimes given as the amount by which the length of a neutral inner cone should be reduced, for example, one tenth. Starting with the neutral flare, the welder can increase the oxygen or decrease the acetylene until the length of the inner cone is decreased the desired amount. See figure 11-1.

c. Lighting the Torch.
(1) To start the welding torch, hold it so as to direct the flame away from the operator, gas cylinders, hose, or any flammable material. Open the acetylene torch valve 1/4-turn and ignite the gas by striking the sparklighter in front of the tip.
(2) Since the oxygen torch valve is closed, the acetylene is burned by the oxygen in the air. There is not sufficient oxygen to provide complete combustion, so the flame is smoky and produces a soot of fine unburned carbon. Continue to open the acetylene valve slowly until the flame burns clean. The acetylene flame is long, bushy, and has a yellowish color. This pure acetylene flame is unsuitable for welding.
(3) Slowly open the oxygen valve. The flame changes to a bluish-white and forms a bright inner cone surrounded by an outer flame. The inner cone develops the high temperature required for welding.
(4) The temperature of the oxyacetylene flame is not uniform throughout its length and the combustion is also different in different parts of the flame. It is so high (up to 6000°F (3316°C)) that products of complete combustion (carbon dioxide and water) are decomposed into their elements. The temperature is the highest just beyond the end of the inner cone and decreases gradually toward the end of the flame. Acetylene burning in the inner cone with oxygen supplied by the torch forms carbon monoxide and hydrogen. As these gases cool from the high temperatures of the inner cone, they burn completely with the oxygen supplied by the surrounding air and form the lower temperature sheath f1ame. The carbon monoxide burns to form carbon dioxide and hydrogen burns to form water vapor. Since the inner cone contains only carbon monoxide and hydrogen, which are reducing in character (i.e., able to combine with and remove oxygen), oxidation of the metal will not occur within this zone. The chemical reaction for a one-to-one ratio of acetylene and oxygen plus air is as follows:
C2H2 + O2 = 2CO + H2 + Heat
This is the primary reaction: however, both carbon monoxide and hydrogen are combustible and will react with oxygen from the air:
2CO + H2 + 1.502 = 2CO2 + H2O + Heat
This is the secondary reaction which produces carbon dioxide, heat, and water.
d. Types of Flames.
(1) General. There are three basic flame types: neutral (balanced), excess acetylene (carburizing), and excess oxygen (oxidizing). They are shown in figure 11-2.
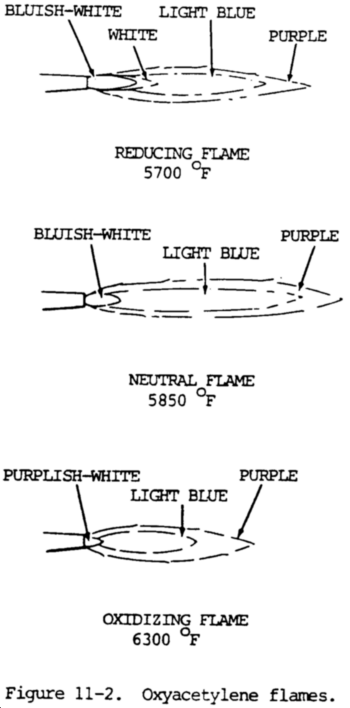
(a) The neutral flame has a one-to-one ratio of acetylene and oxygen. It obtains additional oxygen from the air and provides complete combustion. It is generally preferred for welding. The neutral flame has a clear, well-defined, or luminous cone indicating that combustion is complete.
(b) The carburizing flame has excess acetylene, the inner cone has a feathery edge extending beyond it. This white feather is called the acetylene feather. If the acetylene feather is twice as long as the inner cone it is known as a 2X flame, which is a way of expressing the amount of excess acetylene. The carburizing flame may add carbon to the weld metal.
(c) The oxidizing flame, which has an excess of oxygen, has a shorter envelope and a small pointed white cone. The reduction in length of the inner core is a measure of excess oxygen. This flame tends to oxidize the weld metal and is used only for welding specific metals.
(2) Neutral flame.
(a) The welding flame should be adjusted to neutral before either the carburizing or oxidizing flame mixture is set. There are two clearly defined zones in the neutral flame. The inner zone consists of a luminous cone that is bluish-white. Surrounding this is a light blue flame envelope or sheath. This neutral flame is obtained by starting with an excess acetylene flame in which there is a "feather" extension of the inner cone. When the flow of acetylene is decreased or the flow of oxygen increased the feather will tend to disappear. The neutral flame begins when the feather disappears.
(b) The neutral or balanced flame is obtained when the mixed torch gas consists of approximately one volume of oxygen and one volume of acetylene. It is obtained by gradually opening the oxygen valve to shorten the acetylene flame until a clearly defined inner cone is visible. For a strictly neutral flame, no whitish streamers should be present at the end of the cone. In some cases, it is desirable to leave a slight acetylene streamer or "feather" 1/16 to 1/8 in. (1.6 to 3.2 mm) long at the end of the cone to ensure that the flame is not oxidizing. This flame adjustment is used for most welding operations and for preheating during cutting operations. When welding steel with this flame, the molten metal puddle is quiet and clear. The metal flows easily without boiling, foaming, or sparking.
(c) In the neutral flame, the temperature at the inner cone tip is approximately 5850°F (3232°C), while at the end of the outer sheath or envelope the temperature drops to approximately 2300°F (1260°C). This variation within the flame permits some temperature control when making a weld. The position of the flame to the molten puddle can be changed, and the heat controlled in this manner.
(3) Reducing or carburizing flame.
(a) The reducing or carburizing flame is obtained when slightly less than one volume of oxygen is mixed with one volume of acetylene. This flame is obtained by first adjusting to neutral and then slowly opening the acetylene valve until an acetylene streamer or "feather" is at the end of the inner cone. The length of this excess streamer indicates the degree of flame carburization. For most welding operations, this streamer should be no more than half the length of the inner cone.
(b) The reducing or carburizing flame can always be recognized by the presence of three distinct flame zones. There is a clearly defined bluish-white inner cone, white intermediate cone indicating the amount of excess acetylene, and a light blue outer flare envelope. This type of flare burns with a coarse rushing sound. It has a temperature of approximately 5700°F (3149°C) at the inner cone tips.
(c) When a strongly carburizing flame is used for welding, the metal boils and is not clear. The steel, which is absorbing carbon from the flame, gives off heat. This causes the metal to boil. When cold, the weld has the properties of high carbon steel, being brittle and subject to cracking.
(d) A slight feather flame of acetylene is sometimes used for back-hand welding. A carburizing flame is advantageous for welding high carbon steel and hard facing such nonferrous alloys as nickel and Monel. When used in silver solder and soft solder operations, only the intermediate and outer flame cones are used. They impart a low temperature soaking heat to the parts being soldered.
(4) Oxidizing flame.
(a) The oxidizing flame is produced when slightly more than one volume of oxygen is mixed with one volume of acetylene. To obtain this type of flame, the torch should first be adjusted to a neutral flame. The flow of oxygen is then increased until the inner cone is shortened to about one-tenth of its original length. When the flame is properly adjusted, the inner cone is pointed and slightly purple. An oxidizing flame can also be recognized by its distinct hissing sound. The temperature of this flame is approximately 6300°F (3482°C) at the inner cone tip.
(b) When applied to steel, an oxidizing flame causes the molten metal to foam and give off sparks. This indicates that the excess oxygen is combining with the steel and burning it. An oxidizing flame should not be used for welding steel because the deposited metal will be porous, oxidized, and brittle. This flame will ruin most metals and should be avoided, except as noted in (c) below.
(c) A slightly oxidizing flame is used in torch brazing of steel and cast iron. A stronger oxidizing flame is used in the welding of brass or bronze.
(d) In most cases, the amount of excess oxygen used in this flame must be determined by observing the action of the flame on the molten metal.
(5) MAPP gas flames.
(a) The heat transfer properties of primary and secondary flames differ for different fuel gases. MAPP gas has a high heat release in the primary flame, and a high heat release in the secondary. Propylene is intermediate between propane and MAPP gas. Heating values of fuel gases are shown in table 11-3.

(b) The coupling distance between the work and the flame is not nearly as critical with MAPP gas as it is with other fuels.
(c) Adjusting a MAPP gas flame. Flame adjustment is the most important factor for successful welding or brazing with MAPP gas. As with any other fuel gas, there are three basic MAPP gas flames: carburizing, neutral, and oxidizing (fig. 11-3).
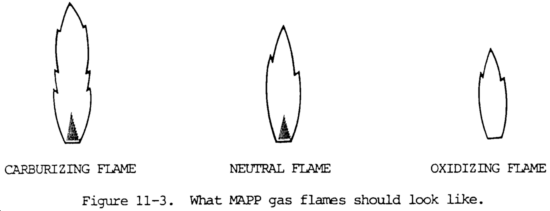
1. A carburizing flame looks much the same with MAPP gas or acetylene. It has a yellow feather on the end of the primary cone. Carburizing flames are obtained with MAPP gas when oxyfuel ratios are around 2.2:1 or lower. Slightly carburizing or "reducing" flames are used to weld or braze easily oxidized alloys such as aluminum.
2. As oxygen is increased, or the fuel is turned down, the carburizing feather pulls off and disappears. When the feather disappears, the oxyfuel ratio is about 2.3:1. The inner flame is a very deep blue. This is the neutral MAPP gas flame for welding, shown in figure 11-3. The flame remains neutral up to about 2.5:1 oxygen-to-fuel ratio.
3. Increasing the oxygen flame produces a lighter blue flame, a longer inner cone, and a louder burning sound. This is an oxidizing MAPP gas flare. An operator experience with acetylene will immediately adjust the MAPP gas flame to look like the short, intense blue flame typical of the neutral acetylene flame setting. What will be produced, however, is a typical oxidizing MAPP gas flame. With certain exceptions such as welding or brazing copper and copper alloys, an oxidizing flame is the worst possible flame setting, whatever the fuel gas used. The neutral flame is the principle setting for welding or brazing steel. A neutral MAPP gas flame has a primary flame cone abut 1-1/2 to 2 times as long as the primary acetylene flame cone.
11-4. OXYFUEL WELDING RODS
a. The welding rod, which is melted into the welded joint, plays an important part in the quality of the finished weld. Good welding rods are designed to permit free flowing metal which will unite readily with the base metal to produce sound, clean welds of the correct composition.
b. Welding rods are made for various types of carbon steel, aluminum, bronze, stainless steel, and other metals for hard surfacing.
11-5. OXYFUEL WELDING FLUXES
a. General.
(1) Oxides of all ordinary commercial metals higher melting points than the metals and alloys (except steel) have themselves. They are usually pasty when the metal is quite fluid and at the proper welding temperature. An efficient flux will combine with oxides to form a fusible slag. The slag will have a melting point lower than the metal so it will flow away from the immediate field of action. It combines with base metal oxides and removes them. It also maintains cleanliness of the base metal at the welding area and helps remove oxide film on the surface of the metal. The welding area should be cleaned by any method. The flux also serves as a protection for the molten metal against atmospheric oxidation.
(2) The chemical characteristics and melting points of the oxides of different metals vary greatly. There is no one flux that is satisfactory for all metals, and there is no national standard for gas welding fluxes. They are categorized according to the basic ingredient in the flux or base metal for which they are to be used.
(3) Fluxes are usually in powder form. These fluxes are often applied by sticking the hot filler metal rod in the flux. Sufficient flux will adhere to the rod to provide proper fluxing action as the filler rod is melted in the flame.
(4) Other types of fluxes are of a paste consistency which are usually painted on the filler rod or on the work to be welded.
(5) Welding rods with a covering of flux are also available. Fluxes are available from welding supply companies and should be used in accordance with the directions accompanying them.
b. The melting point of a flux must be lower than that of either the metal or the oxides formed, so that it will be liquid. The ideal flux has exactly the right fluidity when the welding temperature has been reached. The flux will protect the molten metal from atmospheric oxidation. Such a flux will remain close to the weld area instead of flowing all over the base metal for some distance from the weld.
c. Fluxes differ in their composition according to the metals with which they are to be used. In cast iron welding, a slag forms on the surface of the puddle. The flux serves to break this up. Equal parts of a carbonate of soda and bicarbonate of soda make a good compound for this purpose. Nonferrous metals usually require a flux. Copper also requires a filler rod containing enough phosphorous to produce a metal free from oxides. Borax which has been melted and powdered is often used as a flux with copper alloys. A good flux is required with aluminum, because there is a tendency for the heavy slag formed to mix with the melted aluminum and weaken the weld. For sheet aluminum welding, it is customary to dissolve the flux in water and apply it to the rod. After welding aluminum, all traces of the flux should be removed.
11-6. FOREHAND WELDING
a. In this method, the welding rod precedes the torch. The torch is held at approximately a 45 degree angle from the vertical in the direction of welding, as shown in figure 11-4. The flame is pointed in the direction of welding and directed between the rod and the molten puddle. This position permits uniform preheating of the plate edges immediately ahead of the molten puddle. By moving the torch and the rod in opposite semicircular paths, the heat can be carefully balanced to melt the end of the rod and the side walls of the plate into a uniformly distributed molten puddle. The rod is dipped into the leading edge of the puddle so that enough filler metal is melted to produce an even weld joint. The heat which is reflected backwards from the rod keeps the metal molten. The metal is distributed evenly to both edges being welded by the motion of the tip.
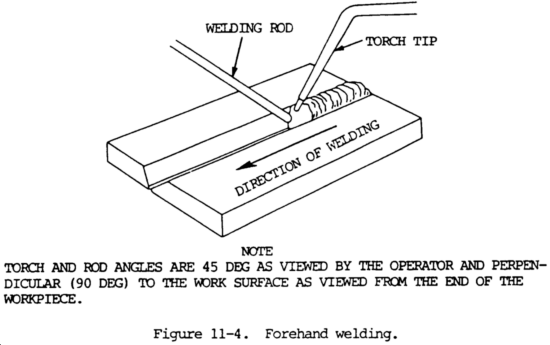
b. In general, the forehand method is recommended for welding material up to 1/8 in. (3.2 mm) thick, because it provides better control of the small weld puddle, resulting in a smoother weld at both top and bottom. The puddle of molten metal is small and easily controlled. A great deal of pipe welding is done using the forehand technique, even in 3/8 in. (9.5 mm) wall thick-nesses. In contrast, some difficulties in welding heavier plates using the forehand method are:
(1) The edges of the plate must be beveled to provide a wide V with a 90 degree included angle. This edge preparation is necessary to ensure satisfactory melting of the plate edges, good penetration, and fusion of the weld metal to the base metal.
(2) Because of this wide V, a relatively large molten puddle is required. It is difficult to obtain a good joint when the puddle is too large.
11-7. BACKHAND WELDING
a. In this method, the torch precedes the welding rod, as shown in figure 11-5. The torch is held at approximately a 45 degree angle from the vertical away from the direction of welding, with the flame directed at the molten puddle. The welding rod is between the flame and the molten puddle. This position requires less transverse motion than is used in forehand welding.
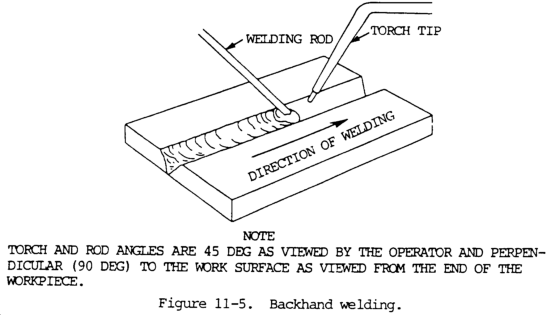
b. Increased speeds and better control of the puddle are possible with backhand technique when metal 1/8 in. (3.2 mm) and thicker is welded, based on the study of speeds normally achieved with this technique and on greater ease of obtaining fusion at the weld root. Backhand welding may be used with a slightly reducing flame (slight acetylene feather) when desirable to melt a minimum amount of steel in making a joint. The increased carbon content obtained from this flame lowers the melting point of a thin layer of steel and increases welding speed. This technique increases speed of making pipe joints where the wall thickness is 1/4 to 5/16 in. (6.4 to 7.9 mm) and groove angle is less than normal. Backhand welding is sometimes used in surfacing operations.
11-8. FILLET WELDING
a. General.
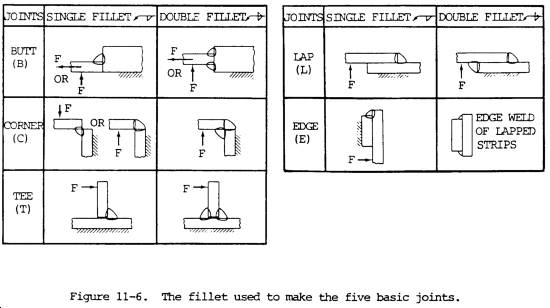
(1) The fillet weld is the most popular of all types of welds because there is normally no preparation required. In some cases, the fillet weld is the least expensive, even though it might require more filler metal than a groove weld since the preparation cost would be less. It can be used for the lap joint, the tee joint, and the corner joint without preparation. Since these are extremely popular, the fillet has wide usage. On corner joints, the double fillet can actually produce a full-penetration weld joint. The use of the fillet for making all five of the basic joints is shown by figure 11-6. Fillet welds are also used in conjunction with groove welds, particularly for corner and tee joints.
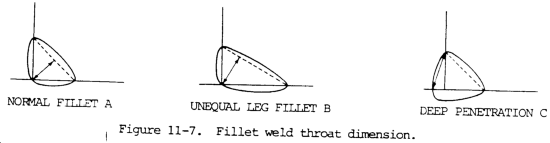
(2) The fillet weld is expected to have equal length legs and thus the face of the fillet is on a 45 degree angle. This is not always so, since a fillet may be designed to have a longer base than height, in which case it is specified by the two leg lengths. On the 45 degree or normal type of fillet, the strength of the fillet is based on the shortest or throat dimension which is 0.707 x the leg length. For fillets having unequal legs, the throat length must be calculated and is the shortest distance between the root of the fillet and the theoretical face of the fillet. In calculating the strength of fillet welds, the reinforcement is ignored. The root penetration is also ignored unless a deep penetrating process is used. If semi-or fully-automatic application is used, the extra penetration can be considered. See figure 11-7 for details about the weld.
(3) Under these circumstances, the size of the fillet can be reduced, yet equal strength will result. Such reductions can be utilized only when strict welding procedures are enforced. The strength of the fillet weld is determined by its failure area, which relates to the throat dimension. Doubling the size or leg length of a fillet will double its strength, since it doubles the throat dimension and area. However, doubling the fillet size will increase its cross-sectional area and weight four times. This illustrated in figure 11-8, which shows the relationship to throat-versus-cross-sectional area, or weight, of a fillet weld. For example, a 3/8 in. (9.5 mm) fillet is twice as strong as a 3/16 in. (4.8 mm) fillet; however, the 3/8 in. (9.5 mm) fillet requires four times as much weld metal.
(4) In design work, the fillet size is sometimes governed by the thickness of the metals joined. In some situations, the minimum size of the fillet must be based on practical reasons rather than the theoretical need of the design. Intermittent fillets are sometimes used when the size is minimum, based on code, or for practical reasons, rather than because of strength requirements. Many intermittent welds are based on a pitch and length so that the weld metal is reduced in half. Large intermittent fillets are not recommended because of the volume-throat dimension relationship mentioned previously. For example, a 3/8 in. (9.5 mm) fillet 6 in. (152.4 mm) long on a 12 in. (304.8 mm) pitch (center to center of intermittent welds) could be reduced to a continuous 3/16 in. (4.8 mm) fillet, and the strength would be the same, but the amount of weld metal would be only half as much.
(5) Single fillet welds are extremely vulnerable to cracking if the root of the weld is subjected to tension loading. This applies to tee joints, corner joints, and lap joints. The simple remedy for such joints is to make double fillets, which prohibit the tensile load from being applied to the root of the fillet. This is shown by figure 11-6. Notice the F (force) arrowhead.
b. A different welding technique is required for fillet welding than for butt joints because of the position of the parts to be welded. When welding is done in the horizontal position, there is a tendency for the top plate to melt before the bottom plate because of heat rising. This can be avoided, however, by pointing the flame more at the bottom plate than at the edge of the upper plate. Both plates must reach the welding temperature at the same time.
c. In making the weld, a modified form of backhand technique should be used. The welding rod should be kept in the puddle between the completed portion of the weld and the flame. The flame should be pointed ahead slightly in the direction in which the weld is being made and directed at the lower plate. To start welding, the flame should be concentrated on the lower plate until the metal is quite red. Then the flame should be directed so as to bring both plates to the welding temperature at the same time. It is important that the flame not be pointed directly at the inner corner of the fillet. This will cause excessive amount of heat to build up and make the puddle difficult to control.
d. It is essential in this form of welding that fusion be obtained at the inside corner or root of the joint.
11-9. HORIZONTAL POSITION WELDING
a. Welding cannot always be done in the most desirable position. It must be done in the position in which the part will be used. Often that may be on the ceiling, in the corner, or on the floor. Proper description and definition is necessary since welding procedures must indicate the welding position to be performed, and welding process selection is necessary since some have all-position capabilities whereas others may be used in only one or two positions. The American Welding Society has defined the four basic welding positions as shown in figure 11-9.
b. In horizontal welding, the weld axis is approximately horizontal, but the weld type dictates the complete definition. For a fillet weld, welding is performed on the upper side of an approximately horizontal surface and against an approximately vertical surface. For a groove weld, the face of the weld lies in an approximately vertical plane.
c. Butt welding in the horizontal position is a little more difficult to master than flat position. This is due to the tendency of molten metal to flow to the lower side of the joint. The heat from the torch rises to the upper side of the joint. The combination of these opposing factors makes it difficult to apply a uniform deposit to this joint.
d. Align the plates and tack weld at both ends (fig. 11-10). The torch should move with a slight oscillation up and down to distribute the heat equally to both sides of the joint, thereby holding the molten metal in a plastic state. This prevents excessive flow of the metal to the lower side of the joint, and permits faster solidification of the weld metal. A joint in horizontal position will require considerably more practice than the previous techniques. It is, however, important that the technique be mastered before passing on to other types of weld positions.
11-10. FLAT POSITION WELDING
a. General. This type of welding is performed from the upper side of the joint. The face of the weld is approximately horizontal.
b. Bead Welds.
(1) In order to make satisfactory bead welds on a plate surface, the flare motion, tip angle, and position of the welding flame above the molten puddle should be carefully maintained. The welding torch should be adjusted to give the proper type of flame for the particular metal being welded.
(2) Narrow bead welds are made by raising and lowering the welding flare with a slight circular motion while progressing forward. The tip should form an angle of approximately 45 degrees with the plate surface. The flame will be pointed in the welding direction (figs. 11-11 and 11-12).
(3) To increase the depth of fusion, either increase the angle between the tip and the plate surface, or decrease the welding speed. The size of the puddle should not be too large because this will cause the flame to burn through the plate. A properly made bead weld, without filler rod, will be slightly below the upper surface of the plate. A bead weld with filler rod shows a buildup on the surface.
(4) A small puddle should be formed on the surface when making a bead weld with a welding rod (fig. 11-12). The welding rod is inserted into the puddle and the base plate and rod are melted together. The torch should be moved slightly from side to side to obtain good fusion. The size of the bead can be controlled by varying the speed of welding and the amount of metal deposited from the welding rod.
c. Butt Welds.
(1) Several types of joints are used to make butt welds in the flat position.
(2) Tack welds should be used to keep the plates aligned. The lighter sheets should be spaced to allow for weld metal contraction and thus prevent warpage.
(3) The following guide should be used for selecting the number of passes (fig. 11-8) in butt welding steel plates:
|
Plate thickness, in. |
Number of passes |
|
1/8 to 1/4 |
1 |
|
1/4 to 5/8 |
2 |
|
5/8 to 7/8 |
3 |
|
7/8 to 1-1/8 |
4 |
(4) The position of the welding rod and torch tip in making a flat position butt joint is shown in figure 11-13. The motion of the flame should be controlled so as to melt the side walls of the plates and enough of the welding rod to produce a puddle of the desired size. By oscillating the torch tip, a molten puddle of a given size can be carried along the joint. This will ensure both complete penetration and sufficient filler metal to provide some reinforcement at the weld.
(5) Care should be taken not to overheat the molten puddle. This will result in burning the metal, porosity, and low strength in the completed weld.
11-11. VERTICAL POSITION WELDING
a. General. In vertical position welding, the axis of the weld is approximately vertical.
b. When welding is done on a vertical surface, the molten metal has a tendency to run downward and pile up. A weld that is not carefully made will result in a joint with excessive reinforcement at the lower end and some undercutting on the surface of the plates.
c. The flew of metal can be controlled by pointing the flame upward at a 45 degree angle to the plate, and holding the rod between the flame and the molten puddle (fig. 11-14). The manipulation of the torch and the filler rod keeps the metal from sagging or falling and ensures good penetration and fusion at the joint. Both the torch and the welding rod should be oscillated to deposit a uniform bead. The welding rod should be held slightly above the center line of the joint, and the welding flame should sweep the molten metal across the joint to distribute it evenly.
d. Butt joints welded in the vertical position should be prepared for welding in the same manner as that required for welding in the flat position.
11-12. OVERHEAD POSITION WELDING
a. General. Overhead welding is performed from the underside of a joint.
b. Bead welds. In overhead welding, the metal deposited tends to drop or sag on the plate, causing the bead to have a high crown. To overcome this difficulty, the molten puddle should be kept small, and enough filler metal should be added to obtain good fusion with some reinforcement at the bead. If the puddle becomes too large, the flame should be removed for an instant to permit the weld metal to freeze. When welding light sheets, the puddle size can be controlled by applying the heat equally to the base metal and filler rod.
c. Butt Joints. The torch and welding rod position for welding overhead butt joints is shown in figure 11-15. The flame should be directed so as to melt both edges of the joint. Sufficient filler metal should be added to maintain an adequate puddle with enough reinforcement. The welding flame should support the molten metal and small welding avoid burning done from one distribute it along the joint. Only a small puddle is required, so a rod should be used. Care should be taken to control the heat to through the plates. This is particularly important when welding is side only.
Section II. WELDING AND BRAZING FERROUS METALS
11-13. GENERAL
a. Welding Sheet Metal.
(1) For welding purposes, the term "sheet metal" is restricted to thicknesses of metals up to and including 1/8 in. (3.2 mm).
(2) Welds in sheet metal up to 1/16 in. (1.6 mm) thick can be made satisfactorily by flanging the edges at the joint. The flanges must be at least equal to the thickness of the metal. The edges should be aligned with the flanges and then tack welded every 5 or 6 in. (127.0 to 152.4 mm). Heavy angles or bars should be clamped on each side of the joint to prevent distortion or buckling. The raised edges are equally melted by the welding flare. This produces a weld nearly flush with the sheet metal surface. By controlling the welding speed and the flame motion, good fusion to the underside of the sheet can he obtained without burning through. A plain square butt joint can also be made on sheet metal up to 1/16 in. (1.6 mm) thick by using a rust-resisting, copper-coated low carbon filler rod 1/16 in. (1.6 mm) in diameter. The method of aligning the joint and tacking the edges is the same as that used for welding flanged edge joints.
(3) Where it is necessary to make an inside edge or corner weld, there is danger of burning through the sheet unless special care is taken to control the welding heat. Such welds can be made satisfactorily in sheet metal up to 1/16 in. (1.6 mm) thick by following the procedures below:
(a) Heat the end of a 1/8 in. (3.2 mm) low carbon welding rod until approximately 1/2 in. (12.7 mm) of the rod is molten.
(b) Hold the rod so that the molten end is above the joint to be welded.
(c) By sweeping the flame across the molten end of the rod, the metal can be removed and deposited on the seam. The quantity of molten weld metal is relatively large as compared with the light gauge sheet. Its heat is sufficient to preheat the sheet metal. By passing the flame quickly back and forth, the filler metal is distributed along the joint. The additional heat supplied by the flame will produce complete fusion. This method of welding can be used for making difficult repairs on automobile bodies, metal containers, and similar applications. Consideration should be given to expansion and contraction of sheet metal before welding is stated.
(4) For sheet metal 1/16 to 1/8 in. (1.6 to 3.2 mm) thick, a butt joint, with a space of approximately 1/8 in. (3.2 mm) between the edges, should be prepared. A 1/8 in. (3.2 mm) diameter copper-coated low carbon filler rod should be used. Sheet metal welding with a filler rod on butt joints should be done by the forehand method of welding.
b. Welding Steel.
(1) General. The term "steel" may be applied to many ferrous metals which differ greatly in both chemical and physical properties. In general, they may be divided into plain carbon and alloy groups. By following the proper procedures, most steels can be successfully welded. However, parts fabricated by welding generally contain less than 0.30 percent carbon. Heat increases the carbon combining power of steel. Care must be taken during all welding processes to avoid carbon pickup.
(2) Welding process. Steel heated with an oxyacetylene flame becomes fluid between 2450 and 2750°F (1343 and 1510°C), depending on its composition. It passes through a soft range between the solid and liquid states. This soft range enables the operator to control the weld. To produce a weld with good fusion, the welding rod should be placed in the molten puddle. The rod and base metal should be melted together so that they will solidify to form a solid joint. Care should be taken to avoid heating a large portion of the joint. This will dissipate the heat and may cause some of the weld metal to adhere to but not fuse with the sides of the welded joint. The flare should be directed against the sides and bottom of the welded joint. This will allow penetration of the lower section of the joint. Weld metal should be added in sufficient quantities to fill the joint without leaving any undercut or overlap. Do not overheat. Overheating will burn the weld metal and weaken the finished joint.
(3) Impurities.
(a) Oxygen, carbon, and nitrogen impurities produce defective weld metal because they tend to increase porosity, blowholes, oxides, and slag inclusions.
(b) When oxygen combines with steel to form iron oxides at high temperatures, care should be taken to ensure that all the oxides formed are removed by proper manipulation of the rod and torch flame. An oxidizing flame causes the steel to foam and give off sparks. The oxides formed are distributed through the metal and cause a brittle, porous weld. Oxides that form on the surface of the finished weld can be removed by wire brushing after cooling.
(c) A carburizing flame adds carbon to the molten steel and causes boiling of the metal. Steel welds made with strongly carburizing flames are hard and brittle.
(d) Nitrogen from the atmosphere will combine with molten steel to form nitrides of iron. These will impair its strength and ductility if included in sufficient quantities.
(e) By controlling the melting rate of the base metal and welding rod, the size of the puddle, the speed of welding, and the flame adjustment, the inclusion of impurities from the above sources may be held to a minimum.
c. Welding Steel Plates.
(1) In plates up to 3/16 in. (4.8 mm) in thickness, joints are prepared with a space between the edges equal to the plate thickness. This allows the flame and welding rod to penetrate to the root of the joint. Proper allowance should be made for expansion and contraction in order to eliminate warping of the plates or cracking of the weld.
(2) The edges of heavy section steel plates (more than 3/16 in. (4.8 mm) thick) should be beveled to obtain full penetration of the weld metal and good fusion at the joint. Use the forehand method of welding.
(3) Plates 1/2 to 3/4 in. (12.7 to 19.1 mm) thick should be prepared for a U type joint in all cases. The root face is provided at the base of the joint to cushion the first bead or layer of weld metal. The backhand method is generally used in welding these plates.
NOTE
Welding of plates 1/2 to 3/4 in. (12.7 to 19.1 mm) thick is not recommended for oxyacetylene welding.
(4) The edges of plates 3/4 in. (19.1 mm) or thicker are usually prepared by using the double V or double U type joint when welding can be done from both sides of the plate. A single V or single U joint is used for all plate thicknesses when welding is done from one side of the plate.
d. General Principles in Welding Steel.
(1) A well balanced neutral flame is used for welding most steels. To be sure that the flame is not oxidizing, it is sometimes used with a slight acetylene feather. A very slight excess of acetylene may be used for welding alloys with a high carbon, chromium, or nickel content. However, increased welding speeds are possible by using a slightly reducing flame. Avoid excessive gas pressure because it gives a harsh flame. This often results in cold shuts or laps, and makes molten metal control difficult.
(2) The tip size and volume of flame used should be sufficient to reduce the metal to a fully molten state and to produce complete joint penetration. Care should be taken to avoid the formation of molten metal drip heads from the bottom of the joint. The flame should bring the joint edges to the fusion point ahead of the puddle as the weld progresses.
(3) The pool of the molten metal should progress evenly down the seam as the weld is being made.
(4) The inner cone tip of the flame should not be permitted to come in contact with the welding rod, molten puddle, or base metal. The flame should be manipulated so that the molten metal is protected from the atmosphere by the envelope or outer flame.
(5) The end of the welding rod should be melted by placing it in the puddle under the protection of the enveloping flame. The rod should not be melted above the puddle and allowed to drip into it.
11-14. BRAZING
a. General.
(1) Brazing is a group of welding processes which produces coalescence of materials by heating to a suitable temperature and using a filler metal having a liquidus above 840°F (449°C) and below the solidus of the base metals. The filler metal is distributed between the closely fitted surfaces of the joint by capillary attraction. Brazing is distinguished from soldering in that soldering employs a filler metal having a liquidus below 840°F (449°C).
(2) When brazing with silver alloy filler metals (silver soldering), the alloys have liquidus temperatures above 840°F (449°C).
(3) Brazing must meet each of three criteria:
(a) The parts must be joined without melting the base metals.
(b) The filler metal must have a liquidus temperature above 840°F (449°C).
(c) The filler metal must wet the base metal surfaces and be drawn onto or held in the joint by capillary attraction.
(4) Brazing is not the same as braze welding, which uses a brazing filler metal that is melted and deposited in fillets and grooves exactly at the points it is to be used. The brazing filler metal also is distributed by capillary action. Limited base metal fusion may occur in braze welding.
(5) To achieve a good joint using any of the various brazing processes, the parts must be properly cleaned and protected by either flux or the atmosphere during heating to prevent excessive oxidation. The parts must provide a capillary for the filler metal when properly aligned, and a heating process must be selected that will provide proper brazing temperatures and heat distribution.
b. Principles.
(1) Capillary flow is the most important physical principle which ensures good brazements providing both adjoining surfaces molten filler metal. The joint must also be properly spaced to permit efficient capillary action and resulting coalescence. More specifically, capillarity is a result of surface tension between base metal(s), filler metal, flux or atmosphere, and the contact angle between base and filler metals. In actual practice, brazing filler metal flow characteristics are also influenced by considerations involving fluidity, viscosity, vapor pressure, gravity, and by the effects of any metallurgical reactions between the filler and base metals.
(2) The brazed joint, in general, is one of a relatively large area and very small thickness. In the simplest application of the process, the surfaces to be joined are cleaned to remove contaminants and oxide. Next, they are coated with flux or a material capable of dissolving solid metal oxides present and preventing new oxidation. The joint area is then heated until the flux melts and cleans the base metals, which are protected against further oxidation by the liquid flux layer.
(3) Brazing filler metal is then melted at some point on the surface of the joint area. Capillary attraction is much higher between the base and filler metals than that between the base metal and flux. Therefore, the flux is removed by the filler metal. The joint, upon cooling to room temperature, will be filled with solid filler metal. The solid flux will be found on the joint surface.
(4) High fluidity is a desirable characteristic of brazing filler metal because capillary attraction may be insufficient to cause a viscous filler metal to run into tight fitting joints.
(5) Brazing is sometimes done with an active gas, such as hydrogen, or in an inert gas or vacuum. Atmosphere brazing eliminates the necessity for post cleaning and ensures absence of corrosive mineral flux residue. Carbon steels, stainless steels, and super alloy components are widely processed in atmospheres of reacted gases, dry hydrogen, dissociated ammonia, argon, and vacuum. Large vacuum furnaces are used to braze zirconium, titanium, stainless steels, and the refractory metals. With good processing procedures, aluminum alloys can also be vacuum furnace brazed with excellent results.
(6) Brazing is a process preferred for making high strength metallurgical bonds and preserving needed base metal properties because it is economical.
c. Processes.
(1) Generally, brazing processes are specified according to heating methods (sources) of industrial significance. Whatever the process used, the filler metal has a melting point above 840°F (450°C) but below the base metal and distributed in the joint by capillary attraction. The brazing processes are:
(a) Torch brazing.
(b) Furnace brazing.
(c) Induction brazing.
(d) Resistance brazing.
(e) Dip brazing.
(f) Infrared brazing.
(2) Torch brazing.
(a) Torch brazing tip size, filler metal of is performed by heating with a gas torch with a proper required composition, and appropriate flux. This depends on the temperature and heat amount required. The fuel gas (acetylene, propane, city gas, etc.) may be burned with air, compressed air, or oxygen.
(b) Brazing filler metal may be preplaced at the joint in the forms of rings, washers, strips, slugs, or powder, or it may be fed from hand-held filler metal in wire or rod form. In any case, proper cleaning and fluxing are essential.
(c) For manual torch brazing, the torch may be equipped with a single tip, either single or multiple flame. Manual torch brazing is particularly useful on assemblies involving sections of unequal mass. Welding machine operations can be set up where the production rate allows, using one or several torches equipped with single or multiple flame tips. The machine may be designed to move either the work or torches, or both. For premixed city gas-air flames, a refractory type burner is used.
(3) Furnace brazing.
(a) Furnace brazing is used extensively where the parts to be brazed can be assembled with the brazing filler metal in form of wire, foil, filings, slugs, powder, paste, or tape is preplaced near or in the joint. This process is particularly applicable for high production brazing. Fluxing is employed except when an atmosphere is specifically introduced in the furnace to perform the same function. Most of the high production brazing is done in a reducing gas atmosphere, such as hydrogen and combusted gases that are either exothermic (formed with heat evolution) or endothermic (formed with heat absorption). Pure inert gases, such as argon or helium, are used to obtain special atmospheric properties.
(b) A large volume of furnace brazing is performed in a vacuum, which prevents oxidation and often eliminates the need for flux. Vacuum brazing is widely used in the aerospace and nuclear fields, where reactive metals are joined or where entrapped fluxes would be intolerable. If the vacuum is maintained by continuous pumping, it will remove volatile constituents liberated during brazing. There are several base metals and filler metals that should not be brazed in a vacuum because low boiling point or high vapor pressure constituents may be lost. The types of furnaces generally used are either batch or contiguous. These furnaces are usually heated by electrical resistance elements, gas or oil, and should have automatic time and temperature controls. Cooling is sometimes accomplished by cooling chambers, which either are placed over the hot retort or are an integral part of the furnace design. Forced atmosphere injection is another method of cooling. Parts may be placed in the furnace singly, in batches, or on a continuous conveyor.
(c) Vacuum is a relatively economical method of providing an accurately controlled brazing atmosphere. Vacuum provides the surface cleanliness needed for good wetting and flow of filler metals without the use of fluxes. Base metals containing chromium and silicon can be easily vacuum brazed where a very pure, low dew point atmosphere gas would otherwise be required.
(4) Induction brazing.
(a) In this process, the heat necessary to braze metals is obtained from a high frequency electric current consisting of a motor-generator, resonant spark gap, and vacuum tube oscillator. It is induced or produced without magnetic or electric contact in the parts (metals). The parts are placed in or near a water-cooled coil carrying alternating current. They do not form any part of the electrical circuit. The brazing filler metal normally is preplaced.
(b) Careful design of the joint and the coil setup are necessary to assure that the surfaces of all members of the joint reach the brazing temperature at the same time. Flux is employed except when an atmosphere is specifically introduced to perform the same function.
(c) The equipment consists of tongs or clamps with the electrodes attached at the end of each arm. The tongs should preferably be water-cooled to avoid overheating. The arms are current carrying conductors attached by leads to a transformer. Direct current may be used but is comparatively expensive. Resistance welding machines are also used. The electrodes may be carbon, graphite, refractory metals, or copper alloys according to the required conductivity.
(5) Resistance brazing. The heat necessary for resistance brazing is obtained from the resistance to the flow of an electric current through the electrodes and the joint to be brazed. The parts comprising the joint form a part of the electric circuit. The brazing filler metal, in some convenient form, is preplaced or face fed. Fluxing is done with due attention to the conductivity of the fluxes. (Most fluxes are insulators when dry.) Flux is employed except when an atmosphere is specifically introduced to perform the same function. The parts to be brazed are held between two electrodes, and proper pressure and current are applied. The pressure should be maintained until the joint has solidified. In some cases, both electrodes may be located on the same side of the joint with a suitable backing to maintain the required pressure.
(6) Dip brazing.
(a) There are two methods of dip brazing: chemical bath dip brazing and molten metal bath dip brazing.
(b) In chemical bath dip brazing, the brazing filler metal, in suitable form, is preplaced and the assembly is immersed in a bath of molten salt. The salt bath furnishes the heat necessary for brazing and usually provides the necessary protection from oxidation; if not, a suitable flux should be used. The salt bath is contained in a metal or other suitable pot, also called the furnace, which is heated from the outside through the wall of the pot, by means of electrical resistance units placed in the bath, or by the I2R loss in the bath itself.
(c) In molten metal bath dip brazing, the parts are immersed in a bath of molten brazing filler metal contained in a suitable pot. The parts must be cleaned and fluxed if necessary. A cover of flux should be maintained over the molten bath to protect it from oxidation. This method is largely confined to brazing small parts, such as wires or narrow strips of metal. The ends of the wires or parts must be held firmly together when they are removed from the bath until the brazing filler metal has fully solidified.
(7) Infrared brazing.
(a) Infrared heat is radiant heat obtained below the red rays in the spectrum. While with every "black" source there is sane visible light, the principal heating is done by the invisible radiation. Heat sources (lamps) capable of delivering up to 5000 watts of radiant energy are commercially available. The lamps do not necessarily need to follow the contour of the part to be heated even though the heat input varies inversely as the square of the distance from the source. Reflectors are used to concentrate the heat.
(b) Assemblies to be brazed are supported in a position that enables the energy to impinge on the part. In some applications, only the assembly itself is enclosed. There are, however, applications where the assembly and the lamps are placed in a bell jar or retort that can be evacuated, or in which an inert gas atmosphere can be maintained. The assembly is then heated to a controlled temperature, as indicated by thermocouples. The part is moved to the cooling platens after brazing.
(8) Special processes.
(a) Blanket brazing is another of the processes used for brazing. A blanket is resistance heated, and most of the heat is transferred to the parts by two methods, conduction and radiation, the latter being responsible for the majority of the heat transfer.
(b) Exothermic brazing is another special process by which the heat required to melt and flow a commercial filler metal is generated by a solid state exothermic chemical reaction. An exothermic chemical reaction is defined as any reaction between two or more reactants in which heat is given off due to the free energy of the system. Nature has provided us with countless numbers of these reactions; however, only the solid state or nearly solid state metal-metal oxide reactions are suitable for use in exothermic brazing units. Exothermic brazing utilizes simplified tooling and equipment. The process employs the reaction heat in bringing adjoining or nearby metal interfaces to a temperature where preplaced brazing filler metal will melt and wet the metal interface surfaces. The brazing filler metal can be a commercially available one having suitable melting and flow temperatures. The only limitations may be the thickness of the metal that must be heated through and the effects of this heat, or any previous heat treatment, on the metal properties.
d. Selection of Base Metal.
(1) In addition to the normal mechanical requirements of the base metal in the brazement, the effect of the brazing cycle on the base metal and the final joint strength must be considered. Cold-work strengthened base metals will be annealed when the brazing process temperature and time are in the annealing range of the base metal being processed. "Hot-cold worked" heat resistant base metals can also be brazed; however, only the annealed physical properties will be available in the brazement. The brazing cycle will usually anneal the cold worked base metal unless the brazing temperature is very low and the time at heat is very short. It is not practical to cold work the base metal after the brazing operation.
(2) When a brazement must have strength above the annealed properties of the base metal after the brazing operation, a heat treatable base metal should be selected. The base metal can be an oil quench type, an air quench type that can be brazed and hardened in the same or separate operation, or a precipitation hardening type in which the brazing cycle and solution treatment cycle may be combined. Hardened parts may be brazed with a low temperature filler metal using short times at temperature to maintain the mechanical properties.
(3) The strength of the base metal has an effect on the strength of the brazed joint. Some base metals are also easier to braze than others, particularly by specific brazing processes. For example, a nickel base metal containing high titanium or aluminum additions will present special problems in furnace brazing. Nickel plating is sometimes used as a barrier coating to prevent the oxidation of the titanium or aluminum, and it presents a readily wettable surface to the brazing filler metal.
e. Brazing Filler Metals. For satisfactory use in brazing applications, brazing filler metals must possess the following properties:
(1) The ability to form brazed joints possessing suitable mechanical and physical properties for the intended service application.
(2) A melting point or melting range compatible with the base metals being joined and sufficient fluidity at brazing temperature to flow and distribute into properly prepared joints by capillary action.
(3) A composition of sufficient homogeneity and stability to minimize separation of constituents (liquation) under the brazing conditions to be encountered.
(4) The ability to wet the surfaces of the base metals being joined and form a strong, sound bond.
(5) Depending on the requirements, ability to produce or avoid base metal-filler metal interactions.
11-15. BRAZING GRAY CAST IRON
a. Gray cast iron can be brazed with very little or no preheating. For this reason, broken castings that would otherwise need to be dismantled and preheated can be brazed in place. A nonferrous filler metal such as naval brass (60 percent copper, 39.25 percent zinc, 0.75 percent tin) is satisfactory for this purpose. This melting point of the nonferrous filler metal is several hundred degrees lower than the cast iron; consequently the work can be accomplished with a lower heat input, the deposition of metal is greater and the brazing can be accomplished faster. Because of the lower heat required for brazing, the thermal stresses developed are less severe and stress relief heat treatment is usually not required.
b. The preparation of large castings for brazing is much like that required for welding with cast iron rods. The joint to be brazed must be clean and the part must be sufficiently warm to prevent chilling of filler metal before sufficient penetration and bonding are obtained. When possible, the joint should be brazed from both sides to ensure uniform strength throughout the weld. In heavy sections, the edges should be beveled to form a 60 to 90 degree V.
11-16. BRAZING MALLEABLE IRON
Malleable iron castings are usually repaired by brazing because the heat required for fusion welding will destroy the properties of malleable iron. Because of the special heat treatment required to develop malleability, it is impossible to completely restore these properties by simply annealing. Where special heat treatment can be performed, welding with a cast iron filler rod and remalleabilizing are feasible.
Section III. RELATED PROCESSES
11-17. SILVER BRAZING (SOLDERING)
a. Silver brazing, frequently called "silver soldering," is a low temperature brazing process with rods having melting points ranging from 1145 to 1650°F (618 to 899°C). This is considerably lower than that of the copper alloy brazing filler metals. The strength of a joint made by this process is dependent on a thin film of silver brazing filler metal. Silver brazing joints are shown in figure 11-16.

b. Silver brazing filler metals are composed of silver with varying percentages of copper, nickel, tin, and zinc. They are used for joining all ferrous and non-ferrous metals except aluminum, magnesium, and other metals which have too low a melting point.
WARNING
Cadmium oxide fumes formed by heating and melting of silver brazing alloys are highly toxic. To prevent injury to personnel, personal protective equipment must be worn and adequate ventilation provided.
c. It is essential that the joints be free of oxides, scale, grease, dirt, or other foreign matter. Surfaces other than cadmium plating can be easily cleaned mechanically by wire brushing or an abrasive cloth; chemically by acid pickling or other means. Extreme care must be used to grind all cadmium surfaces to the base metals since cadmium oxide fumes formed by heating and melting of silver brazing alloys are highly toxic.
d. Flux is generally required. The melting point of the flux must be lower than the melting point of the silver brazing filler metal. This will keep the base metal clean and properly flux the molten metal. A satisfactory flux should be applied by means of a brush to the parts to be joined and also to the silver brazing filler metal rod.
e. When silver brazing by the oxyacetylene process, a strongly reducing flame is desirable. The outer envelope of the f1ame, not the inner cone, should be applied to the work. The cone of the flame is too hot for this purpose. Joint clearances should be between 0.002 and 0.005 in. (0.051 to 0.127 mm) for best filler metal distribution. A thin film of filler metal in a joint is stronger and more effective, and a fillet build up around the joint will increase its strength.
f. The base metal should be heated until the flux starts to melt along the line of the joint. The filler metal is not subjected to the flame, but is applied to the heated area of the base metal just long enough to flow the filler metal completely into the joint. If one of the parts to be joined is heavier than the other, the heavier part should receive the most heat. Also, parts having high heat conductivity should receive more heat.
11-18. OXYFUEL CUTTING
a. General.
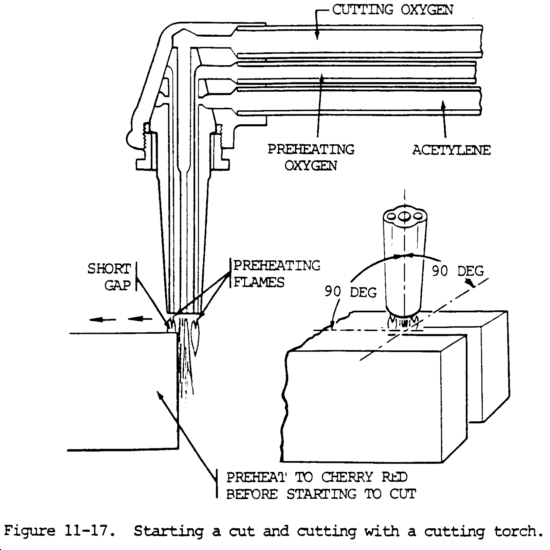
(1) If iron or steel is heated to its kindling temperature (not less than 1600°F (871°C)), and is then brought into contact with oxygen, it burns or oxidizes very rapidly. The reaction of oxygen with the iron or steel forms iron oxide (Fe3O4) and gives off considerable heat. This heat is sufficient to melt the oxide and some of the base metal; consequently, more of the metal is exposed to the oxygen stream. This reaction of oxygen and iron is used in the oxyacetylene cutting process. A stream of oxygen is firmly fixed onto the metal surface after it has been heated to the kindling temperature. The hot metal reacts with oxygen, generating more heat and melting. The molten metal and oxide are swept away by the rapidly moving stream of oxygen. The oxidation reaction continues and furnishes heat for melting another layer of metal. The cut progresses in this manner. The principle of the cutting process is shown in figure 11-17.
(2) Theoretically, the heat created by the burning iron would be sufficient to heat adjacent iron red hot, so that once started the cut could be continued indefinitely with oxygen only, as is done with the oxygen lance. In practice, however, excessive heat absorption at the surface caused by dirt, scale, or other substances, make it necessary to keep the preheating flames of the torch burning throughout the operation.
b. Cutting Steel and Cast Iron.
(1) General. Plain carbon steels with a carbon content not exceeding 0.25 percent can be cut without special precautions other than those required to obtain cuts of good quality. Certain steel alloys develop high resistance to the action of the cutting oxygen, making it difficult and sometimes impossible to propagate the cut without the use of special techniques. These techniques are described briefly in (2) and (3) which follow:
(2) High carbon steels. The action of the cutting torch on these metals is similar to a flame hardening procedure, in that the metal adjacent to the cutting area is hardened by being heated above its critical temperature by the torch and quenched by the adjacent mass of cold metal. This condition can be minimized or overcome by preheating the part from 500 to 600°F (260 to 316°C) before the cut is made.
(3) Waster plate on alloy steel. The cutting action on an alloy steel that is difficult to cut can be improved by clamping a mild steel "waster plate" tightly to the upper surface and cutting through both thicknesses. This waster plate method will cause a noticeable improvement in the cutting action, because the molten steel dilutes or reduces the alloying content of the base metal.
(4) Chromium and stainless steels. These and other alloy steels that previously could only be cut by a melting action can now be cut by rapid oxidation through the introduction of iron powder or a special nonmetallic powdered flux into the cutting oxygen stream. This iron powder oxidizes quickly and liberates a large quantity of heat. This high heat melts the refractory oxides which normally protect the alloy steel from the action of oxygen. These molten oxides are flushed from the cutting face by the oxygen blast. Cutting oxygen is enabled to continue its reaction with the iron powder and cut its way through the steel plates. The nonmetallic flux, introduced into the cutting oxygen stream, combines chemically with the refractory oxides and produces a slag of a lower melting point, which is washed or eroded out of the cut, exposing the steel to the action of the cutting oxygen.
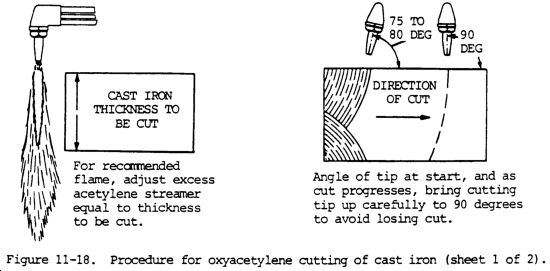
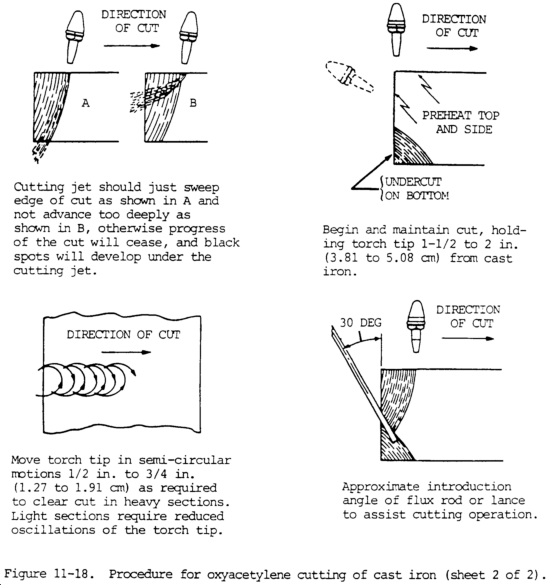
(5) Cast iron. Cast iron melts at a temperature lower than its oxides. Therefore, in the cutting operation, the iron tends to melt rather than oxidize. For this reason, the oxygen jet is used to wash out and erode the molten metal when cast iron is being cut. To make this action effective, the cast iron must be preheated to a high temperature. Much heat must be liberated deep in the cut. This is done by adjusting the preheating flames so that there is an excess of acetylene. The length of the acetylene streamer and the procedure for advancing the cut are shown in figure 11-18. The use of a mild iron flux to maintain a high temperature in the deeper recesses of the cut, as shown in figure 11-18, is also effective.
c. Cutting with MAPP gas.
(1) Quality cuts with MAPP gas require a proper balance between preheat flame adjustment, oxygen pressure, coupling distance, torch angle, travel speed, plate quality, and tip size. Oxyfuel ratios to control flame condition are given in table 11-4.

(2) MAPP gas is similar to acetylene and other fuel gases in that it can be made to produce carburizing, neutral or oxidizing flames (table 11-4). The neutral flame is the adjust most likely to be used for flame cutting. After lighting the torch, slowly increase the preheat oxygen until the initial yellow flame becomes blue, with some yellow feathers remaining on the end of the preheat cones. This is a slightly carburizing flame. A slight twist of the oxygen valve will cause the feathers to disappear. The preheat cones will be dark blue in color and will be sharply defined. This is a neutral flame adjustment and will remain so, even with a small additional amount of preheat oxygen. Another slight twist of the oxygen valve will cause the flame to suddenly change color from a dark blue to a lighter blue color. An increase in sound also will be noted, and the preheat cones will become longer. This is an oxidizing flame. Oxidizing flames are easier to look at because of their lower radiance.
(3) MAPP gas preheat flame cones are at least one and one-half times longer than acetylene preheat cones when produced by the same basic style of tip.
(4) The situation is reversed for natural gas burners, or for torches with a two-piece tip. MAPP gas flame cones are much shorter than the preheat flame on a natural gas two-piece tip.
(5) Neutral flame adjustments are used most cutting. Carburizing and oxidizing flames also are used in special applications. For example, carburizing flame adjustments are used in stack cutting, or where a very square top edge is desired. The "slightly carburizing" flare is used to stack cut light material because slag formation is minimized. If a strongly oxidizing flame is used, enough slag may be produced in the kerf to weld the plates together. Slag-welded plates often cannot be separated after the cut is completed.
(6) A "moderately oxidizing" flame is used for fast starts when cutting or piercing. It produces a slightly hotter flame temperature, and higher burning velocity than a neutral flame. An oxidizing flame commonly is used with a "high-low" device. The large "high" oxidizing flame is used to obtain a fast start. As soon as the cut has started, the operator drops to the "low" position and continues the cut with a neutral flame.
(7) "Very oxidizing" flames should not be used for fast starting. An overly oxidizing flame will actually increase starting time. The extra oxygen flow does not contribute to combustion, but only cools the flame and oxidizes the steel surface.
(8) The oxygen pressure at the torch, not at some remotely located regulator, should be used. Put a low volume, soft flame on the tip. Then turn on the cutting oxygen and vary the pressure to find the best looking stinger (visible oxygen cutting stream).
(a) Low pressures give very short stingers, 20 to 30 in. (50.8 to 76.2 cm) long. Low-pressure stingers will break up at the end. As pressure is increased, the stinger will suddenly become coherent and long. This is the correct cutting oxygen pressure for the given tip. The long stinger will remain over a fairly wide pressure range. But as oxygen pressures are increased, the stinger returns to the short, broken form it had under low pressure.
(b) If too high an oxygen pressure is used, concavity often will show on the cut surface. Too high an oxygen pressure also can cause notching of the cut surface. The high velocity oxygen stream blows the metal and slag out of the kerf so fast that the cut is continuously being started. If too low a pressure is used, the operation cannot run at an adequate speed. Excessive drag and slag formation results, and a wide kerf often is produced at the bottom of the cut.
(9) Cutting oxygen, as well as travel speed, also affects the tendency of slag to stick to the bottom of a cut. This tendency increases as the amount of metallic iron in the slag increases. Two factors cause high iron content in slag: too high a cutting oxygen pressure results in an oxygen velocity through the kerf high enough to blow out molten iron before the metal gets oxidized; and too high a cutting speed results in insufficient time to thoroughly oxidize the molten iron, with the same result as high oxygen pressure.
(10) The coupling distance is the distance between the end of the flame cones and the workpiece. Flame lengths vary with different fuels, and different flame adjusts. Therefore, the distance between the end of the preheat cones and the workpiece is the preferred measure (fig. 11-19). When cutting ordinary plate thicknesses up to 2 to 3 in. (5.08 to 7.62 cm) with MAPP gas, keep the end of the preheat cones abut 1/16 to 1/8 in. (0.16 to 0.32 cm) off the surface of the work. When piercing, or for very fast starts, let the preheat cones impinge on the surface. This will give faster preheating. As plate thicknesses increase above 6 in. (15.24 cm), increase the coupling distance to get more heating from the secondary flame cone. The secondary MAPP gas flame will preheat the thick plate far ahead of the cut. When material 12 in. (30.48 cm) thick or more is cut, use a coupling distance of 3/4 to 11/4 in. (1.91 to 3.18 cm) long.
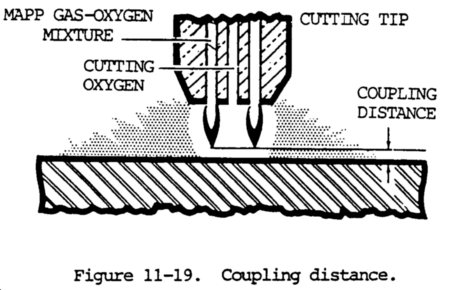
(11) Torch angle
(a) Torch, or lead angle, is the acute angle between the axis of the torch and the workpiece surface when the torch is pointed in the direction of the cut (fig. 11-20). When cutting light-gauge steel (up to 1/4 in. (0.64 cm) thick) a 40 to 50 degree torch angle allows much faster cutting speeds than if the torch were mounted perpendicular to the plate. On plate up to 1/2 in. (1.27 cm) thick, travel speed can be increased with a torch lead angle, but the angle is larger, about 60 to 70 degrees. Little benefit is obtained from cutting plate over 1/2 in. (1.27 cm) thick with an acute lead-angle. Plate over this thickness should be cut with the torch perpendicular to the workpiece surface.
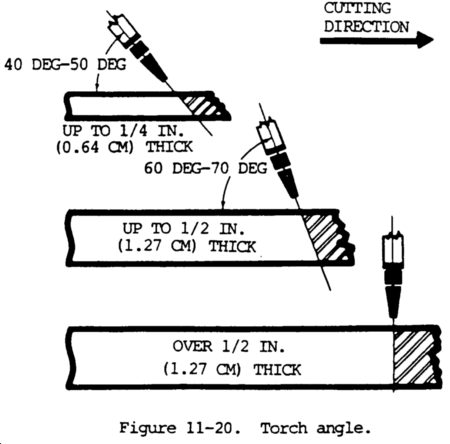
(b) An angled torch cuts faster on thinner-gauge material. The intersection of the kerf and the surface presents a knife edge which is easily ignited. Once the plate is burning, the cut is readily carried through to the other side of the work. When cutting heavy plate, the torch should be perpendicular to the workpiece surface and parallel to the starting edge of the work. This avoids problems of non-drop cuts, incomplete cutting on the opposite side of the thicker plate, gouging cuts in the center of the kerf and similar problems.
(12) There is a best cutting speed for each job. On plate up to about 2 in. (5.08 cm) thick, a high quality cut will be obtained when there is a steady "purring" sound from the torch and the spark stream under the plate has a 15 degree lead angle. This is the angle made by the sparks coming out of the bottom of the cut in the same direction as the torch is traveling. If the sparks go straight down, or even backwards, it means travel speed is too high.
(13) Cut quality.
(a) Variations in cut quality can result from different workpiece surface conditions or plate compositions. For example, rusty or oily plates require more preheat, or slower travel speeds than clean plates. Most variations from the ideal condition of a clean, flat, low-carbon steel plate tend to slow down the cutting action.
(b) One method to use for very rusty plate is to set as big a preheat flame as possible on the torch, then run the flame back and forth over the line to be cut. The extra preheat passes do several things. They spall off much of the scale that would otherwise interfere with the cutting action; and the passes put extra preheat into the plate which usually is beneficial in obtaining improved cut quality and speed.
(c) When working with high strength low alloy plates such as ASTM A-242 steel, or full alloy plates such as ASTM A-514, cut a little bit slower. Also use a low oxygen pressure because these steels are more sensitive to notching than ordinary carbon steels.
(d) Clad carbon-alloy, carbon-stainless, or low-carbon-high-carbon plates require a lower oxygen pressure, and perhaps a lower travel speed than straight low-carbon steel. Ensure the low carbon-steel side is on the same side as the torch. The alloyed or higher carbon cladding will not burn as readily as the carbon steel. By putting the cladding on the bottom, and the carbon steel on the top, a cutting action similar to powder cutting results. The low-carbon steel on top burns readily and forms slag. As the iron-bearing slag passes through the high-carbon or high-alloy cladding, it dilutes the cladding material. The torch, in essence, still burns a lower carbon steel. If the clad or high-carbon steel is on the top surface, the torch is required to cut a material that is not readily oxidizable, and forms refractory slags that can stop the cutting action.
(14) Tip size and style.
(a) Any steel section has a corresponding tip size that gives the most economical operation for a particular fuel. Any fuel will burn in any tip, of course. But the fuel will not burn efficiently, and may even overheat and melt the tip, or cause problems in the cut. For example, MAPP gas will not operate at peak efficiency in most acetylene tips because the preheat orifices are not large enough for MAPP. If MAPP gas is used with a natural-gas tip, there will be a tendency to overheat the tip. The tips also will be susceptible to flash back. A natural-gas tip can be used with MAPP gas, in an emergency, by removing the skirt. Similarly, an acetylene tip can be used if inefficient burning can be tolerated for a short run.
(b) The reasons for engineering different tips for different fuel gases are complex. But the object is to engineer the tip to match the burning velocity, port velocity, and other relationships for each type of gas and orifice size, and to obtain the optimum flame shape and heat transfer properties for each type of fuel. Correct cutting tips cost so little that the cost of conversion is minute compared with the cost savings resulting from efficient fuel use, improved cut quality, and increased travel speed.
Section IV. WELDING, BRAZING, AND SOLDERING NONFERROUS METALS
11-19. ALUMINUM WELDING
a. General.
(1) General. Aluminum is readily joined by welding, brazing, and soldering. In many instances, aluminum is joined with the conventional equipment and techniques used with other metals. However, specialized equipment or techniques may sometimes be required. The alloy, joint configuration, strength required, appearance, and cost are factors dictating the choice of process. Each process has certain advantages and limitations.
(2) Characteristics of aluminum. Aluminum is light in weight and retains good ductility at subzero temperatures. It also has high resistance to corrosion, good electrical and thermal conductivity, and high reflectivity to both heat and light. Pure aluminum melts at 1220°F (660°C), whereas aluminum alloys have an approximate melting range from 900 to 1220°F (482 to 660°C). There is no color change in aluminum when heated to the welding or brazing range.
(3) Aluminum forms. Pure aluminum can be alloyed with many other metals to produce a wide range of physical and mechanical properties. The means by which the alloying elements strengthen aluminum is used as a basis to classify alloys into two categories: nonheat treatable and heat treatable. Wrought alloys in the form of sheet and plate, tubing, extruded and rolled shapes, and forgings have similar joining characteristics regardless of the form. Aluminum alloys are also produced as castings in the form of sand, permanent mold, or die castings. Substantially the same welding, brazing, or soldering practices are used on both cast and wrought metal. Die castings have not been widely used where welded construction is required. However, they have been adhesively bonded and to a limited extent soldered. Recent developments in vacuum die casting have improved the quality of the castings to the point where they may be satisfactorily welded for some applications.
(4) Surface preparation. Since aluminum has a great affinity for oxygen, a film of oxide is always present on its surface. This film must be removed prior to any attempt to weld, braze, or solder the material. It also must be prevented from forming during the joining procedure. In preparation of aluminum for welding, brazing, or soldering, scrape this film off with a sharp tool, wire brush, sand paper, or similar means. The use of inert gases or a generous application of flux prevents the forming of oxides during the joining process.
b. Gas Welding.
(1) General. The gas welding processes most commonly used on aluminum and aluminum alloys are oxyacetylene and oxyhydrogen. Hydrogen may be burned with oxygen using the same tips as used with acetylene. However, the temperature is lower and larger tip sizes are necessary (table 11-5). Oxyhydrogen welding permits a wider range of gas pressures than acetylene without losing the desired slightly reducing flame. Aluminum from 1/32 to 1 in. (0.8 to 25.4 mm) thick may be gas welded. Heavier material is seldom gas welded, as heat dissipation is so rapid that it is difficult to apply sufficient heat with a torch. When compared with arc welding, the weld metal freezing rate of gas welding is very slow. The heat input in gas welding is not as concentrated as in other welding processes and unless precautions are taken greater distortion may result. Minimum distortion is obtained with edge or corner welds.
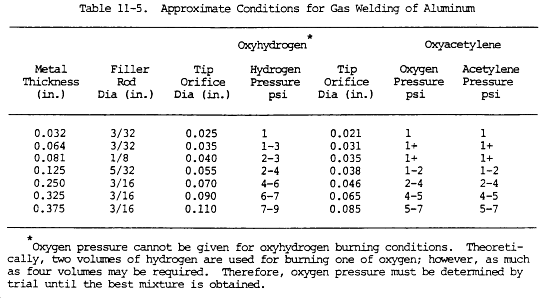
(2) Edge preparation. Sheet or plate edges must be properly prepared to obtain gas welds of maximum strength. They are usually prepared the same as similar thicknesses of steel. However, on material up to 1/16 in. (1.6 mm) thick, the edges can be formed to a 90 degree flange. The flanges prevent excessive warping and buckling. They serve as filler metal during welding. Welding without filler rod is normally limited to the pure aluminum alloys since weld cracking can occur in the higher strength alloys. In gas welding thickness over 3/16 in. (4.8 mm), the edges should be beveled to secure complete penetration. The included angle of bevel may be 60 to 120 degrees. Preheating of the parts is recommended for all castings and plate 1/4 in. (6.4 mm) thick or over. This will avoid severe thermal stresses and insure good penetration and satisfactory welding speeds. Common practice is to preheat to a temperature of 700°F (371°C). Thin material should be warmed with the welding torch prior to welding. Even this slight preheat helps to prevent cracks. Heat treated alloys should not be preheated above 800°F (427°C), unless they are to be postweld heat treated. Preheating above 800°F (427°C) will cause a "hot-short" and the metal strength will deteriorate rapidly.
(3) Preheat temperature checking technique. When pyrolytic equipment (temperature gauges) is not available, the following tests can be made to determine the proper preheat temperatures:
(a) Char test. Using a pine stick, rub the end of the stick on the metal being preheated. At the proper temperatures, the stick will char. The darker the char, the higher the temperature.
(b) Carpenter's chalk. Mark the metal with ordinary blue carpenter's chalk. The blue line will turn white at the proper preheat temperature.
(c) Hammer test. Tap the metal lightly with a hand hammer. The metal loses its ring at the proper preheat temperature.
(d) Carburizing test. Carburize the surface of the metal, sooting the entire surface. As the heat from the torch is applied, the soot disappears. At the point of soot disappearance, the metal surface is slightly above 300°F (149°C). Care should be used not to coat the fluxed area with soot. Soot can be absorbed into the weld, causing porosity.
(4) Welding flame. A neutral or slightly reducing flame is recommended for welding aluminum. Oxidizing flames will cause the formation of aluminum oxide, resulting in poor fusion and a defective weld.
(5) Welding fluxes.
(a) Aluminum welding flux is designed to remove the aluminum oxide film and exclude oxygen from the vicinity of the puddle.
(b) The fluxes used in gas welding are usually in powder form and are mixed with water to form a thin paste.
(c) The flux should be applied to the seam by brushing, sprinkling, spraying, or other suitable methods. The welding rod should also be coated. The flux wil1 melt below the welding temperature of the metal and form a protective coating on the surface of the puddle. This coating breaks up the oxides, prevents oxidation, and permits slow cooling of the weld.
WARNING
The acid solutions used to remove aluminum welding and brazing fluxes after welding or brazing are toxic and highly corrosive. Goggles, rubber gloves, and rubber aprons must be worn when handling the acids and solutions. Do not inhale fumes. When spilled on the body or clothing, wash immediately with large quantities of cold water. Seek medical attention. Never pour water into acid when preparing solutions; instead, pour acid into water. Always mix acid and water slowly. These operations should only be performed in well ventilated areas.
(d) The aluminum welding fluxes contain chlorides and flourides. In the presence of moisture, these will attack the base metal. Therefore, all flux remaining on the joints after welding must be completely removed. If the weld is readily accessible, it can be cleaned with boiling water and a fine brush. Parts having joints located so that cleaning with a brush and hot water is not practical may be cleansed by an acid dip and a cold or hot water rinse. Use 10 percent sulfuric acid cold water solution for 30 minutes or a 5 percent sulfuric acid hot water (150°F (66°C)) solution for 5 to 10 minutes for this purpose.
(6) Welding technique. After the material to be welded has been properly prepared, fluxed, and preheated, the flame is passed in small circles over the starting point until the flux melts. The filler rod should be scraped over toe surface at three or four second intervals, permitting the filler rod to come clear of the flame each time. The scraping action will reveal when welding can be started without overheating the aluminum. The base metal must be melted before the filler rod is applied. Forehand welding is generally considered best for welding on aluminum, since the flame will preheat the area to be welded. In welding thin aluminum, there is little need for torch movement other than progressing forward. On material 3/16 in. (4.8 mm) thick and over, the torch should be given a uniform lateral motion. This will distribute the weld metal over the entire width of the weld. A slight back and forth motion will assist the flux in the removal of oxide. The filler rod should be dipped into the weld puddle periodically, and withdrawn from the puddle with a forward motion. This method of withdrawal closes the puddle, prevents porosity, and assists the flux in removing the oxide film.
11-20. ALUMINUM BRAZING
a. General. Many aluminum alloys can be brazed. Aluminum brazing alloys are used to provide an all-aluminum structure with excellent corrosion resistance and good strength and appearance. The melting point of the brazing filler metal is relatively close to that of the material being joined. However, the base metal should not be melted; as a result, close temperate control is necessary. The brazing temperature required for aluminum assemblies is determined by the melting points of the base metal and the brazing filler metal.
b. Commercial Filler Metals. Commercial brazing filler metals for aluminum alloys are aluminum base. These filler metals are available as wire or shim stock. A convenient method of preplacing filler metal is by using a brazing sheet (an aluminum alloy base metal coated on one or both sides). Heat treatable or core alloys composed mainly of manganese or magnesium are also used. A third method of applying brazing filler metal is to use a paste mixture of flux and filler metal powder. Common aluminum brazing metals contain silicon as the melting point depressant with or without additions of zinc, copper, and magnesium.
c. Brazing Flux. Flux is required in all aluminum brazing operations. Aluminum brazing fluxes consist of various combinations of fluorides and chlorides and are supplied as a dry powder. For torch and furnace brazing, the flux is mixed with water to make paste. This paste is brushed, sprayed, dipped, or flowed onto the entire area of the joint and brazing filler metal. Torch and furnace brazing fluxes are quite active, may severely attack thin aluminum, and must be used with care. In dip brazing, the bath consists of molten flux. Less active fluxes can be used in this application and thin components can be safely brazed.
d. Brazed Joint Design. Brazed joints should be of lap, flange, lock seam, or tee type. Butt or scarf joints are not generally recommended. Tee joints allow for excellent capillary flow and the formation of reinforcing fillets on both sides of the joint. For maximum efficiency lap joints should have an overlap of at least twice the thickness of the thinnest joint member. An overlap greater than 1/4 in. (6.4 mm) may lead to voids or flux inclusions. In this case, the use of straight grooves or knurls in the direction of brazing filler metal flow is beneficial. Closed assemblies should allow easy escape of gases, and in dip brazing easy entry as well as drainage of flux. Good design for long laps requires that brazing filler metal flows in one direction only for maximum joint soundness. The joint design must also permit complete postbraze flux removal.
e. Brazing Fixtures. Whenever possible, parts should be designed to be self-jigging. When using fixtures, differential expansion can occur between the assembly and the fixture to distort the parts. Stainless steel or Inconel springs are often used with fixtures to accommodate differences in expansion. Fixture material can be mild steel or stainless steel. However, for repetitive furnace brazing operations and for dip brazing to avoid flux bath contamination, fixtures of nickel, Inconel, or aluminum coated steel are preferred.
f. Precleaning. Precleaning is essential for the production of strong, leaktight, brazed joints. Vapor or solvent cleaning will usually be adequate for the nonheat treatable alloys. For heat treatable alloys, however, chemical cleaning or manual cleaning with a wire brush or sandpaper is necessary to remove the thicker oxide film.
g. Furnace Brazing. Furnace brazing is performed in gas, oil, or electrically heated furnaces. Temperature regulation within 5°F (2.8°C) is necessary to secure consistent results. Continuous circulation of the furnace atmosphere is desirable, since it reduces brazing time and results in more uniform heating. Products of combustion in the furnace can be detrimental to brazing and ultimate serviceability of brazed assemblies in the heat treatable alloys.
h. Torch Brazing. Torch brazing differs from furnace brazing in that heat is localized. Heat is applied to the part until the flux and brazing filler metal melt and wet the surfaces of the base metal. The process resembles gas welding except that the brazing filler metal is more fluid and flows by capillary action. Torch brazing is often used for the attachment of fittings to previously weld or furnace brazed assemblies, joining of return bends, and similar applications.
i. Dip Brazing. In dip brazing operations, a large amount of molten flux is held in a ceramic pot at the dip brazing temperature. Dip brazing pots are heated internally by direct resistance heating. Low voltage, high current transformers supply alternating current to pure nickel, nickel alloy, or carbon electrodes immersed in the bath. Such pots are generally lined with high alumina content fire brick and a refractory mortar.
WARNING
The acid solutions used to remove aluminum welding and brazing fluxes after welding or brazing are toxic and highly corrosive. Goggles, rubber gloves, and rubber aprons must be worn when handling the acids and solutions. Do not inhale fumes. When spilled on the body or clothing, wash immediately with large quantities of cold water. Seek medical attention.
Never pour water into acid when preparing solutions: instead, pour acid into water. Always mix acid and water slowly. These operations should only be performed in well ventilated areas.
j. Postbrazing Cleaning. It is always necessary to clean the brazed assemblies, since brazing fluxes accelerate corrosion if left on the parts. The most satisfactory way of removing the major portion of the flux is to immerse the hot parts in boiling water as soon as possible after the brazing alloy has solidified. The steam formed removes a major amount of residual flux. If distortion from quenching is a problem, the part should be allowed to cool in air before being immersed in boiling water. The remaining flux may be removed by a dip in concentrated nitric acid for 5 to 15 minutes. The acid is removed with a water rinse, preferably in boiling water in order to accelerate drying. An alternate cleaning method is to dip the parts for 5 to 10 minutes in a 10 percent nitric plus 0.25 percent hydrofluoric acid solution at room temperature. This treatment is also followed by a hot water rinse. For brazed assemblies consisting of sections thinner than 0.010 in. (0.254 mm), and parts where maximum resistance to corrosion is important. A common treatment is to immerse in hot water followed by a dip in a solution of 10 percent nitric acid and 10 percent sodium dichromate for 5 to 10 minutes. This is followed by a hot water rinse. When the parts emerge from the hot water rinse they are immediately dried by forced hot air to prevent staining.
11-21. SOLDERING
a. General. Soldering is a group of processes that join metals by heating them to a suitable temperature. A filler metal that melts at a temperature above 840°F (449°C) and below that of the metals to be joined is used. The filler metal is distributed between the closely fitted surfaces of the joint by capillary attraction. Soldering uses fusible alloys to join metals. The kind of solder used depends on the metals to be joined. Hard solders are called spelter and hard soldering is called silver solder brazing. This process gives greater strength and will stand more heat than soft solder.
b. Soft Soldering. This process is used for joining most common metals with an alloy that melts at a temperature below that of the base metal. In many respects, this operation is similar to brazing in that the base is not melted, but is merely tinned on the surface by the solder filler metal. For its strength the soldered joint depends on the penetration of the solder into the pores of the base metal surface, along with the consequent formation of a base metal-solder alloy, together with the mechanical bond between the parts. Soft solders are used for airtight or watertight joints which are not exposed to high temperatures.
c. Joint Preparation. The parts to be soldered should be free of all oxide, scale, oil, and dirt to ensure sound joints. Cleaning may be performed by immersing in caustic or acid solutions, filing, scraping, or sandblasting.
d. Flux. All soldering operations require a flux in order to obtain a complete bond and full strength at the joints. Fluxes clean the joint area, prevent oxidations, and increase the wetting power of the solder by decreasing its surface tension. The following types of soft soldering fluxes are in common use: rosin, or rosin and glycerine. These are used on clean joints to prevent the formation of oxides during the soldering operations. Zinc chloride and ammonium chloride may be used on tarnished surfaces to permit good tinning. A solution of zinc cut in hydrochloric (muriatic) acid is commonly used by tin workers as a flux.
e. Application. Soft solder joints may be made by using gas flames, wiping, sweating the joints, or by dipping in solder baths. Dipping is particularly applicable to the repair of radiator cores. Electrical connections and sheet metal are soldered with a soldering iron or gun. Wiping is a method used for joining lead pipe and also the lead jacket of underground and other lead-covered cables. Sweated joints may be made by applying a mixture of solder powder and paste flux to the joints. Then heat the part until this solder mixture liquifies and flows into the joints, or tin mating surfaces of members to be joined, and apply heat to complete the joint.
11-22. ALUMINUM SOLDERING
a. General. Aluminum and aluminum base alloys can be soldered by techniques which are similar to those used for other metals. Abrasion and reaction soldering are more commonly used with aluminum than with other metals. However, aluminum requires special fluxes. Rosin fluxes are not satisfactory.
b. Solderability of Aluminum Alloys. The most readily soldered aluminum alloys contain no more than 1 percent magnesium or 5 percent silicon. Alloys containing greater amounts of these constituents have poor flux wetting characteristics. High copper and zinc-containing alloys have poor soldering characteristics because of rapid solder penetration and loss of base metal properties.
c. Joint Design. The joint designs used for soldering aluminum assemblies are similar to those used with other metals. The most commonly used designs are forms of simple lap and T-type joints. Joint clearance varies with the specific soldering method, base alloy composition, solder composition, joint design, and flux composition employed. However, as a guide, joint clearance ranging from 0.005 to 0.020 in. (0.13 to 0.51 mm) is required when chemical fluxes are used. A 0.002 to 0.010 in. (0.05 to 0.25 mm) spacing is used when a reaction type flux is used.
d. Preparation for Soldering. Grease, dirt, and other foreign material must be removed from the surface of aluminum before soldering. In most cases, only solvent degreasing is required. However, if the surface is heavily oxidized, wire-brushing or chemical cleaning may be required.
CAUTION
Caustic soda or cleaners with a pH above 10 should not be used on aluminum or aluminum alloys, as they may react chemically.
e. Soldering techniques. The higher melting point solders normally used to join aluminum assemblies plus the excellent thermal conductivity of aluminum dictate that a large capacity heat source must be used to bring the joint area to proper soldering temperature. Uniform, well controlled heating should be provided. Tinning of the aluminum surface can best be accomplished by covering the material with a molten puddle of solder and then scrubbing the surface with a non-heat absorbing item such as a glass fiber brush, serrated wooden stick or fiber block. Wire brush or other metallic substances are not recommended. They tend to leave metallic deposits, absorb heat, and quickly freeze the solder.
f. Solders. The commercial solders for aluminum can be classified into three general groups according to their melting pints:
(1) Low temperature solders. The melting point of these solders is between 300 and 500°F (149 and 260°C). Solders in this group contain tin, lead, zinc, and/or cadmium and produce joints with the least corrosion resistance.
(2) Intermediate temperature solders. These solders melt between 500 and 700 °F (260 and 371°C). Solders in this group contain tin or cadmium in various combinations with zinc, plus small amounts of aluminum, copper, nickel or silver, and lead.
(3) High temperature solders. These solders melt between 700 and 800°F (371 and 427°C). These zinc base solders contain 3 to 10 percent aluminum and small amounts of other metals such as copper, silver, nickel; and iron to modify their melting and wetting characteristics. The high zinc solders have the highest strength of the aluminum solders, and form the most corrosion-resistant soldered assemblies.
11-23. COPPER WELDING
a. Copper has a high thermal conductivity. The heat required for welding is approximately twice that required for steel of similar thickness. To offset this heat loss, a tip one or two sizes larger than that required for steel is recommended. When welding large sections of heavy thicknesses, supplementary heating is advisable. This process produces a weld that is less porous.
b. Copper may be welded with a slightly oxidizing flame because the molten metal is protected by the oxide which is formed by the flame. If a flux is used to protect the molten metal, the flame should be neutral.
c. Oxygen-free copper (deoxidized copper rod) should be used rather than oxygen-bearing copper for gas welded assemblies. The rod should be of the same composition as the base metal.
d. In welding copper sheets, the heat is conducted away from the welding zone so rapidly that it is difficult to bring the temperature up to the fusion point. It is often necessary to raise the temperature level of the sheet in an area 6.0 to 12.0 in. (152.4 to 304.8 mm) away from the weld. The weld should be started at some point away from the end of the joint and welded back to the end with filler metal being added. After returning to the starting point, the weld should be started and made in the opposite direction to the other end of the seam. During the operation, the torch should be held at approximately a 60 degree angle to the base metal.
e. It is advisable to back up the seam on the underside with carbon blocks or thin sheet metal to prevent uneven penetration. These materials should be channeled or undercut to permit complete fusion to the base of the joint. The metal on each side of the weld should be covered to prevent radiation of heat into the atmosphere. This would allow the molten metal in the weld to solidify and cool slowly.
f. The welding speed should be uniform. The end of the filler rod should be kept in the molten puddle. During the entire welding operation, the molten metal most be protected by the outer flame envelope. If the metal fails to flow freely during the operation, the rod should be raised and the base metal heated to a red heat along the seam. The weld should be started again and continued until the seam weld is completed.
g. When welding thin sheets, the forehand welding method is preferred. The backhand method is preferred for thicknesses of 1/4 in. (6.4 mm) or more. For sheets up to 1/8 in. (3.2 mm) thick a plain butt joint with squared edges is preferred. For thicknesses greater than 1/8 in. (3.2 mm) the edges should be beveled for an included angle of 60 to 90 degrees. This will ensure penetration with spreading fusion over a wide area.
11-24. COPPER BRAZING
a. Both oxygen-bearing and oxygen-free copper can be brazed to produce a joint with satisfactory properties. The full strength of an annealed copper brazed joint will be developed with a lap joint.
b. The flame used should be slightly carburizing. All of the silver brazing alloys can be used with the proper fluxes. With the copper-phosphorous or copper-phosphorous-silver alloys, a brazed joint can be made without a flux, although the use of flux will result in a joint of better appearance.
c. Butt, lap, and scarf joints are used in brazing operations, whether the joint members are flat, round, tubular, or of irregular cross sections. Clearances to permit the penetration of the filler metal, except in large diameter pipe joints, should not be more than 0.002 to 0.003 in. (0.051 to 0.076 mm). The clearances of large diameter pipe joinings may be 0.008 to 0.100 in. (0.203 to 2.540 mm). The joint may be made with inserts of the filler metal or the filler metal may be fed in from the outside after the joint has been brought up to the proper temperature. The scarf joint is used in joining bandsaws and for joints where the double thickness of the lap is not desired.
11-25. BRASS AND BRONZE WELDING
a. General. The welding of brasses and bronzes differs from brazing. This welding process requires the melting of both base metal edges and the welding rod, whereas in brazing only the filler rod is melted.
b. Low Brasses (Copper 80 to 95 Percent, Zinc 5 to 20 Percent). Brasses of this type can be welded readily in all positions by the oxyacetylene process. Welding rods of the same composition as the base metal are not available. For this reason, 1.5 percent silicon rods are recommended as filler metal. Their weldability differs from copper in that the welding point is progressively reduced as zinc is added. Fluxes are required. Preheating and supplementary heating may also be necessary.
c. High Brasses (Copper 55 to 80 Percent, Zinc 20 to 45 Percent). These brasses can be readily welded in all positions by the oxyacetylene process. Welding rods of substantially the same composition are available. The welding technique is the same as that required for copper welding, including supplementary heating. Fluxes are required.
d. Aluminum Bronze. The aluminum bronzes are seldom welded by the oxyacetylene process because of the difficulty in handling the aluminum oxide with the fluxes designed for the brasses. Sane success has been reported by using welding rods of the same content as the base metal and a bronze welding flux, to which has been added a small amount of aluminum welding flux to control the aluminum oxide.
e. Copper-Beryllium Alloys. The welding of these alloys by the oxyacetylene process is very difficult because of the formation of beryllium oxide.
f. Copper-Nickel Alloys. From a welding standpoint, these alloys are similar to Monel, and oxyacetylene welding can be used successfully. The flame used should be slightly reducing. The rod must be of the same composition as the base metal. A sufficient deoxidizer (manganese or silicon) is needed to protect the metal during welding. Flux designed specifically for Monel and these alloys must be used to prevent the formation of nickel oxide and to avoid porosity. Limited melting of the base metal is desirable to facilitate rapid solidification of the molten metal. Once started, the weld should be completed without stopping. The rod should be kept within the protective envelope of the flame.
g. Nickel Silver. Oxyacetylene welding is the preferred method for joining alloys of this type. The filler metal is a high zinc bronze which contains more than 10 percent nickel. A suitable flux must be used to dissolve the nickel oxide and avoid porosity.
h. Phosphor Bronze. Oxyacetylene welding is not commonly used for welding the copper-tin alloys. The heating and slow cooling causes contraction, with consequent cracking and porosity in this hot-short material. However, if the oxyacetylene process must be used the welding rod should be grade E (1.0 to 1.5 percent tin) with a good flux of the type used in braze welding. A neutral flame is preferred unless there is an appreciable amount of lead present. In this case an oxidizing flame will be helpful in producing a sound weld. A narrow heat zone will promote quick solidification and a sound weld.
NOTE
Hot-short is defined as a marked loss in strength at high temperatures below the melting point.
i. Silicon Bronze. Copper-silicon alloys are successfully welded by the oxyacetylene process. The filler metal should be of the same composition as the base metal. A flux with a high boric acid content should be used. A weld pool as small as possible should be maintained to facilitate rapid solidification. This will keep the grain size small and avoid contraction strains during the hot-short temperature range. A slightly oxidizing flare will keep the molten metal clean in oxyacetylene welding of these alloys. This flame is helpful when welding in the vertical or overhead positions.
11-26. MAGNESIUM WELDING
a. General. Gas welding of magnesium is usually used only in emergency repair work. A broken or cracked part can be restored and placed back into use. However, such a repair is only temporary until a replacement part can be obtained. Gas welding has been almost completely phased out by gas-shielded arc welding, which does not require the corrosion-producing flux needed for gas welding.
b. Base Metal Preparation. The base metal preparation is the same as that for arc welding.
c. Welding Fluxes.
(1) The flux protects the molten metal from excessive oxidation and removes any oxidation products from the surfaces. It also promotes proper flow of the weld and proper wetting action between the weld metal and the base metal. Most of the fluxes do not react with magnesium in the fused state, but do react strongly after cooling by taking on moisture. Therefore, all traces of flux and flux residues must be removed immediately after welding.
(2) The fluxes are usually supplied as dry powder in hermetically sealed bottles. They are prepared for use by mixing with water to form a paste. A good paste consistency can be produced with approximately 1/2 pt (0.24 l) of water to 1 lb (0.45 kg) of powder. Do not prepare any more than a one day supply of flux paste. Keep it in a covered glass container when not in use. The flux paste can be applied to the work and welding rod with a small bristle brush, or when possible, by dipping.
(3) The presence of a large amount of sodium in the welding flux gives an intense glare to the welding flame. Operators must wear proper protective attire. Blue lenses are preferred in the goggles.
d. Welding Rods. The reds should be approximately the same composition as the base metal. When castings or forged fittings are welded to a sheet, it is important that the rod have the same composition as the sheet. If necessary, strips of the base metal may be used instead of regular welding rods. Welding rods may be readily identified by the following characteristics: Dowmetal F is blue; Dowmetal J or J-1 is yellow, green, and aluminum; Dowmetal M is yellow; Mazlo AM 35 is round; Mazlo AM 528 and AM 53S are square; Mazlo AM 57S is triangular; Mazlo AM 88S is oval. Like all magnesium alloys, the welding rods are supplied with a corrosion resistant coating which must be removed before using. After a welding operation, all traces of flux should be removed from the unused portion of the rod.
e. Welding Technique.
(1) A liberal coating of flux should be applied to both sides of the weld seam and onto the welding rod. The torch should be adjusted to a neutral or slightly reducing flame.
(2) Tack welds should be spaced at 1/2 to 2-1/2 in. (12.7 to 63.5 mm) intervals along the seam. In making a tack weld, the weld area should be heated gently with the outer flame of the torch to dry and fuse the flux. Do not use a harsh flame which may blow the flux away. When the flux is liquified, the inner cone of the flare is held a distance of 1/16 to 1/8 in. (1.6 to 3.2 mm) from the work and a drop of metal is added from the rod. More flux will be required to finish the weld.
(3) The weld should start in the same manner as the tack welds. The welds should progress in a straight line at a uniform rate of speed with the torch held at a 45 degree angle to the work. The torch should move steadily while the rod is intermittently dipped into the weld puddle. If a decrease of heat is necessary, it is advisable to decrease the angle of the torch from the work. Too hot a flame or too slow a speed increases the activity and viscosity of the flux and causes pitting. If a weld is interrupted, the end of the weld should be refluxed and the flame directed slightly ahead of the weld before restarting the bead. All tack and overlapping welds should be remelted to float away any flux inclusions. To avoid cracking at the start, the weld should be started away from the edge.
(4) Magnesium castings to be welded should be preheated with a torch or in a furnace before welding is started. The entire casting should be brought up to a preheat temperature of abut 650°F (343°C). This temperature can be approximated with blue carpenter's chalk which will turn white at about 600°F (316°C). After welding, the casting should be stress relieved in a furnace for 1 hour at 500°F (260°C). If no furnace is available, a gas flame should be used to heat the entire casting until the stress relieving temperature is reached. The casting should then be allowed to cool slowly, away from all drafts.
WARNING
Precleaning and postcleaning acids used in magnesium welding and brazing are highly toxic and corrosive. Goggles, rubber gloves, and rubber aprons must be worn when handling the acids and solutions. Do not inhale fumes and mists. When spilled on the body or clothing, wash immediately with large quantities of cold water. Seek medical attention.
Never pour water into acid when preparing solutions; instead, pour acid into water. Always mix acid and water slowly. Cleaning operations should be performed only in well ventilated areas.
f. Cleaning After Gas Welding. All traces of flux must be removed from parts immediately after the completion of gas welds. First, scrub with a stiff bristle brush and hot water, and then immerse for 1 to 2 minutes in a chrome pickling solution consisting of 1-1/2 lb (0.7 kg) sodium dichromate and 1-1/2 pt (0.7 1) nitric acid with enough water to make a gallon. The temperature of the solution should be 70 to 90°F (21 to 32°C). After chrome pickling, the parts should be washed in cold running water. They should be boiled for 2 hours in a solution of 8 oz (226.8 g) of sodium dichromate in 1 gal. (3.8 1) of water. Parts should then be rinsed and dried.
11-27. MAGNESIUM BRAZING
a. General.
(1) Furnace, torch, and flux dip brazing can be used. Furnace and torch brazing are generally limited to M1A alloys. Flux dip brazing can be used on AX10, AX31B, K1A, M1A, and ZE10A alloys.
(2) Brazed joints are designed to permit the flux to be displaced from the joint by the brazing filler metal as it flows into the joint. The best joints for brazing are butt and lap. Suitable clearances between parts are essential if proper capillary filling action is to take place. The suggested clearance is from 0.004 to 0.010 in. (0.102 to 0.254 mm). In furnace brazing, beryllium is added to the brazing alloy to avoid ignition of the magnesium.
b. Equipment and Materials.
(1) Furnaces and flux pots are equipped with automatic controls to maintain the required temperature within � 5°F (2.7°C). In torch brazing, the standard type gas welding is used.
(2) Chloride base fluxes similar to those used in gas welding are suitable. A special flux is required for furnace brazing. Fluxes with a water or alcohol base are unsuitable for furnace brazing.
(3) A magnesium base alloy filler metal is used so that the characteristics of the brazed joint are similar to a welded joint and will offer good resistance against corrosion.
c. Base Metal Preparation.
(1) Parts to be brazed must be thoroughly cleaned and free of such substances as oil, grease, dirt, and surface films such as chromates and oxides.
WARNING
Precleaning and postcleaning acids used in magnesium welding and brazing are highly toxic and corrosive. Goggles, rubber gloves, and rubber aprons must be worn when handling the acids and solutions. Do not inhale fumes and mists. When spilled on the body or clothing, wash immediately with large quantities of cold water. Seek medical attention.
Never pour water into acid when preparing solutions; instead, pour acid into water. Always mix acid and water slowly. Cleaning operations should be performed only in well ventilated areas.
(2) Mechanical cleaning can be accomplished by sanding with aluminum oxide cloth. Chemical cleaning can be accomplished by vapor degreasing, alkaline cleaning, or acid cleaning. An acid solution consisting of 24 oz (680.4 g) of chromic acid (CrO3), 40 oz (1134 g) of sodium nitrate (NaNO3), and 1/8 oz (3.54 g) of calcium or magnesium fluoride with enough water to make 1 gal. (3.8 1) is suitable for this purpose. Parts are immersed in the solution at 70 to 90°F (21 to 32°C) for 2 minutes and then rinsed thoroughly, first in cold water and then in hot water.
d. Brazing Procedure.
(1) Torch. The equipment and techniques used for gas welding are used in brazing magnesium. A neutral oxyacetylene or a natural gas-air flame may be used. In some operations, natural gas is preferred because of its soft flame and less danger of overheating. The filler metal is placed on the joint and fluxed before melting, or it is added by means of a flux coated filler rod. If a rod is used, the flame is directed at the base metal, and the rod is dipped intermittently into the molten flux puddle.
(2) Furnace. The parts to be brazed are assembled with filler metal placed in or around the joints. A flux, preferably in powder form, is put on the joints. Then the parts are placed in a furnace, which is at brazing temperature. The brazing time is 2 or 3 minutes, depending on the thickness of the parts being brazed. The parts are air cooled after removal from the furnace.
(3) Flux dip. The joints are provided with slots or recessed grooves for the filler metal, to prevent it being washed into the flux bath. The parts are then assembled in a fixture, thoroughly dried, and then immersed for 30 to 45 seconds in a molten bath of flux.
e. Cleaning after Brazing. Removal of all traces of flux is essential. The flux residues are hydroscopic, and will cause a pitting type of corrosion. The parts should be cleaned in the same manner as for gas welded parts.
11-28. MAGNESIUM SOLDERING
a. General. Magnesium and magnesium alloys can be soldered. However, soldering is limited to the filling of small surface defects in castings, small dents in sheet metal, and other minor treatments of surfaces. Soldering should not be used in stress areas or to join magnesium to other metals because of low strengths and brittle joints obtained.
b. Soldering Procedure.
(1) Magnesium alloy surfaces must be cleaned to a bright metallic luster before soldering to ensure good fusing between the solder and magnesium. This cleaning can be accomplished by filing, wire brushing, or with aluminum oxide cloth.
(2) The area to be soldered should be heated to just above the melting point of the solder. A small quantity of solder is applied and rubbed vigorously over the area to obtain a uniform tinned surface. A stiff wire brush or sharp steel tool assists in establishing a bond. After the bond is established, filler metal may be added to the extent desired. Flux is not necessary.
11-29. NICKEL WELDING
a. General. Nickel alloys can, for the most part, be welded with the same processes used for carbon steel. Oxyacetylene welding is preferred to metal arc in some cases. This is true in welding on thin wall pipe or tubing, and tin gauge strip where the arc would penetrate the material. It is also preferred on some high carbon steels because of the lower weld hardening results.
b. Joint Design. Corner and lap joints are satisfactory where high stresses are not to be encountered. Butt joints are used in equipment such as pressure vessels. Beveling is not required for butt joints in material 0.050 to 0.125 in. (1.270 to 3.175 mm) thick. In thicker material, a bevel angle of 37.5 degrees should be made. For sheets 0.43 in. (10.92 mm) and thinner, both butt and corner joints are used. Corner joints are used for thicknesses of 0.037 in. (0.940 mm) and heavier.
c. Fluxes. Flux is not required when welding nickel. However, it is required for Monel and Inconel. The fluxes are used preferably in the form of a thin paste made by mixing the dry flux in water for Monel. A thin solution of shellac and alcohol (approximately 1.0 lb (0.45 kg) of shellac to 1.0 gal (3.8 1) of alcohol) is used for Inconel. For welding K Monel, a flux composed of two parts of Inconel flux and one part of lithium fluoride should be used. The flux is applied with a small brush or swab on both sides of the seam, top and bottom, and on the welding rod.
d. Welding Rods. Welding rods of the same composition as the alloy being welded are available. Rods of the same composition are necessary to insure uniform corrosion resistance without galvanic effects. In some cases, a special silicon Monel rod is used for welding nickel.
e. Welding Technique.
(1) All oil, dirt, and residues must be removed from the area of the weld by machining, sandblasting, grinding, rubbing with abrasive cloth, or chemically by pickling.
(2) A slightly reducing flame should be used. There is a slight pressure fluctuation in many oxygen and acetylene regulators. The amount of excess acetylene in the flame should be only enough to counteract this fluctuation and prevent the flame from becoming oxidizing in nature.
(3) The tip should be the same size or one size larger than recommended by torch manufacturers for similar thicknesses of steel. The tip should be large enough to permit the use of a soft flame. A high velocity of harsh flame is undesirable.
(4) The parts to be welded should be held firmly in place with jigs or clamps to prevent distortion.
(5) Once started, welding should be continued along the seam without removing the torch from the work. The end of the welding rod should be kept well within the protecting flame envelope to prevent oxidation of the heated rod. The luminous cone tip of the flame should contact the surface of the molten pool in order to obtain concentrated heat. This will also prevent oxidation of the molten metal. The pool should be kept quiet and not puddled or boiled. If surface oxides or slag form on the surface of the molten metal, the rod should be melted into the weld under this surface film.
11-30. NICKEL SOLDERING
a. Soft soldering can be used for joining nickel and high nickel alloys only on sheet metal not more than 1/16 in. (1.6 mm) thick and only for those applications where the solder is not readily corroded. Soft solder is inherently of low strength. Joint strength must be obtained by rivets, lock seams, or spot welding, with soft solder acting as a sealing medium.
b. The 50-50 and 60-40 percent tin-lead solders are preferred for joining metals of this type.
c. The flux used for nickel and Monel is a zinc saturated hydrochloric (muriatic) acid solution. Inconel requires a stronger flux because of its chromium oxide film. All flux and flux residues must be removed from the metal after the soldering operation is completed.
d. Surfaces of metal parts to be soft soldered must be free from dirt, surface oxide or other discoloration. Where possible, the surfaces to be joined should be tinned with solder to ensure complete bonding during the final soldering operation.
11-31. LEAD WELDING
a. General. The welding of lead is similar to welding of other metals except that no flux is required. Processes other than gas welding are not in general use.
b. Gases Used. Three combinations of gases are commonly used for lead welding. These are oxyacetylene, oxyhydrogen, and oxygen-natural gas. The oxyacetylene and oxyhydrogen processes are satisfactory for all positions. The oxygen-natural gas is not used for overhead welding. A low gas pressure ranging from 1-1/2 to 5 psi (10.3 to 34.5 kPa) is generally used, depending on the type of weld to be made.
c. Torch. The welding torch is relatively small in size. The oxygen and flammable gas valves are located at the forward end of the handle so that they may be conveniently adjusted by the thumb of the holding hand. Torch tips range in drill size from 78 to 68. The small tips are for 6.0 lb (2.7 kg) lead (i.e., 6.0 lb per sq ft), the larger tips for heavier lead.
d. Welding Rods. The filler rods should be of the same composition as the lead to be welded. They range in size from 1/8 to 3/4 in. (3.2 to 19.1 mm) in diameter. The smaller sizes are used for lightweight lead and the larger sizes for heavier lead.
e. Types of Joints. Butt, lap, and edge joints are the types most commonly used in lead welding. Either the butt or lap joint is used on flat position welding. The lap joint is used on vertical and overhead position welding. The edge or flange joint is used only under special conditions.
f. Welding Technique.
(1) The flame must be neutral. A reducing flame will leave soot on the joint. An oxidizing flame will produce oxides on the molten lead and impair fusion. A soft, bushy flame is most desirable for welding in a horizontal position. A more pointed flame is generally used in the vertical and overhead positions.
(2) The flow of molten lead is controlled by the flame, which is usually handled with a semicircular or V-shaped motion. This accounts for the herringbone appearance of the lead weld. The direction of the weld depends on the type of joint and the position of the weld. The welding of vertical position lap joints is started at the bottom of the joint. A welding rod is not generally used. Lap joints are preferred in flat position welding. The torch is moved in a semicircular path toward the lap and then away. Filler metal is used but not on the first pass. Overhead position welding is very difficult. For that position, a lap joint and a sharp flame are used. The molten beads must be small and the welding operation must be completed quickly.
11-32. WHITE METAL WELDING
a. General. White metal is divided into three general classes according to the basic composition, i.e., zinc, aluminum, and magnesium. Most of the castings made are of the zinc alloy type. This alloy has a melting point of 725°F (385°C).
b. Flame Adjustment. The welding flame should be adjusted to carburizing but no soot should be deposited on the joint. The oxyacetylene flame is much hotter than necessary and it is important to select a very small tip.
c. Welding Rod. The welding rod may be of pure zinc or a die-casting alloy of the same type as that to be welded. Metal flux (50 percent zinc chloride and 50 percent ammonium chloride) can be used, but is not mandatory.
d. Welding Technique. The castings should be heated until the metal begins to flow. Then turn the flame parallel to the surface, allowing the side of the flame to keep the metal soft while heating the welding rod to the same temperature. With both the base metal and the welding rod at the same temperature, the rod should be applied to and thoroughly fused with the walls of the joint. The rod should be manipulated so as to break up surface oxides.
11-33. BRONZE SURFACING
a. General. Bronze surfacing is used for building up surfaces that have been worn down by sliding friction or other types of wear where low heat conditions prevail. This type of repair does not involve the joining of metal parts. It is merely the addition of bronze metal to a part in order that it may be restored to its original size and shape. After bronze surfacing, the piece is machined to the desired finished dimensions. Cast iron, carbon and alloy steels, wrought iron, malleable iron, Monel, and nickel and copper-base alloys are satisfactorily built up by this process. This process is used to repair worn surfaces of rocker-arm rollers, lever bearings, gear teeth, shafts, spindle, yokes, pins, and clevises. Small bushings can be renewed by filling up the hole in the cast iron with bronze and then drilling them out to the required size.
b. Preparation of Surface. The surface to be rebuilt must be machined to remove all scale, dirt, or other foreign matter. If possible, cast iron surfaces should be chipped to clean them. Machining will smear the surface with graphite particles present in cast iron, and make bonding difficult. If the cast iron surface must be machined, an oxidizing flame should be passed over the surface to burn off the surplus graphite and carbon before the bronze coating is applied. Hollow piston heads or castings should be vented by removing the core plugs, or by drilling a hole into the cavities. This will prevent trapped gases from being expanded by the welding heat and cracking the metal.
c. Flame Adjustment. A neutral or slightly oxidizing flame is recommended. An excess acetylene flame will cause porosity and fuming.
d. Fluxes. A suitable brazing flux should be used to obtain good timing and adhesion of the bronze to the base metal.
e. Welding Rods. The bronze rod selected should fulfill the requirements for hardness and/or ductility needed for the particular application.
f. Application. The bronze surfacing metal is usually applied by mechanical means. This is accomplished using two or more flames and with a straight line or an oscillating motion. A layer of bronze 1/16 to 1/4 in. (1.6 to 6.4 mm) tick is usually sufficient. It should be slowly cooled to room temperature and then machined to the desired dimensions.