CHAPTER 12
SPECIAL APPLICATIONS
Section I. UNDERWATER CUTTING AND WELDING WITH THE ELECTRIC ARC
12-1. GENERAL
WARNING
Safety precautions must be exercised in underwater cutting and welding. The electrode holder and cable must be insulated, the current must be shut off when changing electrodes, and the diver should avoid contact between the electrode and grounded work to prevent electrical shock.
a. Underwater Arc Cutting. In many respects, underwater arc cutting is quite similar to underwater gas cutting. An outside jet of oxygen and compressed air is needed to keep the water from the vicinity of the metal being cut. Arc torches for underwater cutting are produced in a variety of types and forms. They are constructed to connect to oxygen-air pressure sources. Electrodes used may be carbon or metal. They are usually hollow in order to introduce a jet of oxygen into the molten crater created by the arc. The current practice is to use direct current for all underwater cutting and welding. In all cases, the electrode is connected to the negative side of the welding generator.
b. Underwater Arc Welding. Underwater arc welding may be accomplished in much the same manner as ordinary arc welding. The only variations of underwater arc welding from ordinary arc welding are that the electrode holder and cable must be well insulated to reduce current leakage and electrolysis, and the coated electrodes must be waterproofed so that the coating will not disintegrate underwater. The waterproofing for the electrode is generally a cellulose nitrate in which celluloid has been dissolved. Ordinary airplane dope with 2.0 lb (0.9 kg) of added per gallon is satisfactory.
12-2. UNDERWATER CUTTING TECHNIQUE
a. Torch. The torch used in underwater cutting is a fully insulated celluloid underwater cutting torch that utilizes the electric arc-oxygen cutting process using a tubular steel-covered, insulated, and waterproofed electrode. It utilizes the twist type collet for gripping the electrode and includes an oxygen valve lever and connections for attaching the welding lead and an oxygen hose. It is equipped to handle up to a 5/16-in. (7.9-mm) tubular electrode. In this process, the arc is struck normally and oxygen is fed through the electrode center hole to provide cutting. The same electrical connections mentioned above are employed.
b. The welding techniques involve signaling the surface helper to close the knife switch when the welder begins. The bead technique is employed using the drag travel system. When the electrode is consumed, the welder signals "current off" to the helper who opens the knife switch. "Current on" is signaled when a new electrode is positioned against the work. The current must be connected only when the electrode is against the work.
c. Steel electrodes used for underwater cutting should be 14 in. (356 mm) long with a 5/16-in, (7.9-mm) outside diameter and an approximate 0.112-in. (2.845-mm) inside diameter hole. The electrode should have an extruded flux coating and be thoroughly waterproofed for underwater work. A welding current of 275 to 400 amps gives the best result with steel electrodes. When using graphite or carbon electrodes, 600 to 700 amps are required with a voltage setting around 70.
d. When working underwater, the cut is started by placing the tip of the electrode in contact with the work. Depress the oxygen lever slightly and call for current. When the arc is established, the predetermined oxygen pressure (e below) is released and the metal is pierced. The electrode is then kept in continuous contact with the work, cutting at the greatest speed at which complete penetration can be maintained. The electrode should be held at a 90 degree angle to the work. When the electrode is consumed, the current is turned off. A new electrode is then inserted and the same procedure is repeated until the cut is finished.
e. Normal predetermined oxygen pressure required for underwater cutting for a given plate thickness is the normal cutting pressure required in ordinary air cutting plus the dept in feet multiplied by 0.445. As an example, 2-1/4-in. (57.15-mm) plate in normal air cutting requires 20 psi (138 kPa). Therefore, at 10 ft (3 m) underwater, the following result would be reached:
20 + (10 x 0.445) = 24 psi (165 kPa).
NOTE
Allowance for pressure drop in the gas line is 10 to 20 psi (69 to 138 kPa) per 100 ft (30 m) of hose.
12-3. UNDERWATER WELDING TECHNIQUE
a. General. Underwater welding has been restricted to salvage operations and emergency repair work. It is limited to depths helm the surface of not over 30 ft (9 m). Because of the offshore exploration, drilling, and recovery of gas and oil, it is necessary to lay and repair underwater pipelines and the portion of drill rigs and production platforms which are underwater. There are two major categories of underwater welding; welding in a wet environment and welding in a dry environment.
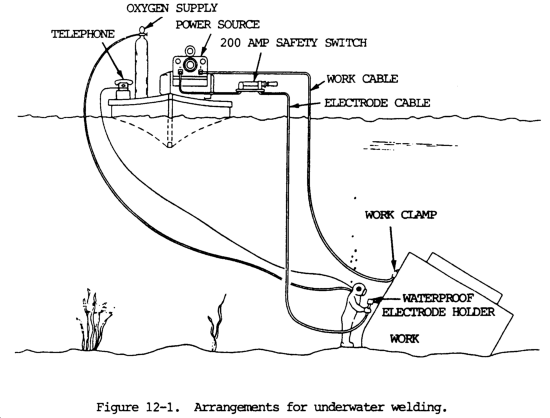
(1) Welding in the wet (wet environment) is used primarily for emergency repairs or salvage operations in shallow water. The poor quality of welds made in the wet is due to heat transfer, welder visibility, and hydrogen presence in the arc atmosphere during welding. When completely surrounded by water at the arc area, the high temperature reducing weld metal quality is suppressed, and there is no base metal heat buildup at the weld. The arc area is composed of water vapor. The arc atmosphere of hydrogen and the oxygen of the water vapor is absorbed in the molten weld metal. It contributes to porosity and hydrogen cracking. In addition, welders working under water are restricted in manipulating the arc the same as on the surface. They are also restricted by low visibility because of their equipment and the water contaminants, plus those generated in the arc. Under the most ideal conditions, welds produced in the wet with covered electrodes are marginal. They may be used for short periods as needed but should be replaced with quality welds as soon as possible. Underwater in-the-wet welding is shown in figure 12-1. The power source should be a direct current machine rated at 300 or 400 amperes. Motor generator welding machines are most often used for underwater welding in-the-wet. The welding machine frame must be grounded to the ship. The welding circuit must include a positive type of switch, usually a knife switch operated on the surface and commanded by the welder-diver. The knife switch in the electrode circuit must be capable of breaking the full welding current and is used for safety reasons. The welding power should be connected to the electrode holder only during welding. Direct current with electrode negative (straight polarity) is used. Special welding electrode holders with extra insulation against the water are used. The underwater welding electrode holder utilizes a twist type head for gripping the electrode. It accommodates two sizes of electrodes. The electrode size normally used is 3/16 in. (4.8 mm); however, 5/32-in. (4.0-mm) electrodes can also be used. The electrode types used conform to AWS E6013 classification. The electrodes must be waterproofed prior to underwater welding, which is done by wrapping them with waterproof tape or dipping them in special sodium silicate mixes and allowing them to dry. Commercial electrodes are available. The welding and work leads should be at least 2/0 size, and the insulation must be perfect. If the total length of the leads exceeds 300 ft 991) m), they should be paralleled. With paralleled leads to the electrode holder, the last 3 ft (0.9) should be a single cable. All connections must be thoroughly insulated so that the water cannot come in contact with the metal parts. If the insulation does leak, sea water will come in contact with the metal conductor and part of the current will leak away and will not be available at the arc. In addition, there will be rapid deterioration of the copper cable at the point of the leak The work lead should be connected to the piece being welded within 3 ft (0.9m) of the point of welding.
(2) Welding in-the-dry (dry environment) produces high-quality weld joints that meet X-ray and code requirements. The gas tungsten arc welding process produces pipe weld joints that meet quality requirements. It is used at depths of up to 200 ft (61 m) for joining pipe. The resulting welds meet X-ray and weld requirements. Gas metal arc welding is the best process for underwater welding in-the dry. It is an all-position process and can be adopted for welding the metals involved in underwater work. It has been applied successfully in depths as great as 180 ft (55 m). There are two basic types of in-the-dry underwater welding. One involves a large welding chamber or habitat known as hyperbaric welding. It provides the welder-diver with all necessary welding equipment in a dry environment. The habitat is sealed around the welded part. The majority of this work is on pipe, and the habitat is sealed to the pipe. The chamber bottom is exposed to open water and is covered by a grating. The atmosphere pressure inside the chamber is equal to the water pressure at the operating depth.
b. Direct current must be used for underwater welding and a 400 amp welder will generally have ample capacity. To produce satisfactory welds underwater, the voltage must run about 10 volts and the current about 15 amps above the values used for ordinary welding.
c. The procedure recommended for underwater welding is simply a touch technique. The electrode is held in light contact with the work so that the crucible formed by the coating at the end of the electrode acts as an arc spacer. To produce 1/2 in. (12.7 mm) of weld bead per 1.0 in. (25.4 mm) of electrode consumed in tee or lap joint welding, the electrode is held at approximately 45 degrees in the direction of travel and at an angle of about 45 degrees to the surface being welded. To increase or decrease weld size, the lead angle may be decreased or increased. The same procedure applies to welding in any position. No weaving or shipping is employed at any time. In vertical welding, working from the top down is recommended.
d. The touch technique has the following advantages:
(1) It makes travel speed easy to control.
(2) It produces uniform weld surfaces almost automatically.
(3) It provides good arc stability.
(4) It permits the diver to feel his way where visibility is bad or working position is awkward.
(5) It reduces slag inclusions to a minimum.
(6) It assures good penetration.
e. In general, larger electrodes are used in underwater welding than are employed in normal welding. For example, when welding down on a vertical lap weld on 1/8 to 3/16 in. (3.2 to 4.8 mm) material, a 1/8- or 5/32-in. (3.2- or 4.0-mm) electrode would usually be used in the open air. However, a 3/1- or 7/32-in. (4.8- or 5.6-mm) electrode is recommended for underwater work because the cooling action of the water freezes the deposit more quickly. Higher deposition rates are also possible for the same reason. Usually, tee and lap joints are used in salvage operations because they are easier to prepare and they provide a natural groove to guide the electrode. These features are important under the difficult working conditions encountered underwater. Slag is light and has many nonadhering qualities. This means the water turbulence is generally sufficient to remove it. The use of cleaning tools is not necessary. However, where highest quality multipass welds are required, each pass should be thoroughly cleaned before the next is deposited.
f. Amperages given in table 12-1 are for depths up to 50 ft (15.2 m). As depth increases, amperage must be raised 13 to 15 percent for each additional 50 ft (15.2 m). For example, the 3/16-in. (4.8-mm) electrode at 200 ft (61 m) will require approximately 325 amperes to assure proper arc stability.
Section II. UNDERWATER CUTTING WITH OXYFUEL
12-4. GENERAL
Underwater cutting is accomplished by use of the oxyhydrogen torch with a cylindrical tube around the torch tip through which a jet of compressed air is blown. The principles of cutting under water are the same as cutting elsewhere, except that hydrogen is used in preference to acetylene because of the greater pressure required in making cuts at great depths. Oxyacetylene may be used up to 25-ft (7.6-m) depths; however, depths greater than 25.0 ft (7.6 m) require the use of hydrogen gas.
12-5. CUTTING TECHNIQUE
a. Fundamentally, underwater cutting is virtually the same as any hand cutting employed on land. However, the torch used is somewhat different. It requires a tube around the torch tip so air and gas pressure can be used to create a gas pocket. This will induce an extremely high rate of heat at the work area since water dispels heat much faster than air. The preheating flame must be shielded from contact with the water. Therefore, higher pressures are used as the water level deepens (approximately 1.0 lb (0.45 kg) for each 2.0 ft (0.6 m) of depth). Initial pressure adjustments are as follows:
Oxygen.....................................................................................60-85 psi (413.7-586.1 kPa)
Acetylene....................................................................................12-15 psi (82.7-103.4 kPa)
Hydrogen...................................................................................35-45 psi (241.3-310.3 kPa)
Compressed air..........................................................................35-50 psi (241.3-344.8 kPa)
b. While the cutting operation itself is similar as on land, a few differences are evident. Same divers light and adjust the f1ame before descending. There is, however, an electric sparking device which is used for underwater ignition. This device causes somewhat of an explosion, but it is not dangerous to the operator.
c. When starting to preheat the metal to be cut, the torch should be held so the upper rim of the bell touches the metal. When the metal is sufficiently hot to start the cut, the bell should be firmly pressed on the metal since the compressed air will travel with the high pressure oxygen and escape through the kerf. Under these circumstances, the preheated gases will prevent undue "chilling" by the surrounding water. No welder on land would place a hand on the torch tip when cutting. However, this is precisely what the diver does underwater since the tip, bell, or torch will become no more than slightly warm under water. The diver, by placing the left hand around the torch head, can hold the torch steady and manipulate it more easily.
d. Due to the rapid dissipation of heat, it is essential that the cut be started by cutting a hole a distance from the outer edge of the plate. After the hole has been cut, a horizontal or vertical cut can be swiftly continued. A diver who has not previously been engaged in underwater cutting must make test cuts before successfully using an underwater cutting torch.
Section III. METALLIZING
12-6. GENERAL
a. General.
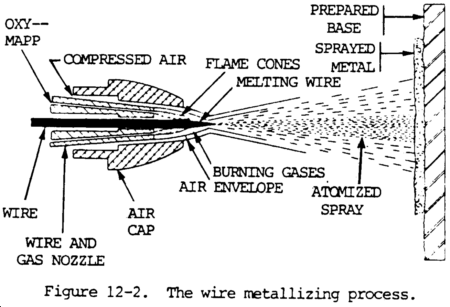
(1) Metallizing is used to spray metal coatings on fabricated workpieces. The coating metal initially is in wire or powder form. It is fed through a special gun and melted by an oxyfuel gas flame, then atomized by a blast of compressed air. The air and combustion gases transport the atomized molten metal onto a prepared surface, where the coating is formed (fig. 12-2).
(2) The metallizing process uses a welding spray gun to enable the welder to place precisely as much or as little weld metal as necessary over any desired surface. Metal deposits as thin as 0.003 in. (0.076 mm) to any desired thickness may be made. The process is versatile, time-saving, and, in some cases, more economical than other welding or repair procedures.
(3) Metallized coatings are used to repair worn parts, salvage mismachined components, or to provide special properties to the surface of original equipment. Metallized coatings are used for improving bearing strength, adding corrosion or heat resistance, hard-facing, increasing lubricity, improving thermal and electrical conductivity, and producing decorative coatings.
(4) Corrosion resistant coatings such as aluminum and zinc are applied to ship hulls, bridges, storage tanks, and canal gates, for example. Hard-facing is applied to shafting, gear teeth, and other machine components, as well as to mining equipment, ore chutes, hoppers, tracks, and rails. Coatings with combined bearing and lubricity properties are used to improve the surface life of machine shafting, slides, and ways.
b. Characteristics of Coated Surfaces.
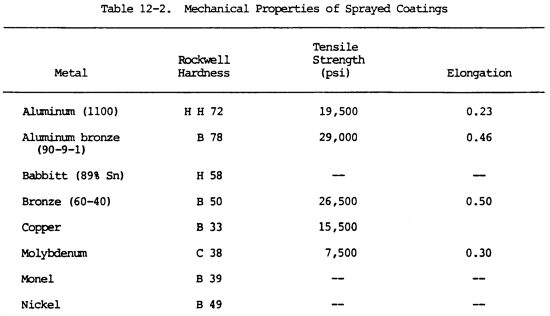
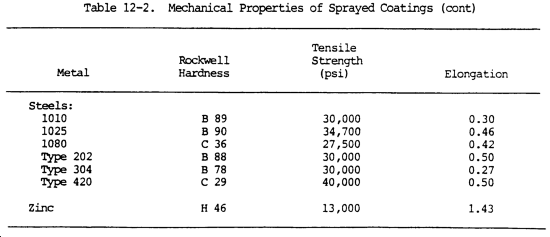
(1) The chemical properties of sprayed coatings are those of the coating metal. The physical properties often are quite different (table 12-2).
(2) As-sprayed metal coatings are not homogeneous. The first molten droplets from the metallizing gun hit the substrate and flatten out. Subsequent particles overlay the first deposit, building up a porous lamellar coating. Bonding is essentially mechanical, although some metallurgical bonding also may occur.
(3) The small pores between droplets soon became closed as the coating thick-ness increases. These microscopic pores can hold lubricants and are one of the reasons metallized coatings are used for increased lubricity on wear surfaces.
(4) The tensile strengths of sprayed coatings are high for the relatively low melting point metals used. Ductility is uniformly low. Therefore, parts must be formal first, and then sprayed. Thin coatings of low melting point metals, such as sprayed zinc on steel, are a minor exception to this rule and can withstand limited forming.
c. Workpiece Restrictions.
(1) Metallizing is not limited to any particular size workpiece. The work may vary from a crane boom to an electrical contact. Metallizing may be done on a production line or by hand; in the plant or in the field.
(2) Workpiece geometry has an important influence on the process. Cylindrical parts such as shafts, driers, and press rolls that can be rotated in a lathe or fixture are ideal for spraying with a machine-mounted gun. For example, a metallizing gun can be mounted on the carriage of a lathe to spray a workpiece at a predetermined feed rate.
(3) Parts such as cams are usually sprayed by hand. Such parts can be sprayed automatically, but the cost of the elaborate setup for automated spraying may not be justified. The volute part of a small pump casing is difficult to coat because of the backdraft or splash of the metal spray. Small-diameter holes, bores of any depth, or narrow grooves are bridging of the spraying coating.
d. Materials for Metallizing.
(1) A wide range of materials can be flame sprayed. Most of them include metals, but refractory oxides in the form of either powder or rods also can be applied. Wires for flame spraying include the entire range of alloys and metals from lead, which melts at 618°F (326°C), to molybdenum with a melting point of 4730°F (2610°C). Higher melting point materials also can be sprayed, but a plasma-arc spray gun is required.
(2) Between the extremes of lead and molybdenum are common metal coatings such as zinc, aluminum, tin, copper, various brasses, bronzes and carbon steels, stainless steels, and nickel-chromium alloys. Spray coatings may be combined on one workpiece. For example, molybdenum or nickel aluminide often is used as a thin coating on steel parts to increase bond strength. Then another coating metal is applied to build up the deposit.
e. Surface Preparation.
(1) Surfaces for metallizing must be clean. They also require roughening to ensure a good mechanical bond between the workpiece and coating. Grease, oil, and other contaminants are rearmed with any suitable solvent. Cast iron or other porous metals should be preheated at 500 to 800°F (260 to 427°C) to remove entrapped oil or other foreign matter. Sand blasting may be used to remove excessive carbon resulting from preheating cast iron. Chemical cleaning may be necessary prior to preheating.
(2) Undercutting often is necessary on shafts and similar surfaces to permit a uniformly thick buildup on the finished part. The depth of undercutting depends on the diameter of the shaft and on service requirements. If the undercut surface becomes oxidized or contaminated, it should be cleaned before roughening and spraying.
(3) Roughening of the workpiece surface usually is the final step before spraying. Various methods are used, ranging from rough threading or threading and knurling to abrasive blasting and electric bonding.
(4) Thin molybdenum or nickel aluminide spray coatings are often applied to the roughened surface to improve the bond strength of subsequent coatings. Applications that require only a thin coating of sprayed metal often eliminate the roughening step and go directly to a bonding coat. The surface is then built up with some other metal.
f. Coating Thickness.
(1) Cost and service requirements are the basis for determining the practical maximum coating thickness for a particular application, such as building up a worn machine part. Total metallizing cost includes cost of preparation, oxygen, fuel gas and materials, application time, and finishing operations. If repair costs are too high, it may be more economical to buy a replacement part.
(2) The total thickness for the as-sprayed coating on shafts is determined by the maximum wear allowance, the minimum coating thickness that must be sprayed, and the amount of stock required for the finishing operation. The minimum thickness that must be sprayed depends on the diameter of the shaft and is given in table 12-3. For press-fit sections, regardless of diameter, a minimum of 0.005 in. (0.127 mm) of coating is required.
(3) Variation in the thickness of deposit depends on the type of surface preparation used. The thickness of a deposit over a threaded surface varies more than that of a deposit over an abrasive blasted surface, or a smooth surface prepared by spray bonding. In general, the total variation in thickness that can be expected for routine production spraying with mounted equipment is 0.002 in. (0.051 mm) for deposits from a metallizing wire.
g. Coating Shrinkage.
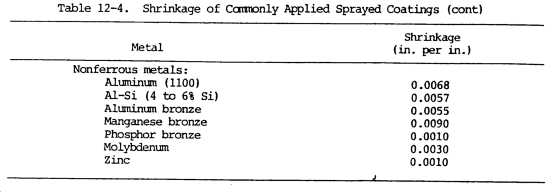
(1) The shrinkage of the metal being deposited also must be taken into consideration because it affects the thickness of the final deposit. For example, deposits on inside diameters must be held to a minimum thickness to conform with the shrinkage stresses; coatings for excessive thickness will separate from the workpiece because of excessive stresses and inadequate bond strength.
(2) Table 12-4 gives shrinkage values for the metals commonly used for spray coatings. Thicker coatings can be deposited with metals of lower shrinkage.
(3) All sprayed-metal coatings are stressed in tension to some degree except in those where the substrate material has a high coefficient of expansion, and is preheated to an approximate temperature for spraying. The stresses can cause cracking of thick metal coatings with a high shrinkage value; steels are in this category. the austenitic stainless steels are in this category.
(4) The susceptibility to cracking of thick austenitic stainless steel deposits can be prevented by first spraying a martensitic stainless steel deposit on the substrate, then depositing austenitic stainless steel to obtain the required coating thickness. The martensitic stainless produces a strong bond with the substrate, has good strength in the as-sprayed form, and provides an excellent surface for the austenitic stainless steel.
h. Types of Metallizing.
(1) Electric arc spraying (EASP).
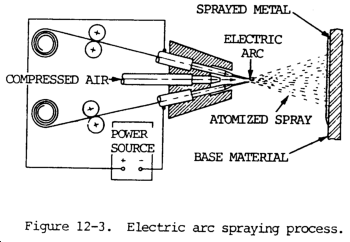
(a) Electric arc spraying is a thermal spraying process that uses an electric arc between two consumable electrodes of the surfacing materials as the heat source. A compressed gas atomizes and propels the molten material to the workpiece. The principle of this process is shown by figure 12-3. The two consumable electrode wires are fed by a wire feeder to bring them together at an angle of approximately 30 degrees and to maintain an arc between them. A compressed air jet is located behind and directly in line with the intersecting wires. The wires melt in the arc and the jet of air atomizes the melted metal and propels the fine molten particles to the workpiece. The power source for producing the arc is a direct-current constant-voltage welding machine. The wire feeder is similar to that used for gas metal arc welding except that it feeds two wires. The gun can be hand held or mounted in a holding and movement mechanism. The part or the gun is moved with respect to the other to provide a coating surface on the part.
(b) The welding current ranges from 300 to 500 amperes direct current with the voltage ranging from 25 to 35 volts. This system will deposit from 15 to 100 lb/hr of metal. The amount of metal deposited depends on the current level and the type of metal being sprayed. Wires for spraying are sized according to the Brown and Sharp wire gauge system. Normally either 14 gauge (0.064 in. or 1.626 mm) or 11 gauge (0.091 in. or 2.311 mm) is used. Larger diameter wires can be used.
(c) The high temperature of the arc melts the electrode wire faster and deposits particles having higher heat content and greater fluidity than the flame spraying process. The deposition rates are from 3 to 5 times greater and the bond strength is greater. There is coalescence in addition to the mechanical bond. The deposit is more dense and coating strength is greater than when using flame spraying.
(d) Dry compressed air is used for atomizing and propelling the molten metal. A pressure of 80 psi (552 kPa) and from 30 to 80 cu ft/min (0.85 to 2.27 cu m/min) is used. Almost any metal that can be drawn into a wire can be sprayed. Following are metals that are arc sprayed: aluminum, babbitt, brass, bronze, copper, molybdenum, Monel, nickel, stainless steel, carbon steel, tin, and zinc.
(2) Flame spraying (FLSP).
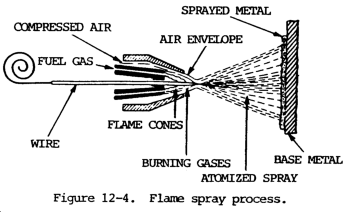
(a) Flame spraying is a thermal spraying process that uses an oxyfuel gas flame as a source of heat for melting the coating material. Compressed air is usually used for atomizing and propelling the material to the workpiece. There are two variations: one uses metal in wire form and the other uses materials in powder form. The method of flame spraying which uses powder is sometimes known as powder flame spraying. The method of flame spraying using wire is known as metallizing or wire flame spraying.
(b) In both versions, the material is fed through a gun and nozzle and melted in the oxygen fuel gas flame. Atomizing, if required, is done by an air jet which propels the atomized particles to the workpiece. When wire is used for surfacing material, it is fed into the nozzle by an air-driven wire feeder and is melted in the gas flame. When powdered materials are used, they may be fed by gravity from a hopper which is a part of the gun. In another system, the powders are picked up by the oxygen fuel gas mixture, carried through the gun where they are melted, and propelled to the surface of the workpiece by the flame.
(c) Figure 12-4 shows the flame spray process using wire. The version that uses wires can spray metals that can be prepared in a wire form. The variation that uses powder has the ability to feed various materials. These include normal metal alloys, oxidation-resistant metals and alloys, and ceramics. It provides sprayed surfaces of many different characteristics.
(3) Plasma spraying (PSP).
(a) Plasma spraying is a thermal spraying process which uses a nontransferred arc as a source of heat for melting and propelling the surfacing material to the workpiece. The process is shown in figure 12�5.
(b) The process is sometimes called plasma flame spraying or plasma metallizing. It uses the plasma arc, which is entirely within the plasma spray gun. The temperature is so much higher than either arc spraying or flame spraying that additional materials can be used as the coating. Most inorganic materials, which melt without decomposition, can be used. The material to be sprayed must be in a powder form. It is carried into the plasma spray gun suspended in a gas. The high-temperature plasma immediately melts the powdered material and propels it to the surface of the workpiece. Since inert gas and extra high temperatures are used, the mechanical and metallurgical properties of the coatings are generally superior to either flame spraying or electric arc spraying. This includes reduced porosity and improved bond and tensile strengths. Coating density can reach 95 percent. The hardest metals known, some with extremely high melting temperatures, can be sprayed with the plasma spraying process.
i. The Spraying Operation. Spraying should be done immediately after the part is cleaned. If the part is not sprayed immediately, it should be protected from the atmosphere by wrapping with paper. If parts are extremely large, it may be necessary to preheat the part 200 to 400°F (93 to 204°C). Care must be exercised so that heat does not build up in the workpiece. This increases the possibility of cracking the sprayed surface. The part to be coated should be preheated to the approximate temperature that it normally would attain during the spraying operation. The distance between the spraying gun and the part is dependent on the process and material being sprayed. Recommendations of the equipment manufacturer should be followed and modified by experience. Speed and feed of spraying should be uniform. The first pass should be applied as quickly as possible. Additional coats may be applied slowly. It is important to maintain uniformity of temperature throughout the part. When there are areas of the part being sprayed where coating is not wanted, the area can be protected by masking it with tape.
12-7. TOOLS AND EQUIPMENT
The major items of equipment used in the process, with the exception of the eutectic torch and a few fittings, are the same as in a normal oxyacetylene welding or cutting operation. Oxygen and acetylene cylinders, cylinder-to-regulator fittings, pressure regulators, hoses, striker, torch and regulator wrench, tip cleaners, and goggles are the same as those commonly used by welders. The metallizing and welding torch, its accessory tips, and the Y hose fittings are the distinct pieces of equipment used in metallizing.
12-8. METALLIZING AND WELDING TORCH
a. This torch is a manually operated, powder dispensing, oxyacetylene torch. There are three sections: the torch body, the mixing chamber and valve assembly, and the tip assembly. These assemblies are chrome plated to prolong service life and to prevent corrosion and contamination.
b. The torch body is also the handle. Like the body of a regular welding torch, it also has needle valves which control the flew of oxygen and acetylene.
c. The mixing chamber and valve assembly is the heart of the torch. In this section, the flow of powder into the oxygen stream is controlled and mixing takes place. A lever, like the cutting lever on a cutting torch, controls the flow of powdered metal. When the lever is held down, powder flows; when released, the powder flow is shut off. The valve and plunger are made of plastic. Should a blockage occur, no sharp or rough objects should be used to clean it. Occasionally, material will build up inside the bore. This cuts down the operating efficiency. If any malfunction occurs or is suspected, the bore is the first item to check. Just forward of the feed lever is the connection for attaching the powder bellows modules. It must be in the UP position while operating.
d. The tip assembly is made of a low heat-conducting alloy. It can be rotated and locked at any position or angle from 0 to 360 degrees. The accessory tips are screwed onto the end of the tip assembly.
12-9. ACCESSORY TIPS
These tips come in three sizes, numbered 45, 48, and 53, according to the size of the drill number used to drill the orifice. The larger the number, the smaller the hole. A number 45 tip would be used for heavy buildup while a number 53 tip would be used for fine, delicate work.
12-10. Y FITTINGS
Two Y fittings are provided with a set: one fitting with left-hand threads for acetylene connections and the other with right-hand threads for oxygen hose connections. These fittings allow the regular welding torch to be used on the same tanks at the same time as the metallizing torch.
12-11. MATERIALS
a. General. The materials used for making welds and overlays are a little different in form, but not new in purpose. Fluxes are used for hard-to-weld metals. Filler metal in the form of a fine powder is used for the weld or coating material.
b. Fluxes. Two fluxes in paste form are used in combination with different powdered alloys. One flux is for copper only; the other is for all types of metals.
c. Welding powders. The metal powders are of high quality, specially formulated alloys developed for a wide variety of jobs. These jobs range from joining copper to copper to putting a hard surface on a gear tooth. Selection of the proper alloy depends on the base metal and surface required. The powder alloys come in plastic containers called bellow modules. They are ready to insert in the connection on the valve assembly after their stoppers have been removed.
12-12. SETUP
The equipment and torch are hooked up to the oxygen and acetylene tanks in the same manner as a regular welding torch. The tip is rotated to the correct angle for the welding position being used, and locked in place.
12-13. OPERATION
a. To operate the torch, the correct pressure setting is needed. This is determined by the size of the tip being used. Tip number 45 and 48 use 25 to 30 psi (172.4 to 206.9 kPa) of oxygen and 4 to 5 psi (27.6 to 34.5 kPa) of acetylene. Tip number 53 uses 15 to 18 psi (103.4 to 124.1 kPa) of oxygen and 2 to 3 psi (13.8 to 20.7 kPa) of acetylene.
b. After the pressures have been set, the torch is lit and adjusted to obtain a neutral flame while the alloy feed lever is depressed. This is done before joining the module to the torch.
c. After proper flame adjustment, the module is attached to the torch. This is done by turning the torch upside down and inserting the end of the module into the mating part located on the valve assembly. A twist to the right locks the module in place. The only time the torch is held upside down is during loading and unloading.
d. Before applying the powder to the surface or joint, the area must be preheated. Steel is heated to a straw color while brass and copper are heated to approximately 800°F (427°C)
e. After preheating, the powder feed lever is depressed and a thin cover of powder is placed over the desired surface. The lever is then released and the area heated until the powder wets the surface or tinning action takes place. Once tinning is observed, the feed lever is depressed until a layer no more than 1/8 in. (3.2 mm) thick has been deposited. If more metal is desired, the area should be reheated. A light cover of powder should be applied and heated again until tinning takes place to ensure proper bonding. In this manner, any desired thickness may be obtained while depositing the metal. The torch must be kept in a constant circular motion to avoid overheating the metal.
f. To shut down the torch, the same procedures are followed as in regular welding. Once the flame is out, the bellows module is removed by turning the torch upside down and twisting the module to the left. The plug must be replaced to prevent contamination of the alloy.
12-14. MALFUNCTIONS AND CORRECTIVE ACTIONS
As with any piece of equipment, malfunctions can occur. The orifice should be checked first if no observable deposit is made when the feed lever is depressed.
Section IV. FLAME CUTTING STEEL AND CAST IRON
12-15. GENERAL
a. General. Plain carbon steels with a carbon content not exceeding 0.25 percent can be cut without special precautions. Certain steel alloys develop high resistance to the action of the cutting oxygen. This makes it difficult, and sometimes impossible, to propagate the cut without the use of special techniques.
b. Oxygen cutting Oxygen cutting (OC) is a group of thermal cutting processes used to sever or remove metals by means of the chemical reaction of oxygen with the base metal at elevated temperatures. In the case of oxidation-resistant metals, the reaction is facilitated by the use of a chemical flux or metal powder. Five basic processes are involved: oxyfuel gas cutting, metal powder cutting, chemical flux cutting, oxygen lance cutting, and oxygen arc cutting. Each of these processes is different and will be described.
c. Oxyfuel Gas Cutting (OFC).
(1) Oxyfuel gas cutting severs metals with the chemical reaction of oxygen with the base metal at elevated temperatures. The necessary temperature is maintained by gas flames from the combustion of a fuel gas and oxygen.
(2) When an oxyfuel gas cutting operation is described, the fuel gas must be specified. There are a number of fuel gases used. The most popular is acetylene. Natural gas is widely used, as is propane, methylacetylene-propadiene stabilized (MAPP gas), and various trade name fuel gases. Hydrogen is rarely used. Each fuel gas has particular characteristics and may require slightly different apparatus. These characteristics relate to the flame temperatures, heat content, oxygen fuel gas ratios, etc.
(3) The general concept of oxyfuel gas cutting is similar no matter what fuel gas is used. It is the oxygen jet that makes the cut in steel, and cutting speed depends on how efficiently the oxygen reacts with the steel.
(4) Heat is used to bring the base metal steel up to kindling temperature where it will ignite and burn in an atmosphere of pure oxygen. The chemical formulas for three of the oxidation reactions is as follows:
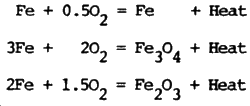
(5) At elevated temperatures, all of the iron oxides are produced in the cutting zone.
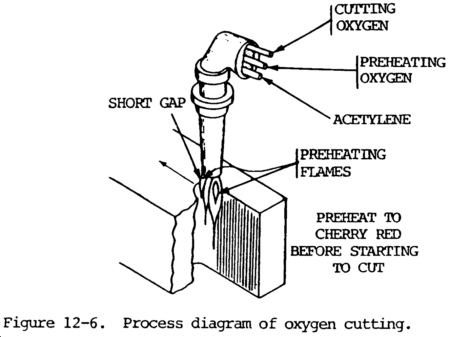
(6) The oxyacetylene cutting torch is used to heat steel by increasing the temperature to its kindling point and then introducing a stream of pure oxygen to create the burning or rapid oxidation of the steel. The stream of oxygen also assists in removing the material from the cut. This is shown by figure 12-6.
(7) Steel and a number of other metals are flame cut with the oxyfuel gas cutting process. The following conditions must apply:
(a) The melting point of the material must be above its kindling temperature in oxygen.
(b) The oxides of the metal should melt at a lower temperature than the metal itself and below the temperature that is developed by cutting.
(c) The heat produced by the combustion of the metal with oxygen must be sufficient to maintain the oxygen cutting operation.
(d) The thermal conductivity must be low enough so that the material can be brought to its kindling temperature.
(e) The oxides formed in cutting should be fluid when molten so the cutting operation is not interrupted.
(8) Iron and low-carbon steel fit all of these requirements and are readily oxygen flame cut. Cast iron is not readily flame cut, because the kindling temperature is above the melting point. It also has a refractory silicate oxide which produces a slag covering. Chrome-nickel stainless steels cannot be flame cut with the normal technique because of the refractory chromium oxide formed on the surface. Nonferrous metals such as copper and aluminum have refractory oxide coverings which prohibit normal oxygen flame cutting. They have high thermal conductivity.
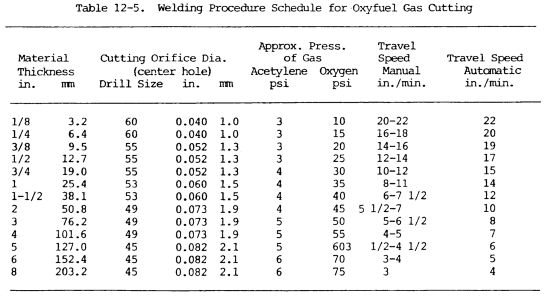
(9) When flame cutting, the preheating flame should be neutral or oxidizing. A reducing or carbonizing flame should not be used. The schedule for flame cutting clean mild steel is shown by the table 12-5.
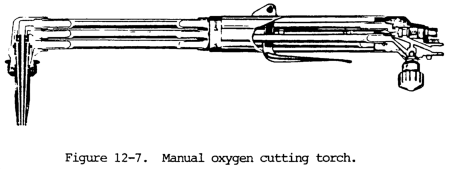
(10) Torches are available for either welding or cutting. By placing the cutting torch attachment on the torch body it is used for manual flame cutting. Figure 12-7 shows a manual oxyacetylene flame-cutting torch. Various sizes of tips can be used for manual flame cutting. The numbering system for tips is not standardized. Most manufacturers use their own tip number system. Each system is, however, based on the size of the oxygen cutting orifice of the tip. These are related to drill sizes. Different tip sizes are required for cutting different thicknesses of carbon steel.
(11) For automatic cutting with mechanized travel, the same types of tips can be used. High-speed type tips with a specially shaped oxygen orifice provide for higher-speed cutting and are normally used. The schedule shown in table 12-5 provides cutting speeds with normal tips; the speeds can be increased 25 to 50 percent when using high speed tips.
(12) Automatic shape-cutting machines are widely used by the metalworking industry. These machines can carry several torches and cut a number of pieces simultaneously. Multitorch cutting machines are directed by numerically-controlled equipment. Regardless of the tracing control system is used, the cutting operation is essentially the same.
(13) One of the newer advances in the automatic flame cutting is the generation of bevel cuts on contour-shaped parts. This breakthrough has made the use of numerically controlled oxygen cutting equipment even more productive.
(14) Many specialized automatic oxygen cutting machines are available for specific purposes. Special machines are available for cutting sprockets and other precise items. Oxygen-cutting machines are available for cutting pipe to fit other pipe at different angles and of different diameters. These are quite complex and have built-in contour templates to accommodate different cuts and bevels on the pipe. Other types of machines are designed for cutting holes in drum heads, test specimens, etc. Two or three torches can be used to prepare groove bevels for straight line cuts as shown by figure 12�8. Extremely smooth oxygen-cut surfaces can be produced when schedules are followed and all equipment is not in proper operating condition.
d. Metal Powder Cutting (POC).
(1) Metal powder cutting severs metals through the use of powder to facilitate cutting. This process is used for cutting cast iron, chrome nickel stainless steels, and some high-alloy steels.
(2) The process uses finely divided material, usually iron powder, added to the cutting-oxygen stream. The powder is heated as it passes through the oxyacetylene preheat flames and almost immediately oxidizes in the stream of the cutting oxygen. A special apparatus to carry the powder to the cutting tip must be added to the torch. A powder dispenser is also required. Compressed air is used to carry the powder to the torch.
(3) The oxidation, or burning of the iron powder, provides a much higher temperate in the oxygen stream. The chemical reaction in the flame allows the cutting-oxygen stream to oxidize the metal being cut continuously in the same manner as when cutting carbon steels.
(4) With the use of iron powder in the oxygen stream, it is possible to start cuts without preheating the base material.
(5) Powder cutting has found its broadest use in the cutting of cast iron and stainless steel. It is used for removing gates and risers from iron and stainless steel castings.
(6) Cutting speeds and cutting oxygen-pressures are similar to those used when cutting carbon steels. For heavier material over 1 in. (25 mm) thick, a nozzle one size larger should be used. Powder flow requirements vary from 1/4 to 1/2 lb (0.11 to 0.23 kg) of iron powder per minute of cutting. Powder tends to leave a scale on the cut surface which can easily be removed as the surface cools. This is a rather special application process and is used only where required.
(7) Stack cutting is the oxygen cutting of stacked metal sheets or plates arranged so that all the plates are severed by a single cut. In this way, the total thickness of the stack is considered the same as the equivalent thickness of a solid piece of metal. When stack cutting, particularly thicker material, the cut is often lost because the adjoining plates may not be in intimate contact with each other. The preheat may not be sufficient on the lower plate to bring it to the kindling temperature and therefore the oxygen stream will not cut through the remaining portion of the stack. One way to overcome this problem is to use the metal powder cutting process. By means of the metal powder and its reaction in the oxygen, the cut is completed across separations between adjacent plates.
e. Chemical Flux Cutting (FOC). Chemical flux cutting is an oxygen-cutting process in which metals are severed using a chemical flux to facilitate cutting. Powdered chemicals are utilized in the same way as iron powder is used in the metal powder cutting process. This process is sometimes called flux injection cutting. Flux is introduced into the cut to combine with the refractory oxides and make them a soluble compound. The chemical fluxes may be salts of sodium such as sodium carbonate. Chemical flux cutting is of minor industrial significance.
f. Oxygen Lace Cutting (LOC).
(1) Oxygen lance cutting severs metals with oxygen supplied through a consumable tube. The preheat is obtained by other means. This is sometimes called oxygen lancing. The oxygen lance is a length of pipe or tubing used to carry oxygen to the point of cutting. The oxygen lance is a small (1/ 8 or 1/4 in. (3.2 or 6.4 mm) nominal) black iron pipe connected to a suitable handle which contains a shutoff valve. This handle is connected to the oxygen supply hose. The main difference between the oxygen lance and an ordinary flame cutting torch is that there is no preheat flame to maintain the material at the kindling temperature. The lance is consumed as it makes a cut. The principle use of the oxygen lance is the cutting of hot metal in steel mills. The steel is sufficiently heated so that the oxygen will cause rapid oxidation and cutting to occur. For other heavy or deep cuts, a standard torch is used to bring the surface of the metal to kindling temperature. The oxygen lance becomes hot and supplies iron to the reaction to maintain the high temperature.
(2) There are several proprietary specialized oxygen lance type cutting bars or pipes. In these systems, the pipe is filled with wires which may be aluminum and steel or magnesium and steel. The aluminum and magnesium readily oxidize and increase the temperature of the reaction. The steel of the pipe and the steel wires will tend to slow down the reaction whereas the aluminum or magnesium wires tend to speed up the reaction. This type of apparatus will burn in air, under water, or in noncombustible materials. The tremendous heat produced is sufficient to melt concrete, bricks, and other nonmetals. These devices can be used to sever concrete or masonry walls and will cut almost anything.
g. Oxygen Arc Cutting (AOC).
(1) Oxygen arc cutting severs metals by means of the chemical reaction of oxygen with the base metal at elevated temperatures. The necessary temperature is maintained by means of an arc between a consumable tubular electrode and the base metal.
(2) This process requires a specialized combination electrode holder and oxygen torch. A conventional constant current welding machine and special tubular covered electrodes are used.
(3) This process will cut high chrome nickel stainless steels, high-alloy steels, and nonferrous metals.
(4) The high temperature heat source is an arc between the special covered tubular electrode and the metal to be cut. As soon as the arc is established, a valve on the electrode holder is depressed. Oxygen is introduced through the tubular electrode to the arc. The oxygen causes the material to burn and the stream helps remove the material from the cut. Steel from the electrode plus the flux from the covering assist in making the cut. They combine with the oxides and create so much heat that thermal conductivity cannot remove the heat quickly enough to extinguish the oxidation reaction.
(5) This process will routinely cut aluminum, copper, brasses, bronzes, Monel, Inconel, nickel, cast iron, stainless steel, and high-alloy steels. The quality of the cut is not as good as the quality of an oxygen cut on mild steel, but sufficient for many applications. Material from 1/4 to 3 in. (6.4 to 76 mm) can be cut with the process. The electric current ranges from 150 to 250 amperes and oxygen pressure of 3 to 60 psi (20.7 to 413.7 kPa) may be used. Electrodes are normally 3/16 in. (4.8 mm) in diameter and 18 in. (457 mm) long. They are suitable for ac or dc use. This process is used for salvage work, as well as for manufacturing and maintenance operations.
12-16. HIGH CARBON STEELS
The action of the cutting torch on high carbon steels is similar to flame hardening processes. The metal adjacent to the cutting area is hardened by being heated above its critical temperature and quenched by the adjacent mass of cold metal. This condition can be minimized by preheating the part from 500 to 600°F (260 to 316°C) before the cut is made.
12-17. WASTER PLATE ALLOY STEEL
The cutting action on an alloy steel that is difficult to cut can be improved by clamping a mild steel "waster plate" tightly to the upper surface and cutting through both thicknesses. This waster plate method will cause a noticeable improvement in the cutting action. The molten steel dilutes or reduces the alloying content of the base metal.
12-18. CHROMIUM AND STAINLESS STEEL
These and other alloy steels that previously could be cut only by a melting action can now be cut by rapid oxidation. This is done by introducing iron powder or a special nonmetallic powdered flux into the cutting oxygen stream. The iron powder oxidizes quickly and liberates a large quantity of heat. This high heat melts the refractory oxides which normally protect the alloy steel from the action of oxygen. These molten oxides are flushed from the cutting face by the oxygen blast. The cutting oxygen is able to continue its reaction with the iron powder and cut its way through the steel plates. The nonmetallic flux, when introduced into the cutting oxygen stream, combines chemically with the refractory oxides. This produces a slag of a lower melting point, which is washed or eroded out of the cut, exposing the steel to the action of the cutting oxygen.
12-19. CAST IRON
Cast iron melts at a temperature lower than its oxides. Therefore, in the cutting operation, the iron tends to melt rather than oxidize. For this reason, the oxygen jet is used to wash out and erode the molten metal when cast iron is being cut. To make this action effective, the cast iron must be preheated to a high temperature and much heat must be liberated deep in the cut. This is effected by adjusting the preheating flames so there is an excess of acetylene. The length of the acetylene streamer and the procedure for advancing the cut are shown in Figure 12-9. The use of a mild iron flux to maintain a high temperature in the deeper recesses of the cut is also effective (fig. 12�9).
Section V. FLAME TREATING METAL
12-20. FLAME HARDENING
a. The oxyacetylene flame can be used to harden the surface of hardenable steel, including stainless steels, to provide better wearing qualities. The carbon content of the steel should be 0.35 percent or higher for appreciable hardening. The best range for the hardening process is 0.40 to 0.50 percent. In this process, the steel is heated to its critical temperature and then quenched, usually with water. Steels containing 0.70 percent carbon or higher can be treated in the same manner, except that compressed air or water sprayed by compressed air, is used to quench the parts less rapidly to prevent surface checking. Oil is used for quenching some steel compositions.
b. The oxyacetylene flame is used merely as a heat source and involves no change in the composition of the steels as in case hardening where carbon or nitrogen is introduced into the surface. In case hardening, the thickness of the hardened area ranges from 0 to 0.020 in. (0 to 0.508 mm).
c. Ordinary welding torches are used for small work, but for most flame hardening work, water-cooled torches are necessary. Tips or burners are of the multiflame type. They are water cooled since they must operate for extended periods without backfiring. Where limited areas are to be hardened, the torch is moved back and forth over the part until the area is heated above the critical temperature. Then the area is quenched. The hardening of extended areas is accomplished by steel hardening devices. These consist of a row of flames followed by a row of quenching jets. A means of moving these elements over the surface of the work, or moving the work at the required speed under the flames and jets, is also required.
12-21. FLAME SOFTENING
a. Certain steels, called air-hardening steels, will become hard and brittle when cooled rapidly in the air from a red hot condition. This hardening action frequently occurs when the steels are flame cut or arc welded. When subsequent machining is required, the hardness must be decreased to permit easier removal of the metal.
b. Oxyacetylene flames adjusted to neutral can be used either to prevent hardening or to soften an already hardened surface. The action of the flame is used to rapidly heat the metal to its critical temperature. However, in flare softening, the quench is omitted and the part is cooled slowly, either by still air or by shielding with an insulating material.
c. Standard type torches, tips, and heating heads, like those used for welding equipment, are not applicable. The equipment used in flame hardening is necessary.
12-22. FLAME STRAIGHTENING
a. It is often desirable or necessary to straighten steel that has been expanded or distorted from its original shape by uneven heating. This is especially true if the steel is prevented from expanding by adjacent cold metal. The contraction on cooling tends to shorten the surface dimension on the heated side of the plate. Since some of the metal has been upset permanently, the plate cannot return to its original dimensions and becomes dished or otherwise distorted.
b. Localized heat causes such metal distortion. This principle can be used to remedy warpage, buckling, and other irregularities in plates, shafts, structural members, and other parts. The distorted areas are heated locally and then quenched on cooling. The raised sections of the metal will be drawn down. By repeating this process and carefully applying heat in the proper areas and surfaces, irregularities can be remedied.
12-23. FLAME STRENGTHENING
Flame strengthening differs from flame hardening. The intent is to locally strengthen parts that will have to withstand severe service conditions. This process is used particularly for parts that are subjected to frequently varying stresses that lead to fatigue failure. The section that is to be strengthened is heated to the hardening temperature with the oxyacetylene flame, then quenched either with water, a water-air mixture, or air, depending on the composition of the steel being treated.
12-24. FLAME DESCALING
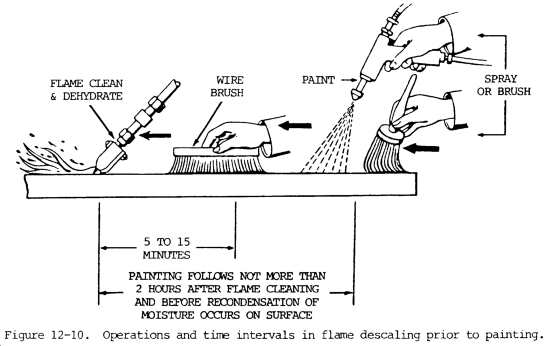
Flare descaling, sometimes called flame cleaning, is widely used for removing loosely adhering mill scale and rust. It is also used to clean rusted structures prior to painting. The scale and rust crack and flake off because of the rapid expansion under the oxyacetylene flame. The flare also turns any moisture present into steam, which accelerates the scale removal and, at the same time, dries the surface. The loose rust is then removed by wire brushing to prepare the surface for painting (fig. 12-10). This process is also used for burning off old paint. Standard torches equipped with long extensions and multiflame tips of varying widths and shapes are used.
12-25. FLAME MACHINING (OXYGEN MACHINING)
a. General. Flame machining. or oxygen machining, includes those processes oxygen and an oxyacetylene flare are used in removing the surfaces of metals. Several of these processes are described below.
b. Scarfing or Deseaming. This process is used for the removal of cracks, scale, and other defects from the surface of blooms, billets, and other unfinished shapes in steel mills. In this process, an area on the surface of the metal is heated to the ignition temperature. Then, a jet or jets of oxygen are applied to the preheated area and advanced as the surface is cut away. The scarfed surface is comparable to that of steel cleaned by chipping.
c. Gouging. This process is used for the removal of welds. It is also used in the elimination of defects such as cracks, sand inclusions, and porosity from steel castings.
d. Hogging. This is a flame machining process used for the removal of excess metals, such as risers and sprues, from castings. It is a combination of scarfing and gouging techniques.
e. Oxygen Turning. This flame machining process is identical in principle to mechanical turning with the substitution of a cutting torch in place of the usual cutting tool.
f. Surface Planing. Surface planing is a type of flame machining similar to mechanical planing. The metal is removed from flat or round surfaces by a series of parallel and overlapping grooves. Cutting tips with special cutting orifices are used in this operation. The operator controls the width and depth of the cut by controlling the oxygen pressure, the tip angle with relation to the metal surface, and the speed with which the cutting progresses.
12-26. OXYACETYLENE RIVET CUTTING
a. Removal of Countersunk Rivets.
(1) When countersunk rivets are being removed, the cutting torch is held so that the cutting nozzle is perpendicular to the plate surface (fig. 12-11). The preheating flames are directed at a point slightly below the center of the rivet head. The tips of the inner cones of the flames should be approximately 1/16 in. (1.6 mm) away from the rivet head.
(2) When the area of the rivet head under the flames becomes bright red, the tip of the torch is raised slightly to direct the cutting oxygen stream to the heated area. The cutting oxygen valve is opened. The torch shield is held steady until the coned head has been burned through and the body or shank of the rivet is reached. The remainder of the head should then be removed in one circular, wiping motion. The torch should be held with the cutting oxygen stream pointed at the base of the countersink, and then moved once around the circumference. After the head has been removed, the shank can be driven out.
b. Removal of Buttonhead Rivets.
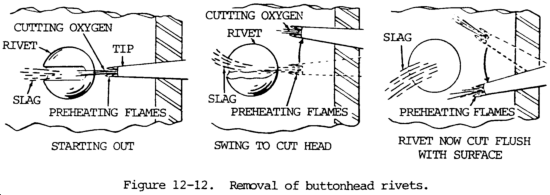
(1) Buttonhead rivets can be removed by using the tip size recommended for cutting steel 1.0 in. (25.4 mm) thick. Adjust the oxygen and acetylene pressures accordingly (fig. 12-12). Hold the tip parallel with the plate and cut a slot in the rivet head from the tip of the button to the underside of the head, similar to the screwdriver slot in a roundhead screw. As the cut nears the plate, draw the tip back at least 1-1/2 in. (38.1 mm) from the rivet and swing the tip in a small arc. This slices off half of the rivet head. Immediately swing the tip in the opposite direction and cut off the other half of the rivet head. After the head has been removed, the shank can be driven out.
(2) By the time the slot is cut, the entire head will be preheated to cutting temperature. While the bottom of the slot is being reached, and just before cutting starts at the surface of the plate, the tip must be drawn back from the rivet a distance of about 1-1/2 in. (38.1 mm). This will permit the oxygen stream to spread out slightly before it strikes the rivet and prevent the jet from breaking through the layer of scale that is always present between the rivet head and the plate. If the tip is not drawn away, the force of the oxygen jet may pierce the film of scale and damage the plate surface.
SECTION VI. CUTTING AND HARD SURFACING
WITH THE ELECTRIC ARC
12-27. GENERAL
a. Cutting. Electric arc cutting is a melting process whereby the heat of the electric arc is used to melt the metal along the desired line of the cut. The quality of the cuts produced by arc cutting does not equal that of cuts produced by applications where smooth cuts are essential. Arc cutting is generally confined to the cutting of nonferrous metals and cast iron.
b. Hard Surfacing. Hard surfacing is the process of applying extremely hard alloys to the surface of a softer metal to increase its resistance to wear by abrasion, corrosion, or impact. The wearing surfaces of drills, bits, cutters, or other parts, when treated with these special alloys, will outwear ordinary steel parts from 2 to 25 times. This will depend on the hard surfacing alloy and the service to which the part is subjected.
12-28. METAL CUTTING WITH ELECTRIC ARC
a. General. Electric arc cutting can be performed by three methods: carbon-arc, metal-arc, and arc-oxygen.
b. Carbon-Arc Cutting. In carbon-arc cutting, a carbon electrode is utilized to melt the metal progressively by maintaining a steady arc length and a uniform cutting speed. Direct current straight polarity is preferred, because it develops a higher heat at the base metal, which is the positive pole. Direct current also permits a higher cutting rate than alternating current, with easier control of the arc. Air cooled electrode holders are used for currents up to 300 amperes. Water cooled electrode holders are desirable for currents in excess of 300 amperes.
c. Metal-Arc Cutting.
(1) Metal-arc. Metal-arc cutting is a progressive operation with a low carbon steel, covered electrode. The covering on the electrode is a non-conducting refractory material. It permits the electrode to be inserted into the gap of the cut without being short circuited. This insulating coating also stabilizes and intensifies the action of the arc. Direct current straight polarity is preferred, but alternating current can be used. Standard electrode holders are applicable for metal-arc cutting in air.
(2) Air-arc. By slightly converting the standard electrode holder, as described in TB 9-3429-203/1, a stream of air can be directed to the surface of the work, increasing the speed of the cut and holding it to a minimum width.
(3) Underwater cutting. Specially constructed, fully insulated holders must be used for underwater metal-arc cutting.
d. Arc-Oxygen Cutting. Arc-oxygen cutting is a progressive operation in which tubular electrode is employed. The steel or conducting-type ceramic electrode is used to maintain the arc and serves as a conduit through which oxygen is fed into the cut. In this process, the arc provides the heat and the oxygen reacts with the metal in the same manner as in oxyacetylene cutting. Both direct and alternating currents are applicable in this process.
12-29. HARD SURFACING
Hard surfacing is used to apply a layer of metal of a special composition onto the surface of metal of a special composition onto the surface or to a specific section or part of a base metal of another composition. A wide variety of characteristics or performance characteristics can be secured by the selection of proper surfacing metals. The applied layer may be as thin as 1/32 in. (0.79 mm) or as thick as required.
12-30. METALS THAT CAN BE HARD SURFACED
a. All plain carbon steels with carbon content up to 0.50 percent can be hard surfaced by either the oxyacetylene or electric arc process.
b. High carbon steels containing more than 0.50 percent carbon can be hard surfaced by any of the arc welding processes. However, preheating to between 300 and 600°F (149 and 316°C) is usually advisable. This preheating will prevent cracking due to sudden heating of hardened parts. It will also prevent excessive hardening and cracking of the heat affected zone during cooling.
c. Low alloy steels can be hard surfaced in the same manner as plain carbon steels of the same hardenability if the steel is not in its hardened state. If it is in the hardened state, it should be annealed before welding. In some cases, heat treatment is required after welding.
d. The hard surfacing of high speed steels is not generally recommended. This is due to the fact that, regardless of heat treatment, brittleness and shrinkage cracks will develop in the base metal after hard surfacing. Usually there is no need for hard surfacing these steels because surfaced parts of low alloy steels should provide equal service characteristics.
e. Manganese (Hadfield) steels should be hard surfaced by the shielded metalarc process only, using the work hardening type of alloys or with alloys that will bond easily with this metal.
f. Stainless steels, including the high chrome and the 18-8 chrome-nickel steels, can be hard surfaced with most of the alloys that have suitable melting points. A knowledge of the composition of the stainless steel at hand is needed for the selection of the proper alloy. Otherwise, brittleness or impairment of corrosion resistance may result. The high coefficient of expansion of the 18-8 steels must also be considered.
g. Gray and alloy cast irons can be hard surfaced with the lower melting point alloys and the austenitic alloys. However, precautions need to be taken to prevent cracking of the cast iron during and after welding. Cobalt base alloys are also applicable to cast iron, although a flux may need to be applied to the cast iron.
h. White cast iron cannot be successfully surfaced because the welding heat materially alters the properties of the underlying metal.
i. Malleable iron can be surfaced in the same manner as cast iron.
j. Copper, brass, and bronze are difficult to surface with ferrous or high alloy nonferrous metals because of the low melting points. However, brass, bronze, and some nickel surfacing alloys can be applied very readily. Fluxes are usually need in these applications to secure sound welds.
12-31. ALIOYS USED FOR HARD SURFACING
a. General. No single hard surfacing material is suitable for all applications. Many types of hard surfacing alloys have been developed to meet the various requirements for hardness, toughness, shock and wear resistance, and other special qualities. These alloys are classified into six groups and are described below.
b. Group A. These include the low alloy types of surfacing alloys that are air hardened. Most of these electrodes are covered with coatings that supply alloying, deoxidizing, and arc stabilizing elements. Preheating of the base metal may be necessary to prevent cracking when harder types of electrodes are used, but in many applications the presence of small cracks is not important.
c. Group B. These electrodes include the medium alloy and medium-high alloy types. They have a light coating for arc stabilization only. The alloying agents are in the metal of the rod or wire. The electrodes in this group have a lower melting point than those in group A. They produce a flatter surface and must be used in the flat position only. Multilayer deposits, with proper preheat, should be free from cracks.
d. Group C. These electrodes include the high speed steel and austenitic steel alloys (other than austenitic manganese steels). The electrodes are either bare or have a light arc stabilizing coating. The bare electrodes should be only used for surfacing manganese steels because their arc characteristics are poor. To avoid embrittlement of the weld metal, the base metal must not be heated over 700°F (371°C). Peening is used in the application of these alloys to reduce stresses and to induce some hardness in the underlying layers.
e. Group D. These electrodes include the cobalt base alloys. They have a moderately heavy coating and are intended for manual welding only. To avoid impairment of metal properties, low welding heat is recommended. Deposits are subject to cracking but this can be prevented by preheating and slow cooling of the workpiece.
f. Group E. These alloys are supplied as tube rods containing granular tungsten carbide inside the tube. Their arc characteristics are poor but porosity and cracks are of little importance in the application for which they are intended. The tungsten carbide granules must not be melted or dissolved in the steel. For this reason, a minimum heat is recommended for welding. The deposits should show a considerable amount of undissolved cubicle particles.
g. Group F. These are nonferrous alloys of copper and nickel base types. They are heavily coated and are intended for direct current reverse polarity welding in the flat position only.
12-32. HARD SURFACING PROCEDURE
a. Preparation of Surface. The surface of the metal to be hard surfaced must be cleaned of all scale, rust, dirt, or other foreign substances by grinding, machining, or chipping. If these methods are not practicable, the surface may be prepared by filing, wire brushing, or sandblasting. The latter methods sometimes leave scale or other foreign matter which must be floated out during the surfacing operation. All edges of grooves, corners, or recesses must be well rounded to prevent overheating of the base metal.
b. Hard Surfacing with the Metal Arc. Surfacing by arc welding is done in the same manner and is similar in principle to joining by arc welding, except that the added metal has a composition that is not the same as that of the base metal. The characteristics of the added metal would be changed or impaired if it were excessively diluted by or blended with the base metal. For this reason, penetration into the base metal should be restricted by applying the surfacing metal with the minimum welding heat. In general, the current, voltage, polarity, and other conditions recommended by the manufacturer of the electrodes are based on this factor. An arc as long as possible will give the best results.
c. Hard Surfacing with the Carbon Arc. This process is used principally for the application of group F alloys. The welding machine is set for straight polarity and the heat of the arc is used to weld the particles of the base metal.
Section VII. ARMOR PLATE WELDING AND
12-33. GENERAL
a. Armor plate is used for the protection of personnel and equipment in combat tanks, self propelled guns, and other combat vehicles against the destructive forces of enemy projectiles. It is fabricated in the forms of castings and rolled plates. These are selectively heat treated, in turn, to develop the desired structural and protective properties. Industrial manufacture of gun turrets and combat tank hulls includes designs using one-piece castings and welded assemblies of cast sections and rolled plates. In certain cases, cast sections of armor are bolted in place to expedite the requirements of maintenance through unit replacement. Welding has replaced riveting as a formative process of structural armor fabrication. Riveting, however, is still used on some vehicles protected by face hardened armor.
b. The development of a suitable technique for welding armor plate is contingent upon a clear understanding of the factors affecting the weldability of armor plates, the structural soundness of the weld, and its ultimate ability to withstand the forces of impact and penetration in service. From the standpoint of field repair by welding, these considerations can be resolved into the factors outlined below:
(1) Knowledge of the exact type of armor being welded through suitable identification tests.
(2) Knowledge of alternate repair methods which are satisfactory for the particular type of armor and type of defect in question.
(3) Design function of the damaged structure.
(4) Selection of welding materials and repair procedures from the facilities available to produce optimum protective properties and structural strength.
(5) Determination of the need for emergency repair to meet the existing situation.
(6) Careful analysis of the particular defect in the armor disposition of the variables listed below:
(a) Joint preparation and design.
(b) Welding electrodes.
(c) Welding current, voltage, and polarity.
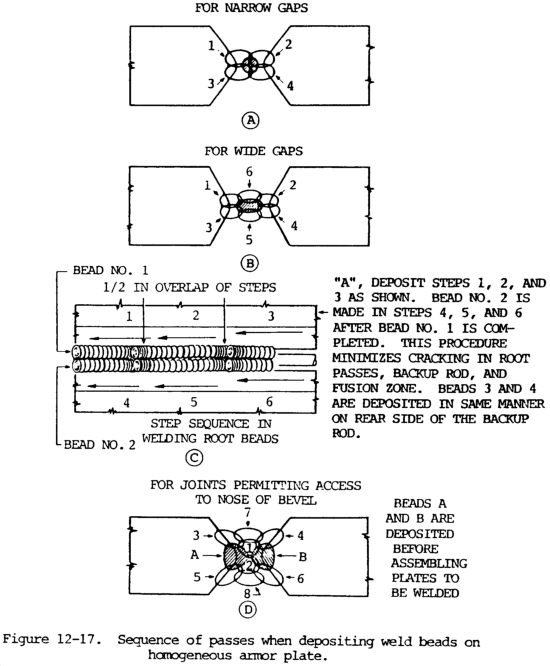
(d) Sequence of welding passes.
(e) Welding stresses and warpage.
(f) Proper protection or removal of flammable materials and equipment in the vicinity of the welding operation.
c. The advantages of welding as an expedient for field repair to damaged armor plate lie principally in the speed and ease with which the operation can be performed. The welding procedures for making repairs in the field are basically the same as those used for industrial fabrication. They must be modified at times because of the varying types of damage due to impact, such as the following:
(1) Complete shell penetration.
(2) Bulges or displaced sections.
(3) Surface gouges.
(4) Linear cracks of various widths terminating in the armor or extending to its outside edges.
(5) Linear or transverse cracks in or adjacent to welded seams.
d. Many repairs made by welding require the selective use of patches obtained by cutting sections from completely disabled armored vehicles having similar armor plate. Also, most of the welding, whether around patches or along linear seams, is performed under conditions that frequently will permit no motion of the base metal sections to yield under contraction stresses produced by the cooling weld metal. The stress problem is further complicated by stresses produced by projectiles physically drifting the edges of the armor at the point of impact or penetration. It is with all these variables in mind that the subsequent plate welding procedures are determined.
12-34. PROPERTIES OR ARMOR PLATE
Armor plate is an air hardening alloy steel, which means that it will harden by normalizing or heating to its upper critical point and cooling in still air. The base metal quenching effect produced adjacent to a weld in heavy armor plate under normal welding conditions is about halfway between the effects of air cooling and oil quenching. The extremely steep thermal gradients occuring in the region of a weld range from temperatures of 3000°F (1649°C) or more in the weld metal to the original temperature of the base metal. Therefore, a narrow zone on each side of the deposited weld metal is heated above its critical temperature by the welding heat and quenched by the relatively cold base metal to form a hard brittle zone. It is in this hard, nonductile formation, known as martensite, that cracks are more likely to occur as a result of the sudden application of load. For this reason, special precautions must be taken in all welding operations to minimize the formation of these hard zones and to limit their effect on the structural properties of the welded armor. Care must be taken to prevent rapid cooling of the armor after welding in order to avoid the formation of cracks in these hard zones.
12-35. TYPES OF ARMOR PLATE
a. General. Two types of armor are used on combat vehicles: homogeneous (cast or rolled) and face hardened (rolled). It is essential that the armor be specifically identified before any welding or cutting operations are performed. This is important because the welding procedures for each type of armor are distinctly different and noninterchangeable.
b. Homogeneous Armor. Homogeneous armor is heat treated through its entire thickness to develop good shock or impact resisting properties. As its name indicates, it is uniform in hardness, composition, and structure throughout and can be welded on either side. Aluminum armor plate is in the homogeneous class and welding procedures are the same as gas metal-arc welding (para 10-12).
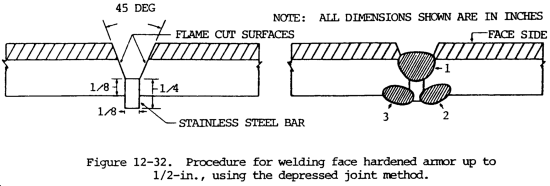
c. Face Hardened Armor Plate. Face hardened armor plate has an extremely hard surface layer, obtained by carburizing, which extends to a depth of 1/5 to 1/4 of the outward facing thickness of the armor on the tank or armored vehicle. The primary purpose of face hardened armor is to provide good resistance to penetration. The inner side is comparatively soft and has properties similar to those of homogeneous armor. The inside and outside of face hardened armor plate are two different kinds of steel. Face hardened steel up to 0.5 in. (12.7 mm) in thickness should be welded from the soft side only.
12-36. IDENTIFICATION OF ARMOR PLATE
a. File Test. This test is a simple but accurate method of identifying armor plate. A file will bite into homogeneous armor plate on both sides, but will only bite into the soft side of face hardened armor plate. When applied to the face side, the file will slip, acting in much the same manner as on case hardened steel.
b. Appearance of Fracture. The metal edges of holes or cracks in homogeneous armor plate are ragged and bent, with the metal drifted in the direction of the forces which damaged the armor. Cracks in homogeneous armor are usually caused by stresses and are present at severe bulges or bends in the plate or section. The metal edges of holes and cracks in face hardened armor are relatively clean cut and sharp. The plates do not bulge to any great extent before cracking. By examining the edges of freshly broken face hardened armor, it can be noted that the metal at the face side is brighter and finer in structure than the metal at the soft side. The brighter metal extends to a depth of approximately 1/5 to 1/4 of the thickness from the surface of the side.
12-37. CUTTING ARMOR PLATE
a. Cutting Homogeneous Armor Plate. Either the oxygen cutting torch, which is preferable, or the electric arc can be used to cut homogeneous armor plate. The carbon arc can be used to cut out welds and to cut castings and plates, but the shielded metal-arc is preferred when oxygen and acetylene are not available.
b. Cutting Face Hardened Armor Plate.
(1) General. The procedure for cutting this type of armor is essentially the same as that required for homogeneous armor except that every precaution should be taken to keep as much heat as possible away from the hard face side of the plate. This is accomplished by performing all cutting operations from the soft side of the armor, thus limiting the extent of heating and consequent softening of the hardened surfaces.
(2) Cutting with the oxygen torch.
(a) The general practice used for oxygen torch cutting can be applied for cutting armor plate, but the tip size, cutting oxygen, and preheating gas temperatures should be kept at the minimum consistent with good quality cuts to prevent overheating.
(b) When the cutting of the stainless steel type of weld, such as is used on tanks and other armored vehicles, is performed with an oxygen cutting torch, the cutting process must be modified to suit. This is necessary because stainless steel is a nonoxidizing metal. Cutting is therefore accomplished by using an oxidizable steel rod in conjunction with the oxygen cutting torch. The oxygen combines with the steel rod and the resultant evolution of high temperature creates high temperature molten steel at the end of the rod. Drops of this molten steel are formed at the end of the rod and wash off onto the weld to help melt it. This washing action is accomplished by an oscillating motion of the torch tip which tends to cause the molten weld metal to wash away in thin layers. When thick welds are cut, the steel rod should be held against the side of the weld and fed downward as required to supply sufficient heat. The oscillating motion should also be used to aid in the removal of the metal. The cutting process in which the steel rod is used is illustrate in figure 12-13.
(c) Cracks or other defects on the face of stainless steel welds can be removed by holding the cutting tip at a slight angle from the face of the weld as shown in figure 12-14. The reaction between the cutting oxygen and the steel rod develops sufficient heat to melt the weld metal which is washed away. The surface of the joint then can be rewelded.
(3) Cutting with the electric arc.
(a) Electric arc cutting is a group of processes whereby metal is cut using the heat of an arc maintained between the electrode and the base metal. Three procedures, described below, are used in cutting with the electric arc.
(b) Carbon-arc cutting is a process wherein the cutting of metal is affected by progressive melting with the heat of an electric arc between a metal electrode and the base metal. Direct current straight polarity (electrode negative) is preferred. Under some conditions, the carbon arc is used in conjunction with a jet of compressed air for the removal of defective austenitic weld metal. The carbon arc is utilized for cutting both ferrous and nonferrous metal, but does not produce a cut of particularly good appearance. The electrodes are either carbon or graphite, preferably with a pointed end to reduce arc wandering and produce less erratic cuts.
(c) Metal-arc cutting is a process whereby the cut is produced by progressive melting. Direct current straight polarity is preferred. Coated electrodes ranging in diameter from 1/8 to 1/4 in. (3.2 to 6.4 mm) are used; larger diameters are not satisfactory because of excessive spatter. The thickness of the metal that can be cut by the metal-arc process is limited only by useful length of the electrodes, which are obtainable in 14.0 and 18.0 in. (355.6 and 457.2 mm) lengths. The principal purpose of the electrode coating is to serve as an insulator between the core of the electrode and the side wall of the cut and, consequently, the cut is made with less short-circuiting against the kerf. The cut provided by metal-arc cutting is less ragged than that produced with the carbon-arc. Nevertheless, it is not satisfactory for welding without further preparation by grinding or chiseling. It is used for cutting both ferrous and nonferrous metals.
(d) Oxy-arc cutting is accomplished by directing a stream of oxygen into the molten pool of metal. The pool is made and kept molten by the arc struck between the base metal and the coated tubular cutting rod, which is consumed during the cutting operation. The tubular rod also provides an oxidizing flux and a means of converging oxygen onto the surface being cut. The tubular cutting electrode is made of mild steel. The possibility of contamination is eliminated by the combination of extremely high heat and oxygen under pressure, which act together to oxidize the rod and coating at the point of the arc before the rod metal can fuse with the base metal.
(4) After completing the cut by an arc cutting process, the rough edges and adhering slag should be removed by hammering, chipping, or grinding prior to welding.
12-38. WELDING HOMOGENEOUS ARMOR PLATE
a. General. Welding of damaged armor on vehicles in the field requires, as a preliminary step, that the type of armor be identified by a method such as described in paragraph 12-36. Homogeneous armor plate can be satisfactorily welded using the electric arc welding process and 18-8 stainless steel heavy coated electrodes with reverse polarity. Armored vehicles that have been exposed to conditions of extreme cold shall not be welded until the base metal has been sufficiently preheated to bring the temperature of the base metal in the zone of welding up to at least 100°F (38°C) At this temperature, the metal will be noticeably warm to the touch. If this preheat is not applied, cracking will occur in the deposited weld metal.
b. Procedures.
(1) When simple cracks (A, fig. 12-15) are welded, the edges of the crack should be beveled by means of flame cutting to produce a double V joint (B, fig. 12-15). Care should be taken to round off the comers at the toe and root of the joint. This is necessary to eliminate excessive dilution of the weld metal by base metal when welding at these points. The included angle of bevel should be approximately 45 degrees to provide electrode clearance for making the root welding beads. The root opening should he from 3/16 to 5/16 in. (4.8 to 7.9 mm) depending on the plate thickness (fig. 12-15).
(2) The weld beads deposited at the root of the weld must be of good quality. It is essential that care be taken to prevent cracks, oxide and slag inclusions, incomplete penetration, or excessive weld metal dilution in this area. Some of the methods recommended as preparatory steps for root head welding are shown in figure 12-16. For narrow root openings, a 3/16-in. (4.8-mm) stainless steel electrode without coating can be tack welded in place (A, fig 12-16). Welding bead numbers 1, 2, 3, and 4 are then deposited in that order. All slag and oxides should be removed from the joint before beads number 3 and 4 are deposited to insure a sound weld in this zone. If a mild steel rod or strip is used instead of a stainless steel rod (B, fig. 12-16), the back side of the backing rod or strip should be chipped out after beads 1 and 2 are deposited to minimize dilution in beads 3 and 4. The use of a stainless steel strip as a backing for root beads in a wide root opening is shown at C, figure 12-16, together with the sequence of root beads. The alternate method, with a mild steel strip, is shown at D, figure 12-16. When the alternate method is used, the backing rod or strip should be chipped out before depositing beads 3 and 4. Another procedure uses a copper backing bar (E, fig. 12-16). The copper bar is removed after beads 1 and 2 are deposited; the beads will not weld to the bar. Beads 3 and 4 are then deposited. In certain cases where plates of homogeneous armor are cracked along their entire length, thus permitting easy access to the entire cross section of the plate, another method of joint preparation can be used (F, fig. 12-16). The beads deposited at the root of the bevel act as a backing for beads subsequently deposited.
(3) A major factor to consider when welding cracks in armor that terminate within the plates is weld crater and fusion zone cracking, especially in the foot beads. An intermittent backstep and overlap procedure (C, fig. 12-17) is recommended to overcome or avoid this hazard. It should be noted that all of the welding steps necessary to complete bead number 1 are completed before bead number 2 is started. By backstepping the passes, the craters at the end of each pass are located on previously deposited metal and are therefore less subject to cracking. All craters on subsequent passes that do not terminate on previously deposited metal should be filled by the hesitation and drawback technique to avoid the formation of star cracks which are caused by the solidification of shallow deposits of molten metal.
(4) Each pass in beads 1, 2, 3, and 4 (A and B, fig. 12�17) is limited to 1 to 2 in. (25.4 to 50.8 mm) in length and should be peened while the weld metal is still hot to help overcome the cooling stresses. No electrode weaving motion should be used when the root beads are deposited, and the welding should be performed preferably with a 5/32-in. (4.0-mm) electrode. Peening also tends to eliminate or minimize warpage in the section being welded. Arc blow should be controlled by properly adjusting the welding. Some of the more common defects encountered when welding root beads on homogeneous armor plate and the proper remedial procedures are shown in figure 12-18.
(5) The sequence of welding beads and the procedure recommended to completely weld the single V joint are shown in figure 12-19. This welding should be performed with 5/32- or 3/16-in. (4.0-to 4.8-mm) electrodes. The electrode is directed against the side wall of the joint to form an angle of approximately 20 to 30 degrees with the vertical. The electrode should also be inclined 5 to 15 degrees in the direction of the welding. By this procedure, the side wall penetration can be effectively controlled. The electrode weaving motion should not exceed 2-1/2 electrode core wire diameters. This is important because stainless steel has a coefficient of expansion approximately 1-1/2 times that of mild steel. Consequently, if a weaving motion greater than that recommended is used, longitudinal shrinkage cracks in the weld or fusion zone may develop. The thickness of the layer of metal deposited can be varied by controlling the speed of welding.
(6) The sequence of passes used for completely filling a double V joint (fig. 12-20) was determined after consideration of all the foregoing factors. The depth of penetration of weld metal into base metal should be controlled in order to obtain good fusion without excessive dilution of the weld. Excessive dilution will cause the weld to be nonstainless, brittle, and subject to cracking. Proper penetration will produce long, scalloped heat affected zone on each side of the weld (A and B, fig. 12-20). Insufficient penetration (surface fusion) will produce a fairly straight edged heat affected zone on each side of the weld. This condition is undesirable from the standpoint of good ballistic properties.
(7) By alternating the deposition of metal, first on one side of the joint and then the other, a closer control of heat input at the joint is obtained and the shape of the welded structure can be maintained. Each layer of metal deposited serves to stress relieve the weld metal immediately beneath it, and will also partially temper the heat affected zone produced in the base metal by the previous welding bead. The passes at the toe of each weld layer also serve as annealing passes. They are deposited before intermediate passes are added to completely fill the intervening space (see passes 9 and 11, 12 and 14, 15 and 16, 18 and 20, etc., fig. 12-20). These annealing passes are important factors in the elimination of fusion zone cracks which might start at the surface of the weld. Through careful control of the depth of penetration, a heat affected zone with a scalloped effect is produced.
c. Emergency Repairs. Emergency repairs on cracked armor plate can be made by using butt straps on the back of the cracked armor (fig. 12-21). The primary purpose of these butt straps is to strengthen the section weakened by the crack.
d. Repairing Penetrations. Complete penetrations in homogeneous armor plate are repaired by using the procedures shown in figures 12-22 through 12-24. Considerable structural damage is done to the metal immediately adjacent to the shell penetration (fig. 12-23). A sufficient amount of metal should be removed to ensure complete freedom from protrusions and subsurface cracks, and good contact between the patch and the base armor plate as shown in figure 12-22. Where the projectile penetration openings are large, relative to the thickness of the plate, a plug patch of homogeneous armor having the same thickness as the base metal should be used. The plug patch should be shaped and welded in place as shown in figure 12-24. Sma1l diameter penetrations in armor can be repaired by plug welding without the use of patches.
e. Repairing Bulges. Bulges in armor that are also cracked but do not interfere with the operation of internal mechanisms in the vehicle can be repaired by welding the cracked section, using the procedure previously described in this section. For best repairs, however, the bulge should be cut out and a patch inserted. Where bulges interfere with the operation of internal mechanisms, grinding or chipping of the bulged surface can be applied to remove the interference. In all cases, the welds should be made to the full thickness of the plate and all cracks over 1/4 in. (6.4 mm) in width should be chipped out before rewelding.
f. Repair Made from One Side. Where it is not feasible to make the welding repair from both sides of the armor, the joint must necessarily be made from one side (fig. 12-19). Either a butt strap or stainless steel strip can be used as a backup for the root beads of the weld.
g. Repairs with Nonwelded Butt Strap. For applications where a butt strap would interfere with the operation of internal mechanisms, a technique is used that permits removal of the butt strap after welding (fig. 12-25). This welding technique was developed to permit welding a single V joint in homogeneous armor plate without welding the butt strap to the deposited weld metal. It involves changing the angle at which the electrode is held during the side to side weaving motion, which is used in making the root pass. By increasing the electrode angle to approximately 60 degrees from the vertical at the middle of the weave and increasing the weaving speed simultaneously (A, fig. 12-25), all the deposited metal is welded only to the previously deposited metal. At each end of the weave, the weaving speed of the electrode is decreased while simultaneously decreasing the electrode angle to approximately 15 degrees from the vertical, and the electrode is held adjacent to the side wall momentarily to ensure good side wall penetration (B, fig. 12-25). After depositing the root pass, the butt strap can be removed by breaking the tack welds securing it to the bottom face of the armor. If desired, a finish pass can be applied to the root of the weld after removing the butt strap.
h. Repairing Gouges. When armor is struck by a projectile impacting at an angle and is thus gouged at the surface, the gouge should be prepared in a double V joint design to allow welding from both sides (fig. 12-26). Merely filling the gouge with weld metal is an unsatisfactory procedure as this does not remove any subsurface cracks that may have been caused by the shell impact. Also, the heat affected zone produced at the base of the filled-in gouge has poor ballistic strength.
12-39. WELDING FACE HARDENED ARMOR PLATE
a. General.
(1) Face hardened armor plate can be welded satisfactorily using the arc welding process and 18-8 stainless steel, heavy coated electrodes with reverse polarity. The face side of face hardened armor is extremely hard and brittle. Special precautions must be taken to avoid excessive heating and distortion of the plate to prevent cracking of the face due to the resulting stresses. A satisfactory method for welding this type of armor makes use of the butt strap and plug weld technique. The welding procedure for face hardened armor varying from 1/4 to 1.0 in. (6.4 to 25.4 mm) in thickness is illustrated in figures 12-27 and 12-28. The welding is done from the soft side of the armor plate and the strength of the joint depends on the soundness of the plug welds. The butt strap should be cut to conform to dimensions given for the particular thickness of face hardened armor being welded. The butt strap is tack welded to the soft side of the armor through elongated slots cut into the strap. The plugs should then be welded to completely fill the slots without excessive weld reinforcement or undercutting at the surface of the plug. These precautions are necessary to eliminate surface discontinuities which act as stress raisers and are a source of crack formations under impact loads. To effectively seal the crack in face hardened armor against lead spatter, and where watertightness is required, a seal head weld should be made on the soft side and ground flush before applying the butt strap. All welding should be performed on clean, scale-free surfaces. Previously deposited weld metal should be thoroughly cleaned by chipping and wire brushing to remove slag and oxides and insure sound welds.
(2) Crater cracks can be eliminated by the backstep and overlap procedures, or by using the electrode hesitation and drawback technique. Crater cracks formed in the initial weld passes should be chipped out before additional weld metal is applied. They can be welded out successfully on all subsequent passes of the weld. As a further precaution, string beads should be used for the initial passes. For subsequent passes, do not weave the electrode more than 2-1/2 electrode core wire diameters. The efficiency of the joint welded by this method depends on good fusion to the base metal and side walls of the slots in the butt strap.
(3) If straightening is necessary, do not hammer on the face of the armor; all hammering should be done on the soft side, on the butt strap, or on the plug welds. Force should not be applied to straighten face hardened armor if the applied force will produce tension on the face side.
(4) Where two or more butt straps are used to repair irregular cracks or to make a patch weld, the butt straps are welded together for additional strength (fig. 12-29).
b. Armor Plate Repair Methods.
(1) Corner joints can be repaired by using angle iron for butt straps (fig. 12-30). The same procedures are followed in making plug welds as used for repairing cracked armor.
(2) Although the butt strap method is satisfactory for repairing damaged face hardened armor up to 1 in. (25.4 mm) thick and heavier, it is usually only used on thicknesses up to and including 1/2 in. (12.7 mm) plate. Another accepted procedure for welding face hardened armor more than 1/2 in. thick is a double V joints method requiring that the soft side be completely welded before any welding is attempted on the face side of the plate (fig. 12-31). By using string bead welding and the backstep and overlap procedure for the root passes, the danger of cracking is held to a minimum. Additional passes can be run straight out; however, no weaving should be used on this type of joint in order to keep the structure free from warpage. The depressed joint method is modified procedure for welding face hardened armor up to and including 1/2 in. (12.7 mm) in thickness (fig. 12-32). This joint is made by using a stainless steel bar 1/8 x 1/4 in. (3.2 x 6.4 mm) in cross section. The principal advantages of this joint are its simplicity and good structural and ballistic properties. Care should be taken that no welding is done on the hard face side.
c. Armor Plate Welding Electrodes.
(1) The most satisfactory method for the repair of homogeneous and face hardened armor plate is the arc welding process with stainless steel electrodes.
(2) The oxyacetylene welding process requires heating of a large section of the base metal on either side of the prepared joint to maintain a welding puddle of sufficient size at the joint to weld satisfactorily. This heating destroys the heat treatment imparted to armor plate, causing large areas to become weak structurally and ballistically. In addition, the procedure is slow and produces considerable warpage in the welded sections.
(3) Initial developments in armor plate welding have specified stainless steel electrodes containing 25 percent chromium and 20 percent nickel. In an effort to conserve chromium and nickel, electrodes containing 18 percent chromium and 8 percent nickel in the core wire and small percentages of either manganese or molybdenum, or both, added in the coating produce excellent results. These electrodes are recommended for welding all types of armor plate by the electric arc process without preheating or postheating the structure welded and should be the all position type. By convention, these electrodes are known as manganese modified 18-8 stainless steel and molybdenum modified 18-8 stainless steel electrodes.
d. Current and Polarity. The recommended welding current settings listed are for direct current reserves polarity, all position, heavy coated, modified 18-8 stainless steel electrodes. The exact current requirements will be governed to some extent by the joint type, electrode design, and position of welding.
|
Electrode diameter (in.) |
Current range (amps) |
|
1/8 |
90 to 100 |
|
5/32 |
110 to 130 |
e. Electrode Requirements. Field repair units will require the various type electrodes in approximately the following proportions:
|
Electrode diameter (in.) |
Percentage of electrode |
|
1/8 |
20 |
|
5/32 |
60 |
|
3/16 |
20 |
12-40. STRENGTHENING RIVETED JOINTS IN ARMOR PLATE
In order to strengthen riveted joints in armor plate which have been made with buttonhead rivets, a seal bead weld is recommended (fig. 12-33). The arc is struck at the top of the rivet with a stainless steel electrode and held there for a sufficient length of time to melt approximately 1/2 in. (12.7 mm) of the electrode. A bead is then deposited along the curved surface of the rivet to the armor plate and continued around the edge of the rivet until the rivet is completely welded to the armor plate. The seal bead weld prevents the rivet head from being sheared off and the shank of the rivet from being punched through the plate. Countersunk rivets are sealed in the same manner. The rivets in joints made in face hardened armor should be seal welded only on the soft side of the plate.
Section VIII. PIPE WELDING
12-41. GENERAL
Pipe operating conditions in the handling of oil, gases, water, and other substances range from high vacuum to pressure of several thousand pounds per square inch. Mechanical joints are not satisfactory for many of these services. Electric arc or oxyacetylene welding provide effective joints in these services and also reduce weight, increase the strength, and lower the cost of pipe installations.
12-42. PREPARATION FOR WELDING
a. Pipe Beveled by Manufacturer. Pipe to be welded is usually supplied with a single V bevel of 32-1/2 degrees with a 1/16-in. (1.6-mm) root face for pipe thicknesses up to 3/4 in. (19.1 mm). A single U groove is used for heavier pipe. If the pipe has not been properly beveled or has been cut in the field, it must be beveled prior to welding.
b. Cutting of Pipe. This operation is necessary when pipe must be cut to suit a specific length requirement. To ensure a leak proof welded joint, the pipe must be cut in a true circle in a plane perpendicular to the center line of the pipe. This may be accomplished by using a strip of heavy paper, cardboard, leather belting, or sheet gasket material with a straight edge longer than the circumference of the pipe to be welded. The material is wrapped around the pipe and overlapped and the pipe marked along the edge of the material with a soapstone pencil. Pipe with a wall thickness exceeding 1/8 in. (3.2 mm) should be cut first with a straight cut, then beveled with a hand torch to a 30 to 35 degree angle, leaving a shoulder of approximately 1/8 in. (3.2 mm).
c. Cleaning of Pipe. After beveling, remove all rust, dirt, scale, or other foreign matter from the outside of the pipe in the vicinity of the weld with a file, wire brush, grinding disk, or other type of abrasive. If the bevels are made by oxyacetylene cutting, the oxide formed must be entirely removed. The inside of the pipe in the vicinity of the weld may be cleaned by a boiler tube and flue cleaner, by sandblasting, by tapping with a hammer with an airblast followup, or by any other suitable method, depending on the inside diameter of the pipe. Care must be taken to clean the scarf faces thoroughly.
d. Aligning the Joint.
(1) A pipe lineup clamp should be used to align and securely hold the pipe ends before tack welding. A spacing tool to separate the pipe ends can be made from an old automobile spring leaf. The spacing for oxyacetylene welding should be approximately 1/8 in. (3.2 mm); for arc welding, the spacing depends on the size of the electrode used for the root pass.
(2) If a pipe lineup clamp is not available, the pipe section must be set in a jig so that their center lines coincide and the spacing of the pipe ends is uniform prior to tack welding. An angle iron (fig. 12-34) will serve as a jig for small diameter pipe, while a section of channel or I-beam is satisfactory for larger pipe.
(3) When a backing ring is used and it is desired to weld to the backing ring, the spacing should not be less than the diameter of the electrode used for the root pass. When welding to the backing ring is not desired, the spacing should not exceed one half the electrode diameter, and varies from this diameter to zero, depending on whether a small or large angle of bevel is used.
e. Backing Rings and Tack Welding.
(1) The purpose of a backing ring is to make possible the complete penetration of the weld metal to the inside of the pipe without excessive burning through, to prevent spattered metal and slag from entering the pipe at the joint, and to prevent the formation of projections and other irregular shaped formations of metal on the inside of the joint. Backing rings also aid materially in securing proper alignment of the pipe ends and, when used, are inserted during assembly of the joint. Backing rings are not used when the pipe service requires a completely smooth inner pipe surface of uniform internal diameter.
(2) There are several types of backing rings: the plain flat strip rolled to fit the inside of the joint; the forged or pressed type (with or without projections); the circumferential rib which spaces the pipe ends the proper distance apart; and the machined ring. All shapes may be of the continuous or split ring types. Several backing rings are shown in figure 12-35.
(3) Backing rings should be made from metal that is readily weldable. Those used when welding steel pipe are usually of low carbon steel.
(4) When the pipe ends have been properly aligned, four tack welds should be made. They should be one-half the thickness of the pipe and equally spaced around the pipe.
12-43. MAKING TEMPLATE PATTERNS
a. General. A template pattern is useful when cutting pipe for a 90 degree bend or other types of joints, such as a tee joint.
b. Material. The material necessary for making a template pattern consists of a ruler, a straight-edge, a compass, an angle, a piece of heavy paper, and a pencil.
c. Preparation of a Template.
(1) The information contained in table 12-6 is helpful in preparing a template.
(2) Lay out the joint full or actual size, with the outside diameter of the pipe (table 12-6, column (2)) represented by the parallel lines (fig. 12-36). Then inscribe a circle of the same diameter, divide it into the correct number of equal parts (column (3)), and number each part beginning with zero.
(3) Extend each point on the circumference of the circle to the line AA, numbering each intersection to correspond with the points on the circle (fig. 12-37). Now draw line BB, as shown, 3.0 in. (76.2 mm) from the corner of the pipe joint.
(4) Next, lay off a line, CC, representing the circumference of the circle as determined from table 12-6, column (4). Divide the line into the same number of equal parts as the circle. At each division, draw a line perpendicular to line CC. Beginning at the left, number each division starting with zero, as shown in fig. 12-38.
(5) Starting at 0, layoff on the vertical line a length equal to B-0. On line 1, lay off a length equal to B-1; on line 2, B-2; and so forth. Join the extremities of these lines. The result will be a curve A'A', corresponding to the line AA in figure 12-36.
(6) Cut out the pattern along edges CA', A'A', A'C, and CC. Wrap the pattern around the pipe. Mark the pipe and soapstone or red lead along the line A'A'. This is the cutting edge. Cutting the two pieces of pipe on the line A'A' and fitting them together will result in a 90 degree bend which requires no further trimming. After cleaning and beveling the pipe, it may be welded.
(7) A tee joint, figure 12-39, can be made by applying the above procedure, as shown in figure 12-40. The resulting template pattern, figure 12-41, is cut out and wrapped around the outlet of the tee. A circle will be inscribed upon the outlet, and the outlet is cut. Next, the pattern is placed on the run and the outline marked and cut. After cleaning and beveling, the pipe may be welded.
12-44. PIPE WELDING PROCESSES
a. General. The most commonly used processes for joining pipe are the manual oxyacetylene process and manual shielded metal-arc process. Automatic and semiautomatic submerged arc, inert gas metal-arc, and atomic hydrogen welding are also used. particularly in shop operations. The manual shielded metal-arc process may be used for welding all metals used in piping systems, whereas manual oxyacetylene welding is generally limited to small size piping or to welding operations where clearances around the joints are small. The equipment required for the oxyacetylene process is also much less expensive and more portable than that required for shielded metal-arc welding.
b. Shielded Metal-Arc Process.
(1) The shielded metal-arc process can be used for welding pipe materials such as aluminum, magnesium, and high chromium-nickel alloys that are difficult to weld by other processes. In shielded metal-arc welding, the number of passes required for welding ferrous metal piping varies with the pipe thickness, the welding position, the size of the electrode, and the welding current used.
(2) The number of passes required for welding low alloy and low carbon steel pipe depends on the thickness of the pipe, the welding position, the size of the electrode, and the current used but, in general, is approximately one pass for each 1/8 in. (3.2 mm) of pipe thickness. When welding in the horizontal or rolled position, the number of layers is usually increased 25 to 30 percent. Smaller electrodes are used to lessen the heat concentration and to ensure complete grain refinement of the weld metal.
(3) The electrodes used vary from 1/8 to 5/32 in. (3.2 to 4.0 mm) diameter for the first pass, 5/32 in. (4.0 mm) diameter for the intermediate passes, and up to 3/16 in. (4.8 mm) for the top passes and reinforcement.
c. Manual Oxyacetylene Welding. The number of passes required for pipe welding with the oxyacetylene flame depends on the thickness of the pipe, the position of the pipe, and the size of the welding rod used. The thickness of the deposited layer is somewhat more than that deposited by the shielded metal-arc process.
(1) In manual shielded metal-arc welding, as much welding as possible is done in the flat or downhand position using suitable power driven equipment for rotating the pipe at a speed consistent with the speed of welding. When the pipe is in a fixed horizontal position, the weld is usually made from the bottom upward. With thin or medium thickness pipe, the welding is done downward. More metal is deposited when welding upward. Complete grain refinement is easier to achieve, and welding downward requires a much higher degree of manual skill.
(2) When the pipe is in a fixed vertical position, it is customary to deposit the filler metal in a series of overlapping string beads, using 1/8 in. (3.2 mm) maximum electrodes, and allowing 25 to 30 beads per square inch of weld area.
(3) When welding by the oxyacetylene process, the directions of welding as described above will, in general, apply. Backhand welding is used when welding downward, and forehand welding is used when welding upward.
12-45. PIPE WELDING PROCEDURES
a. Horizontal Pipe Rolled Weld.
(1) Align the joint and tack weld or hold in position with steel bridge clamps with the pipe mounted on suitable rollers (fig. 12-42). Start welding at point C, figure 12-42, progressing upward to point B. When B is reached, rotate the pipe clockwise until the stopping point of the weld is at point C and again weld upward to point B. When the pipe is being rotated, the torch should be held between B and C and the pipe rotated past it.
(2) The position of the torch at A (fig. 12-42) is similar to that for a vertical weld. As B is approached, the weld assumes a nearly flat position and the angles of application of the torch and rod are altered slightly to compensate for this change.
(3) The weld should be stopped just before the root of the starting point, so that a small opening remains. The starting point is then reheated, so that the area surrounding the junction point is at a uniform temperature. This will ensure a complete fusion of the advancing weld with the starting point.
(4) If the side wall of the pipe is more than 1/4 in. (6.4 mm) in thickness, a multipass weld should be made.
b. Horizontal Pipe Fixed Position Weld.
(1) After tack welding, the pipe is set up so that the tack welds are oriented approximately as shown in figure 12-43. After welding has been started, the pipe must not be moved in any direction.
(2) When welding in the horizontal fixed position, the pipe is welded in four steps.
Step 1. Starting at the bottom of 6 o'clock position, weld upward to the 3 o'clock position.
Step 2. Starting back at the bottom, weld upward to the 9 o'clock position.
Step 3. Starting back at the 3 o'clock position, weld to the top.
Step 4. Starting back at the 9 o'clock position, weld upward to the top overlapping the bead.
(3) When welding downward, the weld is made in two stages. Start at the top overlapping the bead. (fig. 12-44) and work down one side (1, fig. 12-44) to the bottom, then return to the top and work down the other side (2, fig. 12-44) to join with the previous weld at the bottom. The welding downward method is particularly effective with arc welding, since the higher temperature of the electric arc makes the use of greater welding speeds possible. With arc welding, the speed is approximately three times that of the upward welding method.
(4) Welding by the backhand method is used for joints in low carbon or low alloy steel piping that can be rolled or are in horizontal position. One pass is used for wall thicknesses not exceeding 3/8 in. (9.5 mm), two passes for wall thicknesses 3/8 to 5/8 in. (9.5 to 15.9 mm), three passes for wall thicknesses 5/8 to 7/8 in. (15.9 to 22.2 mm), and four for wall thicknesses 7/8 to 1-1/8 in. (22.2 to 28.6 mm).
c. Vertical Pipe Fixed Position Weld. Pipe in this position, where the joint is horizontal, is most frequently welded by the backhand method (fig. 12-45). The weld is started at the tack and carried continuously around the pipe.
d. Multipass Arc Welding.
(1) Root beads. If a lineup clamp is used, the root bead (A, fig. 12-46) is started at the bottom of the groove while the clamp is in position. When no backing ring is used, take care to build up a slight bead on the inside of the pipe. If a backing ring is used, the root bead must be carefully fused to it. As much root bead as the bars of the lineup clamp permit should be applied before the will clamp is removed. Complete the bead after the clamp is removed.
(2) Filler beads. Ensure the filler beads (B, fig. 12-46) are fused into the root bead in order to remove any undercut caused by the deposition of the root bead. One or more filler beads around the pipe will usually be required.
(3) Finish beads. The finish beads (C, fig. 12-46) are applied over the filler beads to complete the joint. Usually, this is a weave bead about 5/8 in. (15.9 mm) wide and approximately 1/16 in. (1.6 mm) above the outside surface of the pipe when complete. The finish weld is shown at D.
Section IX. WELDING CAST IRON, CAST STEEL,
CARBON STEEL, AND FORGINGS
12-46. CAST IRON, CAST STEEL, CARBON STEEL, AND FORGINGS
a. In general, parts composed of these metals can be repaired by the same procedure as that used for their assembly. They can also be repaired by brazing or soldering if the joining equipment originally used is not available or suitable for the purpose. For instance, cast iron and cast steel may be repaired by gas welding, arc welding, or by brazing. Parts or sections made of carbon steel originally assembled by spot, projection, or flash welding may be repaired by gas or arc welding. The same is true of forgings.
b. Gray cast iron has a low ductility and therefore will not expand or stretch to any considerable extent before breaking or cracking Because of this characteristic, preheating is necessary when cast iron is welded by the oxyacetylene process. It can, however, be welded with the metal-arc process without preheating if the welding heat is carefully controlled. Large castings with complicated sections, such as motor blocks, can be welded without dismantling or preheating. Special electrodes designed for this purpose are usually desirable.
c. Generally, the weldability of cast steel is comparable to that of wrought steels. Cast steels are usually welded in order to join one cast item to another or to a wrought steel item, and to repair defects in damaged castings. The weldability of steels is primarily a function of composition and heat treatment. Therefore, the procedures and precautions required for welding wrought steel also apply to cast steels of similar composition, heat treatment, and strength. Welding of cast steels can sometimes be simplified by first considering the load in the area being welded and the actual strength needed in the weld. Castings are often complex; a specific analysis may be required for only part of the entire structure. When welding a section of steel casting that does not require the full strength of the casting, lower-strength weld rods or wires can sometimes be used, or the part being welded to the casting can be of lower strength and leaner analysis than the cast steel part. Under such conditions, the deposited weld metal usually has to match only the strength of the lower-strength member. With heat-treatable electrodes, the welding sometimes can be done before final heat-treating. After being subjected to an austenitizing treatment (heating above the upper critical temperature), weld deposits with carbon contents less than 0.12 percent usually have lower mechanical properties than they have in the as welded or stress-relieved condition.
d. Carbon steels are divided into three groups: low, medium, and high.
(1) Low carbon steels include those with a carbon content up to 0.30 percent. These low carbon steels do not harden appreciably when welded and therefore do not require preheating or postheating except in special cases, such as when heavy sections are to be welded.
(2) Medium carbon steels include those that contain from 0.30 to 0.55 percent carbon. These steels are usually preheated to between 300 and 500°F (149 and 260°C) before welding. Electrodes of the low carbon, heavy coated, straight or reverse polarity type, similar to those used for metal arc welding of low carbon steels, are satisfactory for steels in this group. The preheating temperature will vary depending on the thickness of the material and its carbon content. After welding, the entire joint should be heated to between 1000 and 1200°F (538 and 649°C) and slow cooled to relieve stresses in the base metal adjacent to the weld.
(3) High carbon steels include those that have a carbon content exceeding 0.55 percent. Because of the high carbon content and the heat treatment usually given to these steels, their basic properties are impaired by arc welding. Preheating 500 to 800°F (260 to 427°C) before welding and stress relieving by heating from 1200 to 1450°F (649 to 788°C) with slow cooling should be used to avoid hardness and brittleness in the fusion zone. Either mild steel or stainless steel electrodes can be used with these steels.
e. Parts that were originally forge welded may be repaired by gas or arc welding.
f. High hardness alloy steels are a variety of alloy steels that have been developed to obtain high strength, high hardness, corrosion resistance, and other special properties. Most of these steels depend on a special heat treatment process in order to develop the desired characteristic in the finished state. Many of these steels can be welded with a heavy coated electrode of the shielded arc type whose composition is similar to that of the base metal. Low carbon electrodes can also be used with some steels and stainless steel electrodes where preheating is not practicable or is undesirable. Heat treated steels should be preheated, if possible, in order to minimize the formation of hard zones or layers in the base metal adjacent to the weld. The molten metal should not be overheated, and for this reason, the welding heat should be controlled by depositing the weld metal in narrow string beads. In many cases, the procedure outlined for medium carbon steels and high carbon steels, including the principles of surface fusion, can be used in the welding of alloy steels.
g. High yield strength, low alloy structural steels are special steels that are tempered to obtain extreme toughness and durability. The special alloys and general makeup of these steels require special treatment to obtain satisfactory weldments.
12-47. PROCEDURES
a. Gray Cast Iron.
(1) Edge preparation. The edges of the joint should be chipped out or ground to form a 60 degree angle or bevel. The V should extend to approximately 1/8 in. (3.2 mm) from the bottom of the crack. A small hole should be drilled at each end of the crack to prevent it from spreading. All grease, dirt, and other foreign substances should be removed by washing with a suitable cleaning material.
(2) Welding technique.
(a) Cast iron can be welded with a coated steel electrode, but this method should be used only as an emergency measure. When using a steel electrode, the contraction of the steel weld metal, the carbon picked up from the cast iron by the weld metal, and the hardness of the weld metal caused by rapid cooling must be considered. Steel shrinks more than cast iron when cooled. When a steel electrode is used, this uneven shrinkage will cause strains at the joint after welding. When a large quantity of filler metal is applied to the joint, the cast iron may crack just back of the line of fusion unless preventive steps are taken. To overcome these difficulties, the prepared joint should be welded by depositing the weld metal in short string beads, 3/4 to 1 in. (19.1 to 25.4 mm) long. These should be made intermittently, and in some cases, by the backstep and skip procedure. To avoid hard spots, the arc should be struck in the V and not on the surface of the base metal. Each short length of weld metal applied to the joint should be lightly peened while hot with a small ball peen hammer and allowed to cool before additional weld metal is applied. The peening action forges the metal and relieves the cooling strains.
(b) The electrodes used should be 1/8 in. (3.2 mm) in diameter to prevent excessive welding heat. The welding should be done with reverse polarity. Weaving of the electrode should be held to a minimum. Each weld metal deposit should be thoroughly cleaned before additional metal is added.
(c) Cast iron electrodes are used where subsequent machining of the welded joint is required. Stainless steel electrodes are used when machining of the weld is not required. The procedure for making welds with these electrodes is the same as that outlined for welding with mild steel electrodes. Stainless steel electrodes provide excellent fusion between the filler and base metals. Great care must be taken to avoid cracking in the weld, because stainless steel expands and contracts approximately 50 percent more than mild steel in equal changes of temperature.
(3) Studding. Cracks in large castings are sometimes repaired by "studding" (fig. 12-47). In this process, the fracture is removed by grinding a V groove. Then holes are drilled and tapped at an angle on each side of the groove. Studs are screwed into these holes for a distance equal to the diameter of the studs, with the upper ends projecting approximately 1/4 in. (6.4 mm) above the cast iron surface. The studs should be seal welded in place by one or two beads around each stud and then tied together by weld metal beads. Welds should be made in short lengths and each length peened while hot to prevent high stresses or cracking upon cooling. Each bead should be allowed to cool and be thoroughly cleaned before additional metal is deposited. If the studding method cannot be applied, the edges of the joint should be chipped out or machined. This is done using a round-nosed tool to form a U groove into which the weld metal should be deposited.
(4) Metal-arc brazing of cast iron. Cast iron can be brazed with heavy coated, reverse polarity bronze electrodes. The joints made by this method should be prepared in a manner similar to that used for oxyacetylene brazing of cast iron. The strength of the joint depends on the quality of the bond between the filler metal and the cast iron base metal.
(5) Carbon-arc welding of cast iron. Iron castings may be welded with a carbon arc, a cast iron rod, and a cast iron welding flux. The joint should be preheated by moving the carbon electrodes along the surface, thereby preventing too rapid cooling after welding. The molten puddle of metal can be worked with the carbon electrode to remove any slag or oxides that are formed to the surface. Welds made with the carbon arc cool more slowly and are not as hard as those made with the metal arc and a cast iron electrode. The welds are machinable.
b. Cast Steels.
(1) Joint designs for cast steel weldments are similar to those used for wrought steel.
(2) The choice of electrode filler metal is based on the type of cast steel being used, the strength needs of the joint, and the post-weld heat treatment. When welding carbon or low-alloy cast steels, the electrodes recommended for comparable wrought steel plate should be used. When cast austenitic stainless steels are jointed to either cast or wrought ferritic materials, the proper filler metal depends on the service conditions.
c. Carbon Steels.
(1) Low carbon steels.
(a) Metal-arc welding. In metal-arc welding, the bare, thin coated, or heavy coated shielded arc types of electrodes may be used. These electrodes are of low carbon type (0.10 to 0.14 percent). Low carbon sheet or plate materials that have been exposed to low temperatures should be preheated slightly to room temperature before welding. In welding sheet metal up to 1/8 in. (3.2 mm) in thickness, the plain square butt joint type of edge preparation may be used. When long seams are to be welded on this material, the edges should be spaced to allow for shrinkage because the deposited metal tends to pull the plates together. This shrinkage is less severe in arc welding than in gas welding. Spacing of approximately 1/8 in. (3.2 mm) per foot of seam will suffice. The backstep or skip welding technique should be used for short seams that are fixed to prevent warpage or distortion and minimize residual stresses. Heavy plates should be beveled to provide an included angle up to 60 degrees, depending on the thickness. The parts should be tack welded in place at short intervals along the seam. The first or root bead should be made with an electrode small enough in diameter to obtain good penetration and fusion at the base of the joint. A 1/8 or 5/32 in. (3.2 to 4.0 mm) electrode is suitable for this purpose. This first bead should be thoroughly cleaned by chipping and wire brushing before additional layers of weld metal are deposited. The additional passes of filler metal should be made with a 5/32 or 3/16 in. (4.0 to 4.8 mm) electrode. For overhead welding, best results are obtained by using string beads throughout the weld. When welding heavy sections that have been beveled from both sides, the weave beads should be deposited alternately on one side and then the other. This will reduce the amount of distortion in the welded structure. Each bead should be cleaned thoroughly to remove all scale, oxides, and slag before additional metal is deposited. The motion of the electrode should be controlled to make the bead uniform in thickness and to prevent undercutting and overlap at the edges of the weld.
(b) Carbon-arc welding. Low carbon sheet and plate up to 3/4 in. (19.1 mm) in thickness can be satisfactorily welded by the carbon-arc welding process. The arc is struck against the plate edges, which are prepared in a manner similar to that required for metal-arc welding. A flux should be used on the joint and filler metal added as in oxyacetylene welding. A gaseous shield should be provided around the molten base and filler metal, by means of a flux coated welding rod. The welding should be done without overheating the molten metal. If these precautions are not taken, the weld metal will absorb an excessive amount of carbon from the electrode and oxygen and nitrogen from the air. This will cause brittleness in the welded joint.
(2) Medium carbon steels. The plates should be prepared for welding in a manner similar to that used for low carbon steels. When welding with low carbon steel electrodes, the welding heat should be carefully controlled to avoid overheating of the weld metal and excessive penetration into the side walls of the joint. This control is accomplished by directing the electrode more toward the previously deposited filler metal adjacent to the side walls than toward the side walls directly. By using this procedure, the weld metal is caused to wash up against the side of the joint and fuse with it without deep or excessive penetration. High welding heats will cause large areas of the base metal in the fusion zone adjacent to the welds to become hard and brittle. The area of these hard zones in the base metal can be kept to a minimum by making the weld with a series of small string or weave beads, which will limit the heat input. Each bead or layer of weld metal will refine the grain in the weld immediately beneath it. This will anneal and lessen the hardness produced in the base metal by the previous bead. When possible, the finished joint should be heat treated after welding. Stress relieving is normally used when joining mild steel. High carbon alloys should be annealed. When welding medium carbon steels with stainless steel electrodes, the metal should be deposited in string beads. This will prevent cracking of the weld metal in the fusion zone. When depositing weld metal in the upper layers of welds made on heavy sections, the weaving motion of the electrode should under no circumstances exceed three electrode diameters. Each successive bead of weld should be chipped, brushed, and cleaned prior to the laying of another bead.
(3) High carbon steels. The welding heat should be adjusted to provide good fusion at the side walls and root of the joint without excessive penetration. Control of the welding heat can be accomplished by depositing the weld metal in small string beads. Excessive puddling of the metal should be avoided because this will cause carbon to be picked up from the base which, in turn, will make the weld metal hard and brittle. Fusion between the filler metal and the side walls should be confined to a narrow zone. Use the surface fusion procedure prescribed for medium carbon steels. The same procedure for edge preparation, cleaning of the welds, and sequence of welding beads as prescribed for low and medium carbon steels applies to high carbon steels. Small high carbon steel parts are sometimes repaired by building up worn surfaces. When this is done, the piece should be annealed or softened by heating to a red heat and cooling slowly. Then the piece should be welded or built up with medium carbon or high strength electrodes and heat treated after welding to restore its original properties.
d. Forgings should be welded with the gas or arc processes in a manner similar to parts originally assembled by spot, projection, or flash welding.
e. High hardness alloy steels can be welded with heavy coated electrodes of the shielded arc type whose composition is similar to that of the base metal. Low carbon electrodes can also be used with some steels. Stainless steel electrodes are effective where preheating is not practical or is undesirable. Heat treated steels should be preheated, if possible, in order to minimize formation of hard zones or layers in the base metal adjacent to the weld. The molten metal should not be overheated. For this reason, the welding heat should be controlled by depositing the weld metal in narrow string beads. In many cases, the procedure outlined for medium carbon steels and high carbon steels, including the principles of surface fusion, can be used in the welding of alloy steels.
f. Reliable welding of high yield strength, low alloy structural steels can be performed by using the following guidelines:
(1) Hydrogen is the number one enemy of sound welds in alloy steels. Therefore, use only low hydrogen (MIL-E-18038 or (MIL-E-22200/1) electrodes to prevent underbead cracking. Underbead cracking is caused by hydrogen picked up in the electrode coating, released into the arc and absorbed by the molten metal.
(2) If the electrodes are in an airtight container, immediately upon opening the container place the electrodes in a ventilated holding oven set at 250 to 300°F (121 to 149°C). In the event that the electrodes are not in an airtight container, put them in a ventilated baking oven and bake for 1 to 1-1/4 hours at 800°F (427°C). Baked electrodes should, while still warm, be placed in the holding oven until used. Electrodes must be kept dry to eliminate absorption of hydrogen. Testing for moisture should be in accordance with MIL-E-22200.
NOTE
Moisture stabilizer NSN 3439-00-400-0090 is an ideal holding oven for field use ((MIL-M-45558).
(3) Electrodes are identified by classification numbers which are always marked on the electrode containers. For low hydrogen coatings the last two numbers of the classification should be 15, 16, or 18. Electrodes of 5/32 and 1/8 in. (4.0 and 3.2 mm) in diameter are the most commonly used since they are more adaptable to all types of welding of this type steel.
(4) Wire electrodes for submerged arc and gas-shielded arc welding are not classified according to strength. Welding wire and wire-flux combinations used for steels to be stress relieved should contain no more than 0.05 percent vanadium. Weld metal with more than 0.05 percent vanadium may become brittle if stress relieved. When using either the submerged arc or gas metal-arc welding processes to weld high yield strength, low alloy structural steels to lower strength steels, the wire-flux and wire-gas combination should be the same as that recommended for the lower strength steels.
(5) For welding plates under 1 in. 925.4 mm) thick, preheating above 50°F (10°C) is not required except to remove surface moisture from the base metal.
(6) It is important to avoid excessive heat concentration when welding in order to allow the weld area to cool rather quickly. Either the heat input monograph or the heat input calculator can be used to determine the heat input into the weld.
(7) For satisfactory welds use good welding practices, as defined in section I, along with the following procedures:
(a) Use a straight stringer bead whenever possible.
(b) Restrict weave to partial weave pattern. Best results are obtained by a slight circular motion of the electrode with the weave area never exceeding two electrode diameters.
(c) Never use a full weave pattern.
(d) Skip weld as practical.
(e) Peening of the weld is sometimes recommended to relieve stresses while cooling larger pieces.
(f) Fillet welds should be smooth and correctly contoured. Avoid toe cracks and undercutting. Electrodes used for fillet welds should be lower strength than those used for butt welding. Air hammer peening of fillet welds can help to prevent cracks, especially if the welds are to be stress relieved. A soft steel wire pedestal can help to absorb shrinkage forces. Butter welding in the toe area before actual fillet welding strengthens the area where a toe crack may start. A bead is laid in the toe area, then ground off prior to the actual fillet welding. This butted weld bead must be located so that the toe passes of the fillet will be laid directly over it during actual fillet welding. Because of the additional material involved in fillet welding, the cooling rate is increased and heat inputs may be extended about 25 percent.
Section X. FORGE WELDING
12-48. GENERAL
a. General. This is a group of heating in a forge or other furnace welding processes in which a weld is made by and by applying pressure or blows.
b. Roll Welding. This is a process in which heat is obtained from a furnace and rolls are used to apply pressure.
c. Die Welding. This is a process in which heat is obtained from a furnace and dies are used to apply pressure.
d. Hammer Welding. This is a process in which heat is obtained from a forge or furnace and hammer blows are used to apply pressure.
e. Forge welding, as performed by the blacksmith, is by far the oldest process for joining metal pieces of parts, but hand forge welding is no longer used extensively because of the development of oxyacetylene and electric arc welding. It is, however, an effective process under some field conditions and therefore, equipment and procedures required in hand forge welding are described briefly in this manual.
12-49. APPLICATION
a. In forge welding, metal parts are heated in a forge furnace with fuel such as coal, coke, or charcoal. The parts to be joined are heated until the surface of the metal becomes plastic. When this condition is reached, the parts are quickly superimposed and the weld is made by pressure or hammering. The hammering may be done by either hand or machine. The force of the hammering or pressure depends on the size and mass of the parts being joined. In this process, the surfaces to be joined must be free from foreign matter. In some cases, a flux is used (usually sand or borax sprinkled on the surfaces to be joined) just before the metal reaches the welding temperature in order to remove the oxide and dirt. The flux spreads over the metal, prevents further oxidation by keeping out the air, lowers the melting point of the scale, and makes it fluid so that it can be squeezed out of the weld when the metal is hammered. Various types of forge welds are shown in figure 12-48.
b. Because of the development of machine forge welding, the speed of welding and the size of the parts to be welded have increased greatly. Long seams in lap or butt welded pipe can be made. The quality of the weld is such that its location is almost impossible to detect. This process requires the use of a gas flame or other suitable heating method to bring the edges of the metal up to the welding temperature. Pressure is applied by rolls which press the plastic edges together until another set of rolls roves to the parts being welded along the line of welding.
Section XI. HEAT TREATMENT OF STEEL
12-50. GENERAL
a. Heat treatment of steel may be defined as an operation or combination of operations which involve the heating and cooling of the metal in its solid state in order to obtain certain desirable characteristics or properties. Metal and alloys are primarily heat treated to increase their hardness and strength, to improve ductility, and to soften them for later forming or cutting operations.
b. Alloy steels and plain carbon steels with a carbon content of 0.35 percent or higher can be hardened to the limits attainable for the particular carbon content, or softened as required by controlling the rate of heating, the rate of cooling, and the method of cooling.
c. One of the most important factors in heat treating steels is that the metal should never be heated to a temperature close to its melting point. When this occurs, certain elements in the metal are oxidized (burned out), and the steel becomes coarse and brittle. Steel in this condition usually cannot be restored by any subsequent heat treatment. In general, the lower the carbon content, the higher the temperature to which steels can be heated without being oxidized.
e. The must common problem related to heat treatment are warping, dimensional changes, cracking, failure to harden, soft spots, and excessive brittleness. The following table lists some problems, possible causes, and remedies.
12-51. ANNEALING
a. Annealing is a process involving the heating of a metal above the critical temperature and subsequent slow cooling. The purpose of such heating may be to remove stresses; induce softness; alter ductility, toughness, electrical, magnetic, or other physical properties; refine crystalline structure; remove gases; or produce a definite microstructure.
b. Specific heat treatments which fall under the term annealing are:
(1) Full annealing. This is the heating of iron base alloys above the critical temperature range, holding them above that range for a proper period of time, followed by cooling in a medium which will prolong the time of cooling.
(2) Process annealing. This is the heating of iron base alloys to a temperature below or close to the lower limit of the critical temperature range, followed by cooling as desired.
(3) Normalizing. This is the heating of iron base alloys to approximately 100°F (38°C) above the critical temperature range, followed by cooling to below that range in still air at ordinary temperature.
(4) Patenting. This is the heating of iron base alloys above the critical temperature range, followed by cooling below that range in air, molten lead, a molten mixture of nitrates, or nitrates maintained at a temperature usually between 800 to 1050°F (427 to 566°C), depending on the carbon content of the steel and the properties required of the finished product.
(5) Spheroidizing. This is any process of heating and cooling steel that produces a rounded or globular form of carbide. Methods of spheroidizing generally used are:
(a) Prolonged heating at a temperature just below the lower critical temperature, usually followed by relatively slow cooling.
(b) In the case of small objects of high carbon steels, the spheroidizing result is achieved more rapidly by prolonged heating to temperatures alternately within and slightly below the critical temperature range.
(6) Tempering (also called drawing). This is reheating hardened steel to some temperature below the lower critical temperature, followed by any desired rate of cooling.
(7) Malleablizing. This is an annealing operation performed on white cast iron to partially or wholly transform the combined carbon to temper carbon, and in some cases, to wholly remove the carbon from the iron by decarburization.
(8) Graphitizing. This is a type of annealing of gray cast iron in which sane or all of the combined carbon is transferred to free graphite carbon.
12-52. HARDENING
a. Plain carbon steel is hardened by heating it above the critical temperature and cooling it rapidly by plunging it into water, iced brine, or other liquid. When heating through the critical temperature range, iron undergoes a transformation and changes from a form with low carbon solubility to one with high carbon solubility. Upon cooling, a reverse transformation occurs. Since these changes are progressive and require time for completion, they may be stopped if the cooling period is shortened.
b. If the cooling is very rapid, as in water quenching, the transformation takes place much below the critical temperature range. The carbon is fixed tied in a highly stressed, finely divided state, and the steel becomes hard, brittle, and much stronger than steel that is slowly cooled.
c. The presence of alloying elements alters the rate of transformation on cooling. Each alloy element shows individuality in its effect; therefore, alloy steels are manufactured and heat treated to meet specific performance requirements.
12-53. TEMPERING
After a steel is hardened, it is too brittle for ordinary purposes. Some of the badness should be removed and toughness induced. This process of reheating quench hardened steel to a temperature below the transformation range and then, cooling it at any rate desired is called tempering. The metal must be heated uniformly to a predetermined temperature, depending on the toughness desired. As the tempering temperature increases, toughness increases and hardness decreases. The tempering range is usually between 370 and 750°F (188 and 399°C), but sometimes is as high as 1100°F (593°C).
12-54. SURFACE HARDENING
a. General. A low carbon steel cannot be hardened to any great extent because of its low carbon content, yet the surface can be hardened by means of case hardening. The hardening is accomplished by increasing the carbon content of the surface only.
b. Case Hardening. This process produces a hard surface resistant to wear but leaves a soft, tough core. It is accomplished as follows:
(1) Pack carburizing. The work is placed in a metal container and surrounded by a mixture of carburizing materials. The container is sealed and heated from 1 to 16 hours at 1700 to 1800°F (927 to 982°C). The approximate penetration is 7/1000 in. per hour. Carburizing is usually followed by quenching to produce a hardened case.
(2) Gas carburizing. The work is placed in a gas tight retort and heated to 1700 (927°C). Natural or manufactured gas is passed through the retort until proper depth of hardening is obtained.
(3) Nitriding. The work is placed in an atmosphere of ammonia gas at 950°F (510°C) for a period of 10 to 90 hours. The maximum depth of 3/100 in. will be reached at 90 hours. The work is then removed and cooled slowly. Little warpage will result because of the low temperature. The case must then be ground so that it will be corrosion resistant.
WARNING
Cyanide and cyanide fumes are dangerous poisons; therefore, this process requires expert supervision and adequate ventilation.
(4) Cyaniding. The work is preheated and immersed in a cyanide bath at 1550°F (843°C). Time of immersion varies from a few minutes to 2 hours with a resulting penetration of 1/100 in. per hour. Parts should be tempered if toughness is desired.
(5) Forge case hardening. This process, usually used in the field, is accomplished by preheating work in a forge or with a torch up to 1650°F (899°C), then dipping the work in potassium cyanide or Kasenite and applying the flame until the compound melts. Repeat until required depth is attained and then quench.
c. Induction Hardening. This process is accomplished by the use of high frequency current with low voltage and a water spray to quench the work. It is used only on high carbon steels.
d. Flame Hardening. This process is accomplished by heating the surface to be hardened with an oxyacetylene torch and quenching it in water. The steel must be high in carbon.
12-55. USE OF CARBONIZING COMPOUND PASTE, NSN 6580-00-695-9268, AND ISOLATING PASTE, NSN 6850-00-664-0355, FOR SURFACE HARDENING
a. General. The surface hardness of common steel is directly proportional to its carbon content. Low carbon steels may be given a hard exterior shell by increasing the amount of carbon in their surfaces. If the workpiece to be hardened is packed in material of high carbon content and then brought to a relatively high temperature, the carbon of the packing material transfers to the surface of the workpiece and hardens it when it is quenched. The hard case created by quenching is very brittle and may crack and chip easily. Toughness may be imparted to this brittle case by air cooling, reheating the workpiece to a somewhat lower temperature than that used in the initial hardening, and then quickly quenching it. It is often desired to have only certain parts of a given workpiece hardened while retaining the basic toughness of the steel in the body of the workpiece; for example, the cutting edges of hand tools. This may be accomplished by packing the surfaces to be hardened with the carbonizing material and the balance of the workpiece with an isolating material. Since the material used to pack the workpiece, either for hardening or for isolating, would dry and peel away in the furnace heat, it must be secured to the workpiece by some method of wrapping or shielding.
b. Workpiece of Preparation.
(1) Packing.
(a) Remove all rust, scale, and dirt from the workpiece to be hardened.
(b) Firmly press the nontoxic the surfaces or edges to be hardened. (12.7 mm) thick.
(c) Firmly press the nontoxic isolating past, NSN 6850-00-664-0355, over the balance of the workpiece. The paste should be approximately 1/2 in. (12.7 mm) thick.
(d) If the workpiece temperature is to be recognized by its color, leave a small opening where bare metal can be seen. A similar opening must be provided in the workpiece shielding or wrapping ((2) below)
(e) Whenever possible, a suitable pyrometer or temperature measuring instrument must be used on the furnace, as estimating metal temperature by its color is not accurate.
(2) Shielding and wrapping. Wrap the packed workpiece loosely in a piece of thin sheet iron; or insert it into a piece of tubing of suitable dimension. If available, a metal container about 1 in. (25.4 mm) larger than the workpiece can be used. Fill any space between the workpiece and the container with carbonizing paste and/or isolating paste.
NOTE
If a metal container is to be reused, it should be made of a heat resistant material such as 18 percent chromium-8 percent nickel steel. Sheet iron and plain carbon steel will not stand high temperatures for long periods.
c. Heating.
(1) Place the container with the workpiece of the shielded workpiece in a furnace.
(a) If a heat treating furnace is not available, heating may be done in a forge or with an acetylene torch. When using the forge, keep the work entirely covered with coal, rotating it periodically to ensure even temperatures at all times in all areas.
(b) If an acetylene torch is used, place the work in a simple muffle jacket of bricks similar to figure 12-49. Care should be taken to keep the temperature as even as possible on all areas. Keep the flame out of contact with the workpiece, or with any one particular portion of it.
(2) The workpiece must be heated to 1700°F (927°C) (bright orange). The time needed to reach this temperature depends on the size of the workpiece and the furnace.
(3) Note the time when the workpiece reaches 1700°F (927°C). Hold this heat for the time required to give the desired depth of case hardening. See table 12-8.
(4) Remove the packed workpiece from the furnace after the required heating time.
(5) The heating times listed in table 12-8 are general. They are intended for use with any low carbon steel.
12-56. QUENCHING AFTER CARBURIZING
After the workpiece has been removed from the furnace or forge, remove the shield and packing and allow the workpiece to cool in the air until it reaches 1405°F (763°C). Then quench by plunging it in water or oil if required by the type of steel alloy. This procedure will not produce as good a grain structure as the procedure outlined in paragraph 12-57 below.
12-57. DRAWING AND QUENCHING AFTER CARBURIZING
a. Normal Drawing and Quenching. For better structure in the finished workpiece, heat the workpiece as outlined in paragraph 12-55 (1) through (3), and remove it to cool to a black heat without removing the paste or the shield. Reheat the still-packed workpiece in a furnace or forge to approximately 1450°F (788°C) (orange in furnace) for a few minutes. Then remove it from the heat, remove the shielding and packing, and quench by plunging in water or oil if required by the type of steel alloy.
b. Drawing and Quenching SAE Steel. For the best grain structure in SAE steel workplaces, follow the procedure outlined in a. above, except reheat the SAE steel to the temperature shown in table 12-9 before quenching. The workpiece is tempered after quenching. This method is generally used when the case hardening penetration is from 1/25 to 3/50 in. (1.0 to 1.5 mm).
12-58. MUFFLE JACKET
To construct a temporary muffle jacket (fig. 12-49), use enough fire or refractory bricks to build a boxlike structure with a floor, three sides, and a top. The temporary muffle jacket should be located on a level earth base. The interior cavity should be just large enough to comfortably accommodate the workpiece when wrapped in a shield and the flame of the heat source. The top of the jacket must provide an opening to act as a chimney. Pack the sides, back, and bottom of structure with mist earth to help contain the heat. If fire or refractory bricks are not available, use common building bricks. Make every effort to keep the size of the workpiece such that center supports for the top are not required. If this is not possible, use brick for such center supports.
12-59. HEAT SOURCE
When using an oxyacetylene torch for heat, position the torch so that its flare will be completely within the muffle jacket. Do not allow the flame to be in direct contract with any particular portion of the workpiece. Have sufficient fuel available for 2 to 3 hours of operation at full flame. After the workpiece has been packed, shielded, and placed in the muffle jacket, ignite the torch, adjust the flame for maximum heat, and use additional brick to close about one half of the front opening of the jacket.
Section XII. OTHER WELDING PROCESSES
12-60. RESISTANCE WELDING
a. General. Resistance welding is a type of welding process in which the workplaces are heated by the passage of an electric current through the area of contact. Such processes include spot, seam, projection, upset, and flash welding.
b. Resistance Welding Process.
(1) Spot Welding. This is a resistance welding process wherein coalescence is produced by the heat obtained from resistance to the flow of electric current through the workpieces, which are held together under pressure by electrodes. The size and shape of the individually formal welds are limited primarily by the size and contour of the electrodes. Spot welding is particularly adaptable to thin sheet metal construction and has many applications in this type of work. The spot welding principle is illustrated in figure 12-50.
(2) Roll spot welding. This is a resistance welding process wherein separate spot welds are made without retracting the electrodes. This is accomplished by means of circular electrodes which are in continuous contact with the work.
(3) Seam welding. This is a resistance welding process wherein coalescence is produced by the heat obtained from resistance to the flow of electric current through the workplaces, which are held together under pressure by rotating circular electrodes. The resulting weld is a series of overlapping spot welds made progressively along a joint. Lapped and flanged joints in cans, buckets, tanks, mufflers, etc., are commonly welded by this process.
(4) Projection welding. This is a process wherein coalescence is produced by the heat obtained from resistance to the flow of electric current through the workpieces, which are held together under pressure by electrodes. The resulting welds are localized at predetermined points by the design of the parts to be welded. This localization is usually accomplished by projections, embossments, or intersections. This process is commonly used in the assembly of punched, formed, and stamped parts.
(5) Upset welding. This is a resistance welding process wherein coalescence is produced simultaneously over the entire area of abutting surfaces or progressively along a joint by the heat obtained from resistance to the flow of electric current through the area of contact of these surfaces. Pressure is applied before heating is started and is maintained throughout the heating period. Upsetting is accompanied by expulsion of metal from the joint (A, fig. 12-51).
(6) Flash welding. Flash welding is a resistance welding process wherein coalescence is produced simultaneously over the entire area of abutting surfaces by the heat obtained from resistance to the flow of electric current between the two surfaces, and by the application of pressure after the heating caused by flashing is substantially completed. The final application of pressure is accompanied by expulsion of metal from the joint (B, fig. 12-51).
(7) Percussion welding. This weld is made simultaneously over the entire area of abutting surfaces by the heat obtained from an arc. The arc is produced by a rapid discharge of electrical energy. It is extinguished by pressure applied percussively during the discharge.
c. Welding Procedures.
(1) The operation of spot, seam, and projection welding involves the use of electric current of proper magnitude for the correct length of tire. The current and time factors must be coordinated so that the base metal within a confined area will be raised to its melting point and then resolidified under pressure. The temperature obtained must be sufficient to ensure fusion of the base metal elements, but not so high that metal will be forced from the weld zone when the pressure is applied.
(2) In upset welding (A, fig. 12-51), the surfaces to be welded are brought into close contact under pressure. The welding heat is obtained from resistance to the flow of current through the area of contact of the abutting surfaces. When a sufficiently high temperature is obtained, welding of the surfaces is achieved by upsetting with the application of high pressure.
(3) In flash welding (B, fig. 12-51), the fusing of the parts is accomplished in three steps. The surfaces to be joined are brought together under light pressure, then separated slightly to allow arcing to occur. This small arc brings the metals to their melting points at the separated ends and, as a final operation, the molten surfaces are forced together under heavy pressure. As they meet, the molten metal and slag are thrown out and a clean fusion is obtained.
12-61. SPOT WELDING MAGNESIUM
a. General. Magnesium can be joined by spot, seam, or flash welding, but spot welding is the most widely used. Spot welding is used mostly on assemblies subject to low stresses and on those not subjected to vibration. The welding of dissimilar alloys by the spot welding process should be avoided, especially if they are alloys with markedly different properties.
b. Welding Current.
(1) General. Either alternating current or direct current can be used for spot welding magnesium. High currents and short weld duration are required, and both alternating current and direct current spot welders have sufficient capacity and provide the control of current that is necessary in the application of this process.
(2) Alternating current machines. The alternating current spot welding machines, equipped with electronic synchronous timers, heat control, and phase shifting devices to control weld timing and current, are suitable for the welding of magnesium. Three types of machines are used; single-phase, three-phase, and dry-disk rectifier type.
(3) Direct current machines. The electrostatic condenser discharge type is the most widely used direct current machine for magnesium welding. The line demand for this type of equipment may be as high as 500 kva when welding sheets approximately 1/8 in. (3.2 mm) thick. Electromagnetic machines are also used. They require lower pressure applied by the electrodes during welding than the electrostatic equipment.
c. Electrodes. Electrodes for spot welding magnesium should be made of high-conductivity copper alloys conforming to Resistance Welder Manufacturer�s Association specifications. Hard-rolled copper can be used where special offset electrodes are desired. Electrodes should be water cooled but never to the point where condensation will take place. Intermittent water flow, supplied only when the weld is made, assists in the maintenance of a constant tip temperature. The most common tips are dome-ended with tip radii of curvature ranging from 2.0 to 8.0 in. (50.8 to 203.2 mm) depending on sheet thickness. Four degree flat tips are frequently used. Flat tips with diameters from 3/8 to 1-1/4 in. (9.5 to 31.8 mm) are used on the side of the work where the surface is to be essentially free of marks. Contact surfaces of the electrodes must be kept clean and smooth.
d. Cleaning. Magnesium sheets for spot welding should be purchased with an oil coating rather than a chrome pickle finish. Pickled surfaces are hard to clean for spot welding because of surface etch. Satisfactory cleaning can be accomplished by either chemical or mechanical rnethods. Mechanical cleaning is used where the number of parts to be cleaned does not justify a chemical cleaning setup. Stainless steel wool, stainless steel wire brushes, or aluminum oxide cloth are used for this purpose. Ordinary steel wool and wire brushes leave metallic particles and should not be used, because the magnetic field created in the tip will attract these particles. Chemical cleaning is recommended for high production. It is economical and provides consistently low surface resistance, resulting in more uniform welds and approximately double the number of spot welds between tip cleanings. The allowable time between cleaning and welding is also much longer. Chemically cleaned parts can be welded up to 100 hours after cleaning, while mechanically cleaned parts should be welded at once.
e. Machine Settings. Spot welding is a machine operation requiring accurate current, timing, and welding force and therefore, the adjustment of the welding machine to the proper setting is the most important step in the production of strong consistent welds. The welding machine manufacturer�s operating instructions should be followed closely. Recommended spacings and edge distances are given in table 12-10.
f. Pressure. Welding pressures are usually established first, using the liner current or capacitance and voltage values recommended. High pressure provides greater latitude in the currents that can be used for the production of sound welds, but may be limited by excessive sheet separation or the size of the electrodes. After approximating the pressure, the proper weld time, voltage, and weld current or capacitance should be determined to obtain welds of the desired size and strength. If the maximum weld size is too small or cracking is encountered, it may be necessary to increase the pressure and current, or possibly the weld time. After all the settings are fixed, the hold time may need adjustment to make certain that pressure is maintained on the weld until solidification is complete. Insufficient hold time will result in porous welds and is normally indicated by a cracking sound during the contraction of the weld. Trial welds should be made in material of the same gauge, alloy, hardness, and surface preparation as the metal to be welded. Test welds between strips crossed at right angles are useful for determining proper welding conditions, because they can be easily twisted apart.
12-62. SPOT AND SEAM WELDING TITANIUM
a. Spot and seam welding procedures for titanium and titanium alloys are very similar to those used on other metals. Welds can be made over a wide range of conditions. Special shielding is not required. The short welding times and proximity of the surfaces being joined prevent embrittlement of the welds by contamination from the air.
b. The spot and seam welding conditions which have the greatest effect on weld quality are welding current and time. With variations in these conditions, the diameter, strength, penetration, and indentation of the spot welds change appreciably. Electrode tip radium and electrode force also have some effect on these properties. For all applications, welding conditions should be established depending on the thicknesses being welded and the properties desired.
c. Most experience in spot welding is available from tests on commercially pure titanium. In these tests, the welding conditions have varied considerably, and it is difficult to determine if there are optimum spot welding conditions for various sheet gauges. One of the major problems encountered is excessive weld penetration. However, penetration can be controlled by selecting suitable welding current and time.
d. Experience with some of the high strength alpha-beta alloys has shown that postweld heat treatments are beneficial to spot and seam weld ductility, but procedures have not been developed to heat treat these welds in the machines. When necessary, furnace heat treatments or an oxyacetylene torch may be used to heat treat spot welds.
e. Specifications have been established for spot and seam welds in commercially pure titanium. The quality control measures of these specifications for stainless steel (MIL-W-6858) are used. Suitable minimum edge distances and spot spacing are listed in table 12-11. These are the same spot spacings and edge distances specified for spot welds in steel.
12-63. FLASH WELDING TITANIUM
a. Flash welding procedures for titanium are similar to those used for other metals. As was the case for spot and seam welding, special shielding is not necessary to produce satisfactory flash welds. However, inert gas shielding has been used to decrease the possibility of weld contamination and to increase ductility. For many of the high strength alloys, postweld heat treatments are required to prevent cracking and improve weld ductility. These welds are transferred to a furnace for heat treatment.
b. Flash welding conditions have varied considerably. However, short flashing cycles and fast upset speeds similar to those used for aluminum generally are employed. The upset cycle is probably the most important variable, because of its effect on the expulsion of contaminated metal from the joint. In some of the high strength alpha-beta alloys, superior results were obtained by using intermediate pressures (8000 to 10,000 psi (55,160 to 68,950 kPa)).
NOTE
High upset pressure results in high residual stresses that may cause the occurence of microfissures in the hard weld zones in these alloys.
c. An adopted specification requires the tensile strength of the weld area of flash welded joints to be 95 percent minimum of parent metal, and elongation through the weld area to be 50 percent minimum of parent material. With proper welding procedures and postweld treatment, flash welds in titanium and most of the titanium alloys can be held to these criteria.
