CHAPTER 13
DESTRUCTIVE AND NONDESTRUCTIVE TESTING
Section I. PERFORMANCE TESTING
13-1. GENERAL
To ensure the satisfactory performance of a welded structure, the quality of the welds must be determined by adequate testing procedures. Therefore, they are proof tested under conditions that are the same or more severe than those encountered by the welded structures in the field. These tests reveal weak or defective sections that can be corrected before the materiel is released for use in the field. The tests also determine the proper welding design for ordnance equipment and forestall injury and inconvenience to personnel
13-2. TESTING OF MILITARY MATERIEL
a. Weapons can be proof tested by firing from cover with an every heavy charge too determine the safety of the welded piece.
b. Automotive materiel can be tested at high speeds over rough ground to determine its road safety.
c. Welded armor plate and other heavy structural members can be tested by gun strength fire with projectiles of various calibers to determine their strengths under shock.
d. Other similar tests are used to check the performance of complex structures; however, because the piece of materiel may consist of several types of metals welded with various filler metals, the successful operation of the entire structure requires that each weld must be able to withstand the particular load for which it is designed. For this reason, a number of physical tests have been devised to determine the strength and other characteristics of the welds used in the structure.
13-3. FIELD INSPECTION OF WELDS AND EQUIPMENT REPAIRED BY WELDING
a. General. A definite procedure for the testing of welds is not set up as a part of the normal routine of ordnance units operating under field conditions. If facilities are available, some of the physical testing methods may be instituted. In general, however, the item welded is subjected to a thorough visual examination by a qualified inspector, and if found to be satisfactory, it is then returned to the using arm or service.
b. Inspection Procedure. The finished weld should be inspected for undercut, overlap, surface checks, cracks, or other defects. Also, the degree of penetration and side wall fusion, extent of reinforcement, and size and position of the welds are important factors in the determination as to whether a welding job should be accepted or rejected, because they all reflect the qualify of the weld.
c. Destructive Tests of Experimental Welds. If special circumstances require the use of a new or novel welding procedure, new welding material, or unfamiliar apparatus, and when welding operators lack experience in their use, it is advisable to make experimental welds with scrap or unsalvageable material. These welds or welded materials must be subjected to destructive tests. The required development of procedure and familiarity with equipment can be attained in this manner.
d. Performance Tests. When materiel has been repaired by standard welding procedures, visual inspection should be sufficient to determine the efficiency of the weld. However, after the repaired item has been returned to the using arm or service, the item should be subjected to such practical tests as are necessary to prove its ability to withstand the strains and stresses of normal service. This will involve the towing or driving of mobile equipment over terrain that it is normally expected to traverse and the firing of artillery pieces to ensure that the repair will not break down under the forces of recoil. In most cases, the item can be placed in service with instructions to the using personnel to make one or more thorough inspections after the item has been in service a short time and to report signs of possible failure or unsatisfactory performance. Defective repaired parts can, in this way, be detected before serious trouble results.
Section II. VISUAL INSPECTION AND CORRECTIONS
13-4. INCOMPLETE PENETRATION
This term is used to describe the failure of the filler and base metal to fuse together at the root of the joint. Bridging occurs in groove welds when the deposited metal and base metal are not fused at the root of the joint. The frequent cause of incomplete penetration is a joint design which is not suitable for the welding process or the conditions of construction. When the groove is welded from one side only, incomplete penetration is likely to result under the following conditions.
a. The root face dimension is too big even though the root opening is adequate.
b. The root opening is too small.
c. The included angle of a V-groove is too small.
d. The electrode is too large.
e. The rate of travel is too high.
f. The welding current is too low.
13-5. LACK OF FUSION
Lack of fusion is the failure of a welding process to fuse together layers of weld metal or weld metal and base metal. The weld metal just rolls over the plate surfaces. This is generally referred to as overlap. Lack of fusion is caused by the following conditions:
a. Failure to raise to the melting point the temperature of the base metal or the previously deposited weld metal.
b. Improper fluxing, which fails to dissolve the oxide and other foreign material from the surfaces to which the deposited metal must fuse.
c. Dirty plate surfaces.
d. Improper electrode size or type.
e. Wrong current adjustment.
13-6. UNDERCUTTING
Undercutting is the burning away of the base metal at the toe of the weld. Undercutting may be caused by the following conditions:
a. Current adjustment that is too high.
b. Arc gap that is too long.
c. Failure to fill up the crater completely with weld metal.
13-7. SLAG INCLUSIONS
Slag inclusions are elongated or globular pockets of metallic oxides and other solids compounds. They produce porosity in the weld metal. In arc welding, slag inclusions are generally made up of electrode coating materials or fluxes. In multilayer welding operations, failure to remove the slag between the layers causes slag inclusions. Most slag inclusion can be prevented by:
a. Preparing the groove and weld properly before each bead is deposited.
b. Removing all slag.
c. Making sure that the slag rises to the surface of the weld pool.
d. Taking care to avoid leaving any contours which will be difficult to penetrate fully with the arc.
13-8. POROSITY
a. Porosity is the presence of pockets which do not contain any solid material. They differ from slag inclusions in that the pockets contain gas rather than a solid. The gases forming the voids are derived form:
(1) Gas released by cooling weld because of its reduced solubility temperature drops.
(2) Gases formed by the chemical reactions in the weld.
b. Porosity is best prevented by avoiding:
(1) Overheating and undercutting of the weld metal.
(2) Too high a current setting.
(3) Too long an arc.
13-9. GAS WELDING
a. The weld should be of consistent width throughout. The two edges should form straight parallel lines.
b. The face of the weld should be slightly convex with a reinforcement of not more than 1/16 in. (1.6 mm) above the plate surface. The convexity should be even along the entire length of the weld. It should not be high in one place and low in another.
c. The face of the weld should have fine, evenly spaced ripples. It should be free of excessive spatter, scale, and pitting.
d. The edges of the weld should be free of undercut or overlap.
e. Starts and stops should blend together so that it is difficult where they have taken place.
f. The crater at the end of the weld should be filled and show no holes, or cracks.
(1) If the joint is a butt joint, check the back side for complete penetration through the root of the joint. A slight bead should form on the back side.
(2) The root penetration and fusion of lap and T-joints can be checked by putting pressure on the upper plate until it is bent double. If the weld has not penetrated through the root, the plate will crack open at the joint as it is being bent. If it breaks, observe the extent of the penetration and fusion at the root. It will probably be lacking in fusion and penetration.
13-10. GAS METAL-ARC WELDING (GMAW) WITH SOLID-CORE WIRE
a. Lack of Penetration. Lack of input in the weld area. This can be penetration is the result of too little heat corrected by:
(1) Increasing the wire-feed speed and reducing the stickout distance.
(2) Reducing the speed of travel.
(3) Using proper welding techniques.
b. Excessive Penetration. Excessive penetration usually causes burnthrough. It is the result of too much heat in the weld area. This can be corrected by:
(1) Reducing the wire-feed speed and increasing the speed of travel.
(2) Making sure that the root opening and root face are correct.
(3) Increasing the stickout distance during welding and weaving the gun.
c. Whiskers. Whiskers are short lengths of electrode wire sticking through the weld on the root side of the joint. They are caused by pushing the electrode wire past the leading edge of the weld pool. Whiskers can be prevented by:
(1) Reducing the wire-feed speed and the speed of travel.
(2) Increasing the stickout distance and weaving the gun.
d. Voids. Voids are sometimes referred to as wagon tracks because of their resemblance to ruts in a dirt road. They may be continued along both sides of the weld deposit. They are found in multipass welding. Voids can be prevented by:
(1) Avoiding a large contoured crown and undercut.
(2) Making sure that all edges are filled in.
(3) On succeeding passes , using slightly higher arc voltage and increasing travel speed.
e. Lack of Fusion. Lack of fusion, also referred to as cold lap, is largely the result of improper torch handling, low heat, and higher speed travel. It is important that the arc be directed at the leading edge of the puddle. To prevent this defect, give careful consideration to the following:
(1) Direct the arc so that it covers all areas of the joint. The arc, not the puddle, should do the fusing.
(2) Keep the electrode at the leading edge of the puddle.
(3) Reduce the size of the puddle as necessary by reducing either the travel speed or wire-feed speed.
(4) Check current values carefully.
f. Porosity. The most common defect in welds produced by any welding process is porosity. Porosity that exists on the face of the weld is readily detected, but porosity in the weld metal below the surface must be determined by x-ray or other testing methods. The causes of most porosity are:
(1) Contamination by the atmosphere and other materials such as oil, dirt, rust, and paint.
(2) Changes in the physical qualities of the filler wire due to excessive current.
(3) Entrapment of the gas evolved during weld metal solidification.
(4) Loss of shielding gas because of too fast travel.
(5) Shielding gas flow rate too low, not providing full protection.
(6) Shielding gas flow rate too high, drawing air into the arc area.
(7) Wrong type of shielding gas being used.
(8) Gas shield blown away by wind or drafts.
(9) Defects in the gas system.
(10) Improper welding technique, excessive stickout, improper torch angle, and too fast removal of the gun and the shielding gas at the end of the weld.
g. Spatter. Spatter is made up of very fine particles of metal on the plate surface adjoining the weld area. It is usually caused by high current, a long arc, an irregular and unstable arc, improper shielding gas, or a clogged nozzle.
h. Irregular Weld Shape. Irregular welds include those that are too wide or too narrow, those that have an excessively convex or concave surface, and those that have coarse, irregular ripples. Such characteristics may be caused by poor torch manipulation, a speed of travel that is too slow, current that is too high or low, improper arc voltage, improper stickout, or improper shielding gas.
i. Undercutting. Undercutting is a cutting away of the base material along the edge of the weld. It may be present in the cover pass weld bead or in multipass welding. This condition is usually the result of high current, high voltage, excessive travel speed, low wire-feed speed, poor torch technique, improper gas shielding or the wrong filler wire. To correct undercutting, move the gun from side to side in the joint. Hesitate at each side before returning to the opposite side.
13-11. GAS METAL-ARC WELDING (GMAW) WITH FLUX-CORED WIRE
a. Burn-Through. Burn-through may be caused by the following:
(1) Current too high.
(2) Excessive gap between plates.
(3) Travel speed too s1ow.
(4) Bevel angle too large.
(5) Nose too small.
(6) Wire size too small.
(7) Insufficient metal hold-down or clamping.
b. Crown Too High or Too Low. The crown of the weld may be incorrect due to the following:
(1) Current too high or low.
(2) Voltage too high or low.
(3) Travel speed too high.
(4) Improper weld backing.
(5) Improper spacing in welds with backing.
(6) Workpiece not level.
c. Penetration Too Deep or Too Shallow. Incorrect penetration may be caused by any of the following:
(1) Current too high or low.
(2) Voltage too high or low.
(3) Improper gap between plates.
(4) Improper wire size.
(5) Travel speed too slow or fast.
d. Porosity and Gas Pockets. These defects may be the results of any of the following:
(1) Flux too shallow.
(2) Improper cleaning.
(3) Contaminated weld backing.
(4) Improper fitup in welds with manual backing.
(5) Insufficient penetration in double welds.
e. Reinforcement Narrow and Steep-Sloped (Pointed). Narrow and pointed reinforcements may be caused by the following:
(1) Insufficient width of flux.
(2) Voltage too low.
f. Mountain Range Reinforcement. If the reinforcement is ragged, the flux was too deep.
g. Undercutting. Undercutting may be caused by any of the following:
(1) Travel speed too high.
(2) Improper wire position (fillet welding).
(3) Improper weld backing.
h. Voids and Cracks. These weld deficiencies may be caused by any of the following:
(1) Improper cooling.
(2) Failure to preheat.
(3) Improper fitup.
(4) Concave reinforcement (fillet weld).
Section III. PHYSICAL TESTING
13-12. GENERAL
a. The tests described in this section have been developed to check the skill of the welding operator as well as the quality of the weld metal and the strength of the welded joint for each type of metal used in ordnance materiel.
b. Some of these tests, such as tensile and bending tests, are destructive, in that the test Specimens are loaded until they fail, so the desired information can be gained. Other testing methods, such as the X-ray and hydrostatic tests, are not destructive.
13-13. ACID ETCH TEST
a. This test is used to determine the soundness of a weld. The acid attacks or reacts with the edges of cracks in the base or weld metal and discloses weld defects, if present. It also accentuates the boundary between the base and weld metal and, in this manner, shows the size of the weld which may otherwise be indistinct. This test is usually performed on a cross section of the joint.
b. Solutions of hydrochloric acid, nitric acid, ammonium per sulfate, or iodine and potassium iodide are commonly used for etching carbon and low alloy steels.
13-14. GUIDED BEND TEST
The quality of the weld metal at the face and root of the welded joint, as well as the degree of penetration and fusion to the base metal, are determined by means of guided bend tests. These tests are made in a jig (fig. 13-1). These test specimens are machined from welded plates, the thickness of which must be within the capacity of the bending jig. The test specimen is placed across the supports of the die which is the lower portion of the jig. The plunger, operated from above by a hydraulic jack or other device, causes the specimen to be forced into and to assure the shape of the die. To fulfill the requirements of this test, the specimens must bend 180 degrees and, to be accepted as passable, no cracks greater than 1/8 in. (3.2 mm) in any dimension should appear on the surface. The face bend tests are made in the jig with the face of the weld in tension (i.e., on the outside of the bend) (A, fig. 13�2). The root bend tests are made with the root of the weld in tension (i. e., on outside of the bend) (B, fig. 13-2). Guided bend test specimens are also shown the in figure 13-3.
13-15. FREE BEND TEST
a. The free bend test has been devised to measure the ductility of the weld metal deposited in a weld joint. A test specimen is machined from the welded plate with the weld located as shown at A, figure 13-4. Each corner lengthwise of the specimen shall be rounded in a radius not exceeding one-tenth of the thickness of the specimen. Tool marks, if any, shall be lengthwise of the specimen. Two scribed lines are placed on the face 1/16 in. (1.6 mm) in from the edge of the weld. The distance between these lines is measured in inches and recorded as the initial distance X (B, fig. 13-4). The ends of the test specimen are then bent through angles of about 30 degrees, these bends being approximately one-third of the length in from each end. The weld is thus located centrally to ensure that all of the bending occurs in the weld. The specimen bent initially is then placed in a machine capable of exerting a large compressive force (C, fig. 13-4) and bent until a crack greater than 1/16 in. (1.6 mm) in any dimension appears on the face of the weld. If no cracks appear, bending is continued until the specimens 1/4 in. (6.4 mm) thick or under can be tested in vise. Heavier plate is usually tested in a press or bending jig. Whether a vise or other type of compression device is used when making the free bend test, it is advisable to machine the upper and lower contact plates of the bending equipment to present surfaces parallel to the ends of the specimen (E, fig. 13-4). This will prevent the specimen from slipping and snapping out of the testing machine as it is bent.

b. After bending the specimen to the point where the test bend is concluded, the distance between the scribed lines on the specimen is again measured and recorded as the distance Y. To find the percentage of elongation, subtract the initial from the final distance, divide by the initial distance, and multiply by 100 (fig. 13-4). The usual requirements for passing this test are that the minimum elongation be 15 percent and that no cracks greater than 1/16 in. (1.6 mm) in any dimension exist on the face of the weld.
c. The free bend test is being largely replaced by the guided bend test where the required testing equipment is available.
13-16. BACK BEND TEST
The back bend test is used to determine the quality of the weld metal and the degree of penetration into the root of the Y of the welded butt joint. The specimens used are similar to those required for the free bend test (para 13-15) except they are bent with the root of the weld on the tension side, or outside. The specimens tested are required to bend 90 degrees without breaking apart. This test is being largely replaced by the guided bend test (para 13-14).
13-17. NICK BREAK TEST
a. The nick break test has been devised to determine if the weld metal of a welded butt joint has any internal defects, such as slag inclusions, gas pockets, poor fusion, and/or oxidized or burnt metal. The specimen is obtained from a welded butt joint either by machining or by cutting with an oxyacetylene torch. Each edge of the weld at the joint is slotted by means of a saw cut through the center (fig. 13-5). The piece thus prepared is bridged across two steel blocks (fig. 13-5) and stuck with a heavy hammer until the section of the weld between the slots fractures. The metal thus exposed should be completely fused and free from slag inclusions. The size of any gas pocket must not be greater than 1/16 in. (1.6 mm) across the greater dimension and the number of gas pockets or pores per square inch (64.5 sq mm) should not exceed 6.
b. Another break test method is used to determine the soundness of fillet welds. This is the fillet weld break test. A force, by means of a press, a testing machine, or blows of a hammer, is applied to the apex of the V shaped specimen until the fillet weld ruptures. The surfaces of the fracture will then be examined for soundness.
13-18. TENSILE STRENGTH TEST
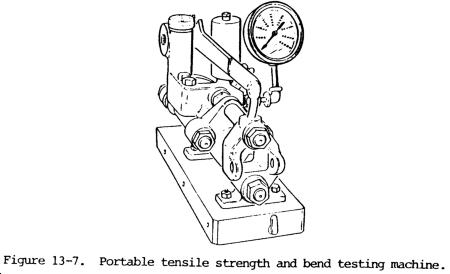
a. This test is used to measure the strength of a welded joint. A portion of a to locate the welded plate is locate the weld midway between the jaws of the testing machine (fig. 13�6). The width thickness of the test specimen are measured before testing, and the area in square inches is calculated by multiplying these before testing , and the area in square inches is calculated by multiplying these two figures (see formula, fig. 13-6). The tensile test specimen is then mounted in a machine that will exert enough pull on the piece to break the specimen. The testing machining may be either a stationary or a portable type. A machine of the portable type, operating on the hydraulic principle and capable of pulling as well as bending test specimens, is shown in figure 13-7. As the specimen is being tested in this machine, the load in pounds is registered on the gauge. In the stationary types, the load applied may be registered on a balancing beam. In either case, the load at the point of breaking is recorded. Test specimens broken by the tensile strength test are shown in figure 13-3.
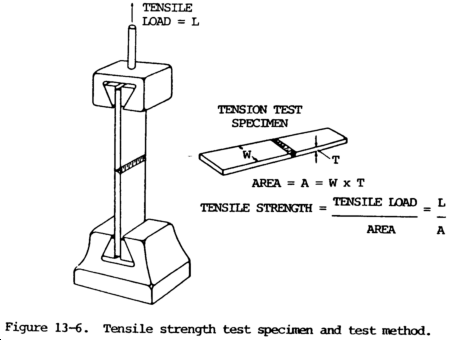
b. The tensile strength, which is defined as stress in pounds per square inch, is calculated by dividing the breaking load of the test piece by the original cross section area of the specimen. The usual requirements for the tensile strength of welds is that the specimen shall pull not less than 90 percent of the base metal tensile strength.
c. The shearing strength of transverse and longitudinal fillet welds is determined by tensile stress on the test specimens. The width of the specimen is measured in inches. The specimen is ruptured under tensile load, and the maximum load in pounds is determined. The shearing strength of the weld in pounds per linear inch is determined by dividing the maximum load by the length of fillet weld that ruptured. The shearing strength in pounds per square inch is obtained by dividing the shearing strength in pounds per linear inch by the average throat dimension of the weld in inches. The test specimens are made wider than required and machined down to size.
13-19. HYDROSTATIC TEST
This is a nondestructive test used to check the quality of welds on closed containers such as pressure vessels and tanks. The test usually consists of filling the vessel with water and applying a pressure greater than the working pressure of the vessel. Sometimes, large tanks are filled with water which is not under pressure to detect possible leakage through defective welds. Another method is to test with oil and then steam out the vessel. Back seepage of oil from behind the liner shows up visibly.
13-20. MAGNETIC PARTICLE TEST
This is a test or inspection method used on welds and parts made of magnetic alloy steels. It is applicable only to ferromagnetic materials in which the deposited weld is also ferromagnetic. A strong magnetic field is set up in the piece being inspected by means of high amperage electric currents. A leakage field will be set up by any discontinuity that intercepts this field in the part. Local poles are produced by the leakage field. These poles attract and hold magnetic particles that are placed on the surface for this purpose. The particle pattern produced on the surface indicates the presence of a discontinuity or defect on or close to the surface of the part.
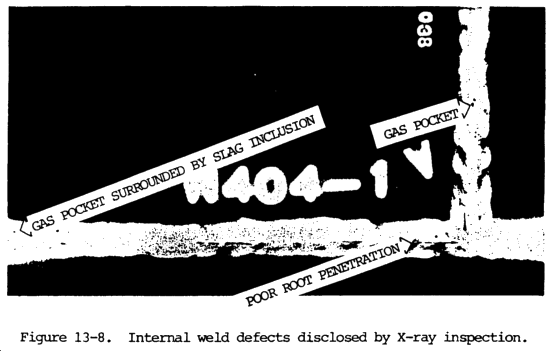
13-21. X-RAY TEST
This is a radiographic test method used to reveal the presence and nature of internal defects in a weld, such as cracks, slag, blowholes, and zones where proper fusion is lacking. In practice, an X-ray tube is placed on one side of the welded plate and an X-ray film, with a special sensitive emulsion, on the other side. When developed, the defects in the metal show up as dark spots and bands, which can be interpreted by an operator experienced in this inspection method. Porosity and defective root penetration as disclosed by X-ray inspection are shown in figure 13-8.
NOTE
Instructions for handling X-ray apparatus to avoid harm to operating personnel are found in the "American Standard Code for the Industrial Use of X-rays".
13-22. GAMMA RAY TEST
This test is a radiographic inspection method similar to the X-ray method described in paragraph 13-13, except that the gamma rays emanate from a capsule of radium sulfate instead of an X-ray tube. Because of the short wave lengths of gamma rays, the penetration of sections of considerable thickness is possible, but the time required for exposure for any thickness of metal is much longer than that required for X-rays because of the slower rate at which the gamma rays are produced. X-ray testing is used for most radiographic inspections, but gamma ray equipment has the advantage of being extremely portable.
13-23. FLUORESCENT PENETRANT TEST
Fluorescent penetrant inspection is a nondestructive test method by means of which cracks, pores, leaks, and other discontinuities can be located in solid materials. It is particularly useful for locating surface defects in nonmagnetic materials such as aluminum, magnesium, and austenitic steel welds and for locating leaks in all types of welds. This method makes use of a water washable, highly fluorescent material that has exceptional penetration qualities. This material is applied to the clean dry surface of the metal to be inspected by brushing, spraying, or dipping. The excess material is removed by rinsing, wiping with clean water-soaked cloths, or by sandblasting. A wet or dry type developer is then applied. Discontinuities in surfaces which have been properly cleaned, treated with the penetrant, rinsed, and treated with developer show brilliant fluorescent indications under black light.
13-24. HARDNESS TESTS
a. General. Hardness may be defined as the ability of a substance to resist indentation of localized displacement. The hardness test usually applied is a nondestructive test, used primarily in the laboratory and not to any great extent in the field. Hardness tests are used as a means of controlling the properties of materials used for specific purposes after the desired hardness has been established for the particular application. A hardness test is used to determine the hardness of weld metal. By careful testing of a welded joint, the hard areas can be isolated and the extent of the effect of the welding heat on the properties of the base metal determined.
b. Hardness Testing Equipment.
(1) File test. The simplest method for determining comparative hardness is the file test. It is performed by running a file under manual pressure over the piece being tested. Information may be obtained as to whether the metal tested is harder or softer than the file or other materials that have been given the same treatment.
(2) Hardness testing machines.
(a) General. There are several types of hardness testing machines. Each of them is singular in that its functional design best lends itself to the particular field or application for which the machine is intended. However, more than one type of machine can be used on a given metal, and the hardness values obtained can be satisfactorily correlated. Two types of machines are used most commonly in laboratory tests for metal hardness: the Brinell hardness tester and the Rockwell hardness tester.
(b) Brinell hardness tester. In the Brinell tests, the specimen is mounted on the anvil of the machine and a load of 6620 lb (3003 kg) is applied against a hardened steel ball which is in contact with the surface of the specimen being tested. The steel ball is 0.4 in. (10.2 mm) in diameter. The load is allowed to remain 1/2 minute and is then released, and the depth of the depression made by the ball on the specimen is measured. The resultant Brinell hardness number is obtained by the following formula:
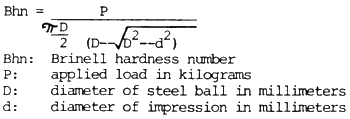
It should be noted that, in order to facilitate the determination of Brinell hardness, the diameter of the depression rather than the depth is actually measured. Charts of Brinell hardness numbers have been prepared for a range of impression diameters. These charts are commonly used to determine Brinell numbers.
(c) Rockwell hardness tester. The principle of the Rockwell tester is essentially the same as the Brinell tester. It differs from the Brinell tester in that a lesser load is impressed on a smaller ball or cone shaped diamond. The depth of the indentation is measured and indicated on a dial attached to the machine. The hardness is expressed in arbitrary figures called "Rockwell numbers." These are prefixed with a letter notation such as "B" or "C" to indicate the size of the ball used, the impressed load, and the scale used in the test.
13-25. MAGNAFLUX TEST
a. General. This is a rapid, non-destructive method of locating defects at or near the surface of steel and its magnetic alloys by means of correct magnetization and the application of ferromagnetic particles.
b. Basic Principles. For all practical purposes, magnaflux inspection may be likened to the use of a magnifying glass. Instead of using a glass, however, a magnetic field and ferromagnetic powders are employed. The method of magnetic particle inspection is based upon two principles: one, that a magnetic field is produced in a piece of metal when an electric current is flowed through or around it; two, that minute poles are set up on the surface of the metal wherever this magnetic field is broken or distorted.
c. When ferromagnetic particles are brought into the vicinity of a magnetized part, they are strongly attracted by these poles and are held more firmly to them than to the rest of the surface of the part, thereby forming a visible indication.
13-26. EDDY CURRENT (ELECTROMAGNETIC) TESTING.
a. General. Eddy current (electromagnetic) testing is a nondestructive test method based on the principle that an electric current will flow in any conductor subjected to a changing magnetic field. It is used to check welds in magnetic and nonmagnetic materials and is particularly useful in testing bars, fillets, welded pipe, and tubes. The frequency may vary from 50 Hz to 1 MHz, depending on the type and thickness of material current methods. The former pertains to tests where the magnetic permeability of a material is the factor affecting the test results and the latter to tests where electrical conductivity is the factor involved.
b. Nondestructive testing by eddy current methods involves inducing electric currents (eddy or foucault currents) in a test piece and measuring the changes produced in those currents by discontinuities or other physical differences in the test piece. Such tests can be used not only to detect discontinuities, but also to measure variations in test piece dimensions and resistivity. Since resistivity is dependent upon such properties as chemical composition (purity and alloying), crystal orientation, heat treatment, and hardness, these properties can also be determined indirectly. Electromagnetic methods are classified as magnetoinductive and eddy current methods. The former pertains to tests where the magnetic permeability of a material is the factor affecting the test results and the latter to tests where electrical conductivity is the factor involved.
c. One method of producing eddy currents in a test specimen is to make the specimen the core of an alternating current (ac) induction coil. There are two ways of measuring changes that occur in the magnitude and distribution of these currents. The first is to measure the resistive component of impedance of the exciting coil (or of a secondary test coil), and the second is to measure the inductive component of impedance of the exciting (or of a secondary) coil. Electronic equipment has been developed for measuring either the resistive or inductive impedance components singly or both simultaneously.
d. Eddy currents are induced into the conducting test specimen by alternating electromagnetic induction or transformer action. Eddy currents are electrical in nature and have all the properties associated with electric currents. In generating eddy currents, the test piece, which must be a conductor, is brought into the field of a coil carrying alternating current. The coil may encircle the part, may be in the form of a probe, or in the case of tubular shapes, may be wound to fit inside a tube or pipe. An eddy current in the metal specimen also sets up its own magnetic field which opposes the original magnetic field. The impedance of the exciting coil, or of a second coil coupled to the first, in close proximity to the specimen, is affected by the presence of the induced eddy currents. This second coil is often used as a convenience and is called a sensing or pick up coil. The path of the eddy current is distorted by the presence of a discontinuity. A crack both diverts and crowds eddy currents. In this manner, the apparent impedance of the coil is changed by the presence of the defect. This change can be measured and is used to give an indication of defects or differences in physical, chemical, and metallurgical structure. Subsurface discontinuities may also be detected, but the current falls off with depth.
13-27. ACOUSTIC EMISSION TESTING
a. Acoustic emission testing (AET) methods are currently considered supplementary to other nondestructive testing methods. They have been applied, however, during proof testing, recurrent inspections, service, and fabrication.
b. Acoustic emission testing consists of the detection of acoustic signals produced by plastic deformation or crack formation during loading. These signals are present in a wide frequency spectrum along with ambient noise from many other sources. Transducers, strategically placed on a structure, are activated by arriving signals. By suitable filtering methods, ambient noise in the composite signal is notably reduced. Any source of significant signals is plotted by triangulation based on the arrival times of these signals at the different transducers.
13-28. FERRITE TESTING
a. Effects of Ferrite Content. Fully austenitic stainless steel weld deposits have a tendency to develop small fissures even under conditions of minimal restraint. These small fissures tend to be located transverse to the weld fusion line in weld passes and base metal that were reheated to near the melting point of the material by subsequent weld passes. Cracks are clearly injurious defects and cannot be tolerated. On the other hand, the effect of fissures on weldment performance is less clear, since these micro-fissures are quickly blurted by the very tough austenitic matrix. Fissured weld deposits have performed satisfactorily under very severe conditions. However, a tendency to form fissures generally goes hand-in-hand with a tendency for larger cracking, so it is often desirable to avoid fissure-sensitive weld metals.
b. The presence of a small fraction of the magnetic delta ferrite phase in an otherwise austenitic (nonmagnetic) weld deposit has an influence in the prevention of both centerline cracking and fissuring. The amount of delta ferrite in as-welded material is largely controlled by a balance in the weld metal composition between the ferrite-promoting elements (chromium, silicon, molybdenum, and columbium are the most common) and the austenite-promoting elements (nickel, manganese, carbon, and nitrogen are the most common). Excessive delta ferrite, however, can have adverse effects on weld metal properties. The greater the amount of delta ferrite, the lower will be the weld metal ductility and toughness. Delta ferrite is also preferentially attacked in a few corrosive environments, such as urea. In extended exposure to temperatures in the range of 900 to 1700°F (482 to 927°C), ferrite tends to transform in part to a brittle intermetallic compound that severely embrittles the weldment.
c. Portable ferrite indicators are designed for on-site use. Ferrite content of the weld deposit may indicated in percent ferrite and may be bracketed between two values. This provides sufficient control in most applications where minimum ferrite content or a ferrite range is specified.