Figure 2-1. Welding helmet and hand-held shield
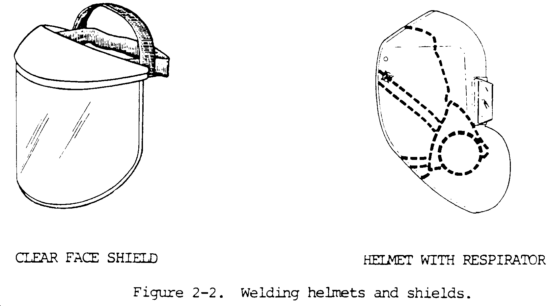
Figure 2-2. Welding helmet and shields
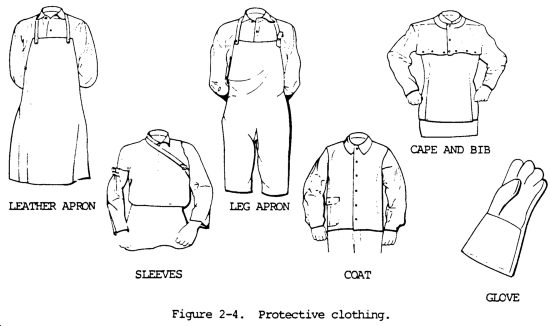
Figure 2-4. Protective clothing
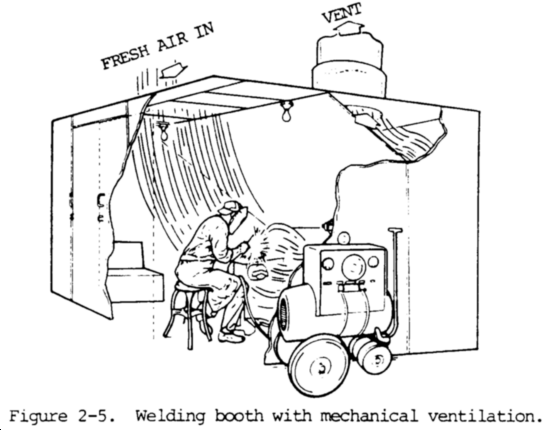
Figure 2-5. Welding booth with mechanical ventilation
Figure 2-6. Process diagram for air carbon arc cutting
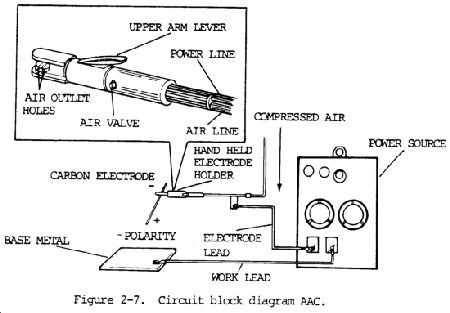
Figure 2-7. Circuit block diagram AAC
Figure 2-8. Safe way to weld container that held combustibles
Figure 3-1. Construction lines
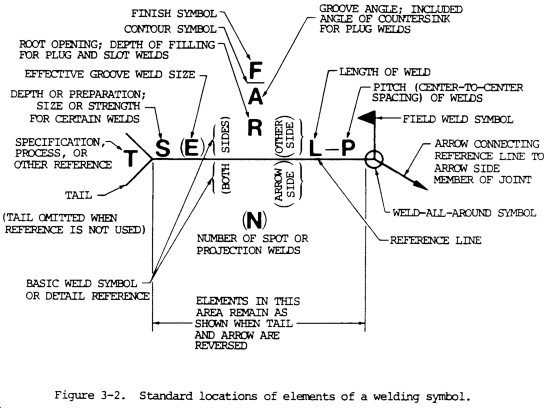
Figure 3-2. Standard locations of elements of a welding symbol
Figure 3-3. Basic and supplementary arc and gas welding symbols
Figure 3-4. Process or specification references
Figure 3-5. Definite process reference
Figure 3-6. No process or specification reference
Figure 3-7. Weld-all-around and field weld symbols
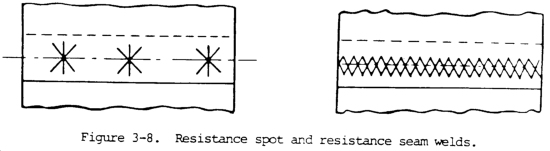
Figure 3-8. Resistance spot and resistance seam welds
Figure 3-9. Arrow side fillet welding symbol
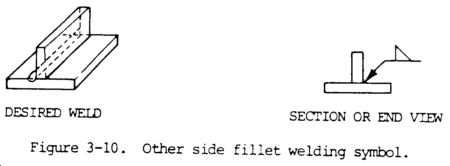
Figure 3-10. Other side fillet welding symbol
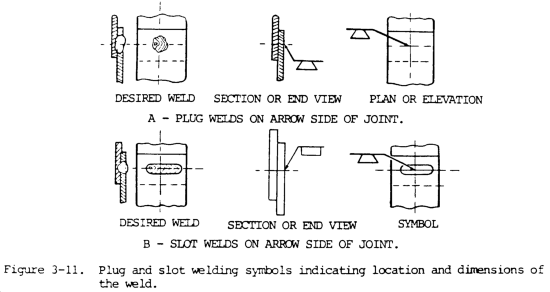
Figure 3-11. Plug and slot welding symbols indicating location and dimensions of the weld
Figure 3-12. Arrow side V groove welding symbol
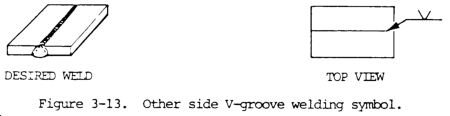
Figure 3-13. Other side V groove welding symbol
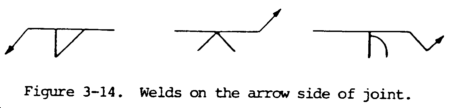
Figure 3-14. Welds on the arrow side of the joint
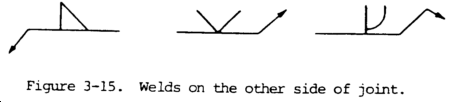
Figure 3-15. Welds on the other side of the joint
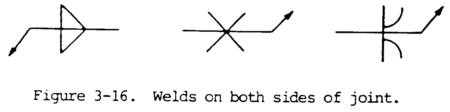
Figure 3-16. Welds on both sides of joint
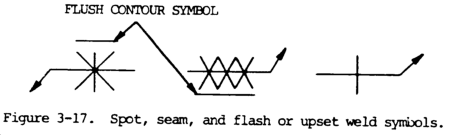
Figure 3-17. Spot, seam, and flash or upset weld symbols
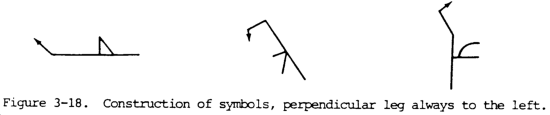
Figure 3-18. Construction of symbols, perpendicular leg always to the left
Figure 3-19. Construction of symbols, arrow break toward chamfered member
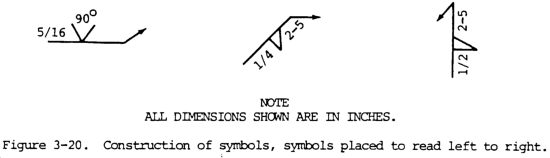
Figure 3-20. Construction of symbols, symbols placed to read left to right
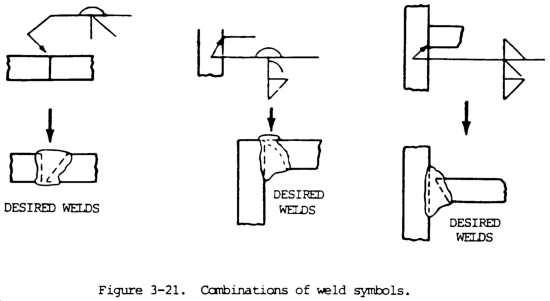
Figure 3-21. Combination of weld symbols
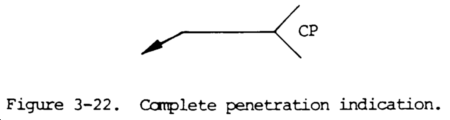
Figure 3-22. Complete penetration indication
Figure 3-23. Construction of symbols, special types of welds
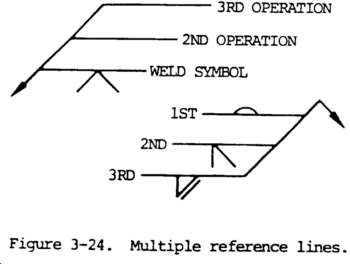
Figure 3-24. Multiple reference lines
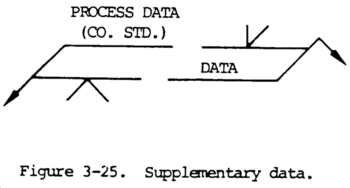
Figure 3-25. Supplementary data
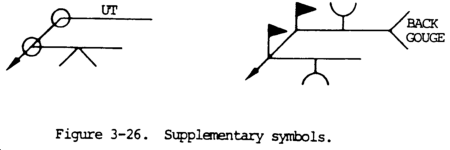
Figure 3-26. Supplementary symbols
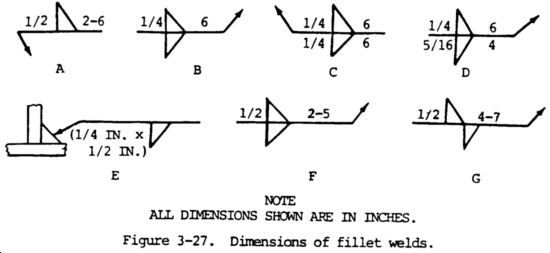
Figure 3-27. Dimensions of fillet welds
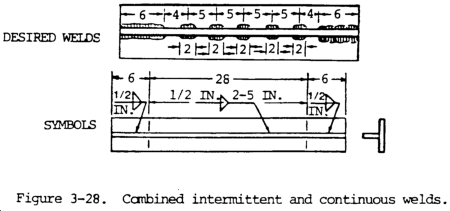
Figure 3-28. Combined intermittent and continuous welds
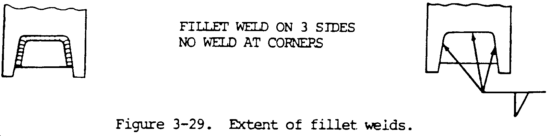
Figure 3-29. Extent of fillet welds
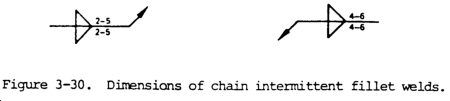
Figure 3-30. Dimensions of chain intermittent fillet welds
Figure 3-31. Dimensions of staggered intermittent fillet welds
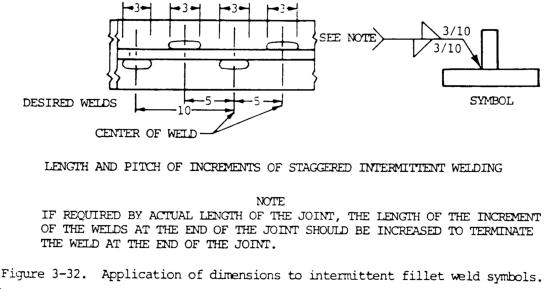
Figure 3-32. Application of dimensions to intermittent fillet weld symbols
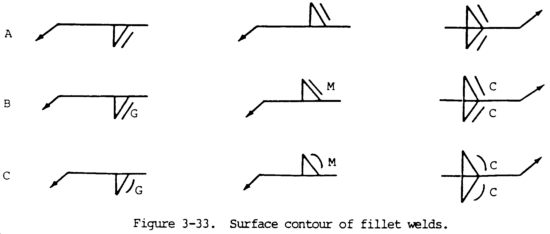
Figure 3-33. Surface contour of fillet welds
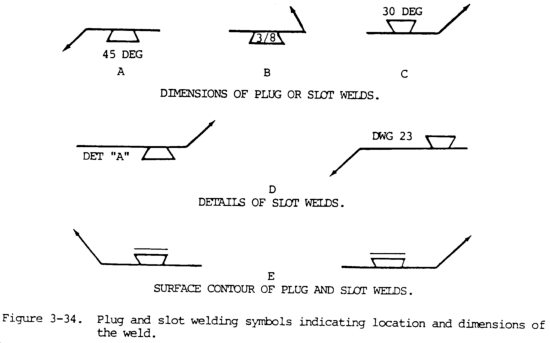
Figure 3-34. Plug and slot welding symbols indicating location and dimensions of the weld
Figure 3-35. Surface contour of plug welds and slot welds
Figure 3-36. Surface contour of plug welds and slot welds with user's standard finish symbol
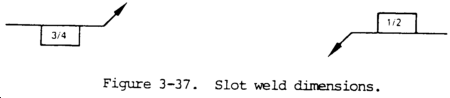
Figure 3-37. Slot weld dimensions
Figure 3-38. Dimensions of arc spot and arc seam welds
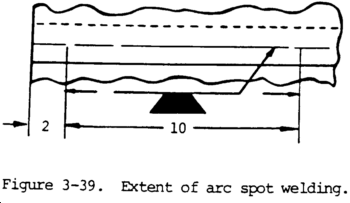
Figure 3-39. Extent of arc spot welding
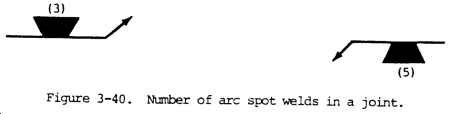
Figure 3-40. Number of arc spot welds in a joint
Figure 3-41. Surface contour of arc spot and arc seam welds
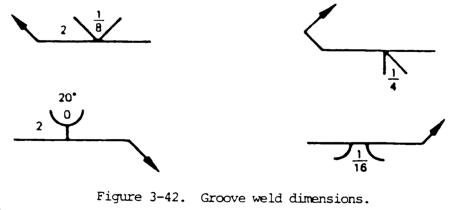
Figure 3-42. Groove weld dimensions
Figure 3-43. Groove weld dimensions having no general note
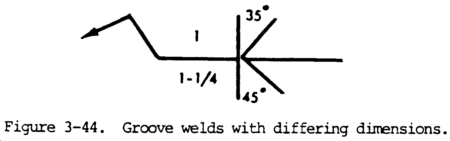
Figure 3-44. Groove welds with differing dimensions
Figure 3-45. Groove weld dimensions for welds extending through the members joined
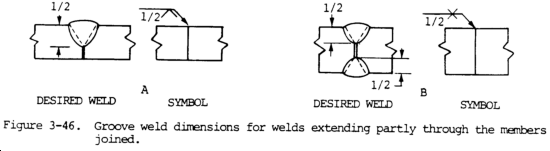
Figure 3-46. Groove weld dimensions for welds extending partly through the members joined
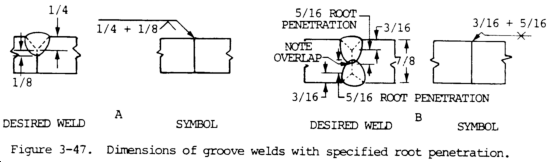
Figure 3-47. Dimensions of groove welds with specified root penetration
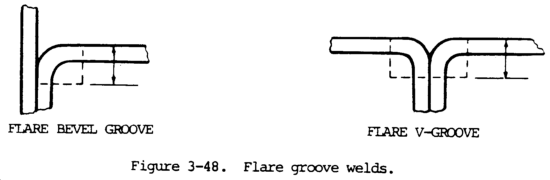
Figure 3-48. Flare groove welds
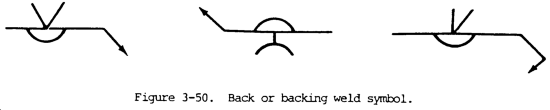
Figure 3-50. Back or backing weld symbol
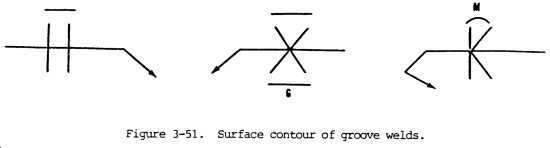
Figure 3-51. Surface contour of groove welds
Figure 3-52. Contours obtained by welding
Figure 3-53. Flush contour by machining
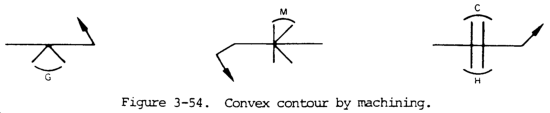
Figure 3-54. Convex contour by machining
Figure 3-55. Surface contour of back or backing welds
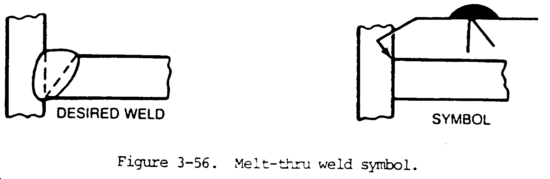
Figure 3-56. Melt-thru weld symbol
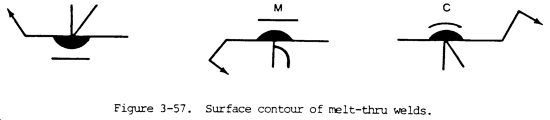
Figure 3-57. Surface contour of melt-thru welds
Figure 3-58. Size of surfaces built up by welding
Figure 3-59. Flange weld symbols
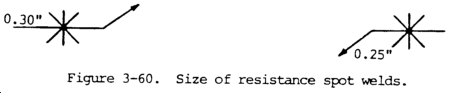
Figure 3-60. Size of resistance spot welds
Figure 3-61. Strength of resistance spot welds
Figure 3-62. Spacing of resistance spot welds
Figure 3-63. Extent of resistance spot weld
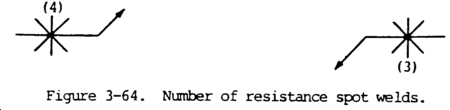
Figure 3-64. Number of resistance spot welds
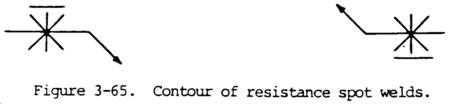
Figure 3-65. Contour of resistance spot welds
Figure 3-66. Size of resistance seam welds
Figure 3-67. Strength of resistance seam welds
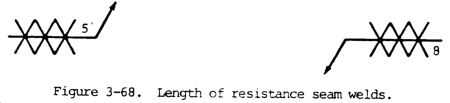
Figure 3-68. Length of resistance seam welds
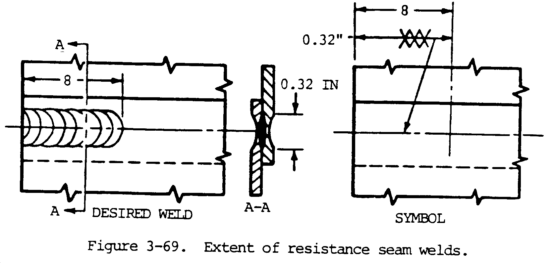
Figure 3-69. Extent of resistance seam welds
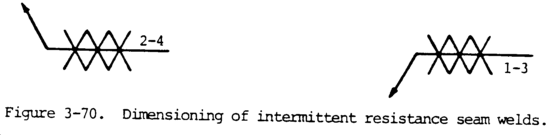
Figure 3-70. Dimensioning of intermittent resistance seam welds
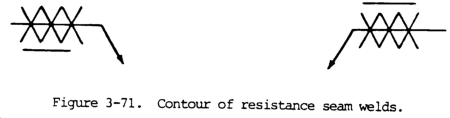
Figure 3-71. Contour of resistance seam welds
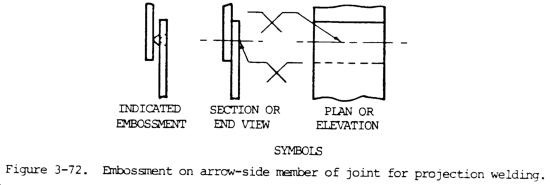
Figure 3-72. Embossment on arrow-side member of joint for projection welding
Figure 3-73. Embossment on other-side member of joint for projection welding
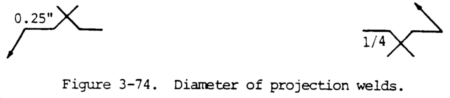
Figure 3-74. Diameter of projection welds
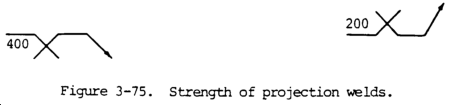
Figure 3-75. Strength of projection welds
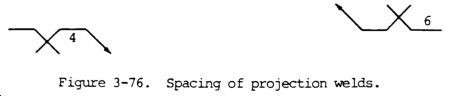
Figure 3-76. Spacing of projection welds
Figure 3-77. Number of projection welds
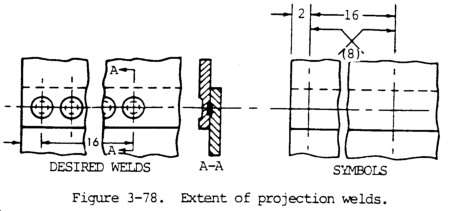
Figure 3-78. Extent of projection welds
Figure 3-79. Contour of projection welds
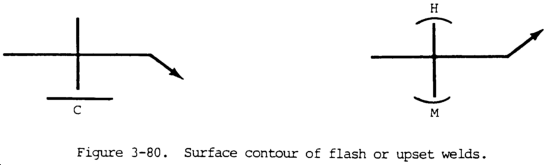
Figure 3-80. Surface contour of lash or upset welds
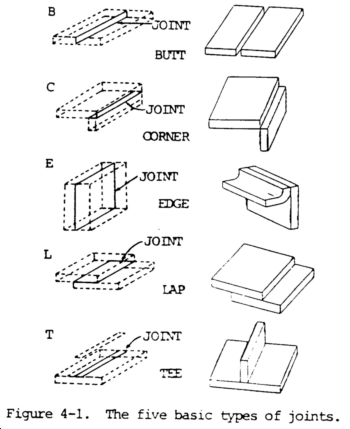
Figure 4-1. The five basic types of joints
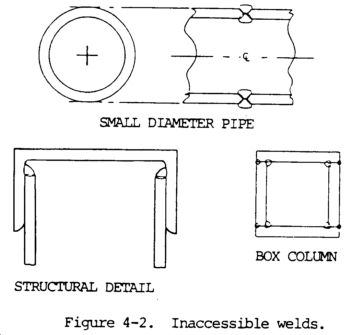
Figure 4-2. Inaccessible welds
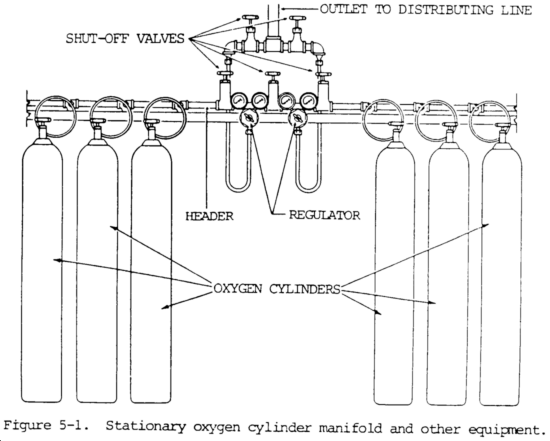
Figure 5-1. Stationary oxygen cylinder manifold and other equipment
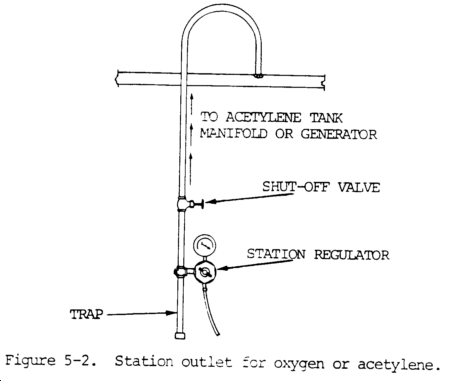
Figure 5-2. Station outlet for oxygen or acetylene
Figure 5-3. Stationary acetylene cylinder manifold and other equipment
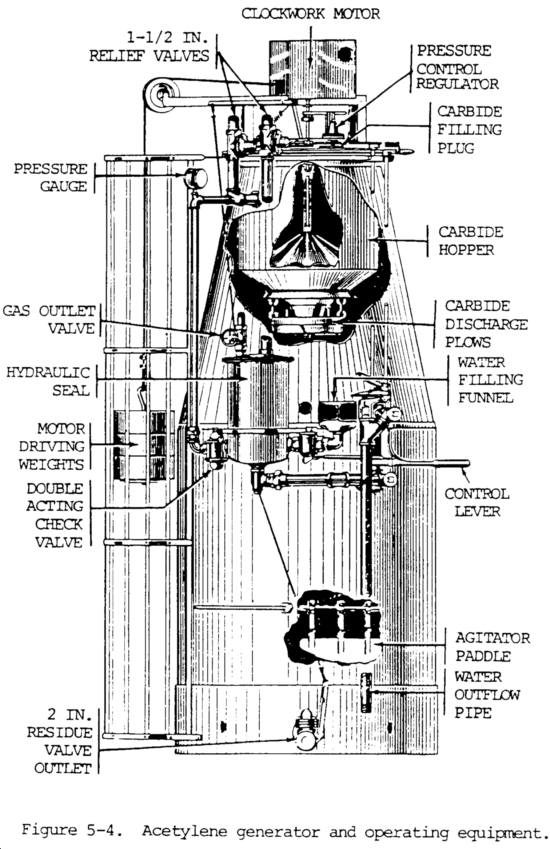
Figure 5-4. Acetylene generator and operating equipment
Figure 5-5. Portable oxyacetylene welding and cutting equipment
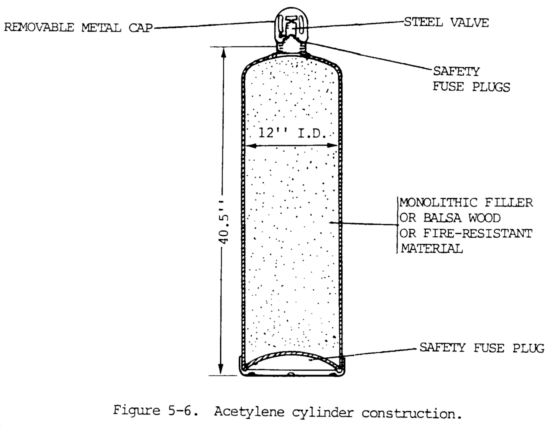
Figure 5-6. Acetylene cylinder construction
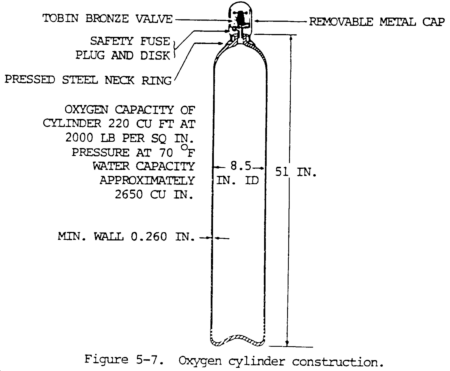
Figure 5-7. Oxygen cylinder construction
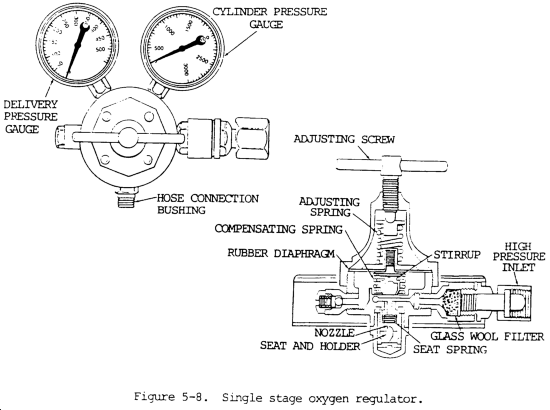
Figure 5-8. Single stage oxygen regulator
Figure 5-9. Two stage oxygen regulator
Figure 5-10. Mixing head for injector type welding torch
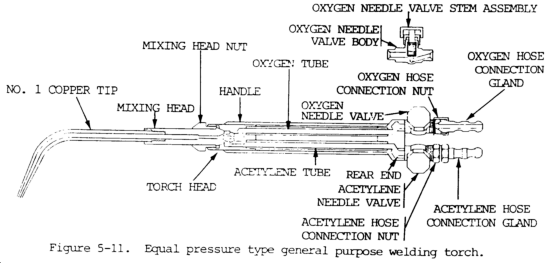
Figure 5-11. Equal pressure type general purpose welding torch
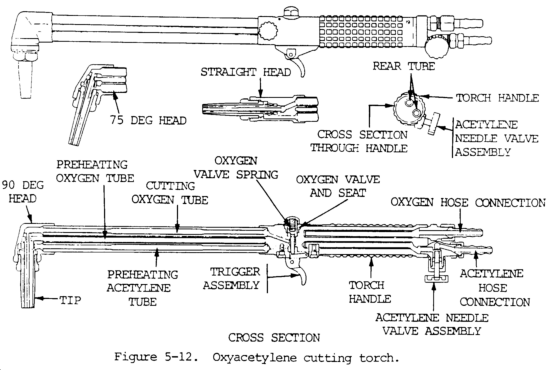
Figure 5-12. Oxyacetylene cutting torch
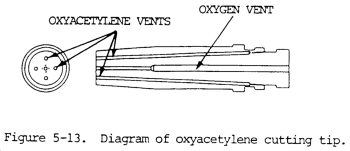
Figure 5-13. Diagram of oxyacetylene cutting tip
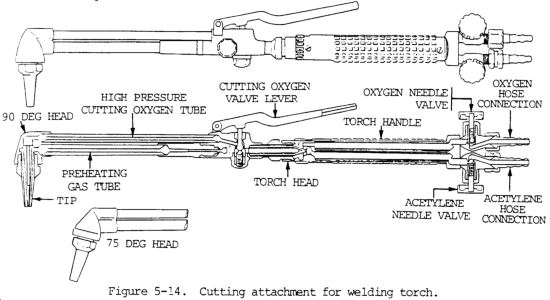
Figure 5-14. Cutting attachment for welding torch
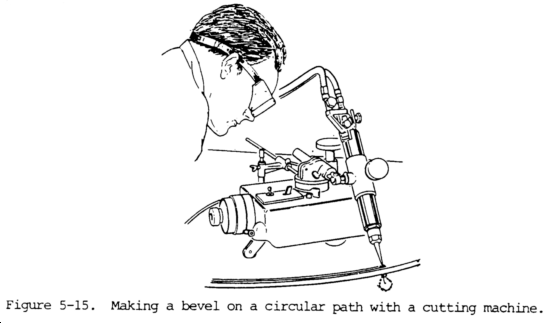
Figure 5-15. Making a bevel on a circular path with a cutting machine
Figure 5-16. Machine for making four oxyacetylene cuts simultaneously
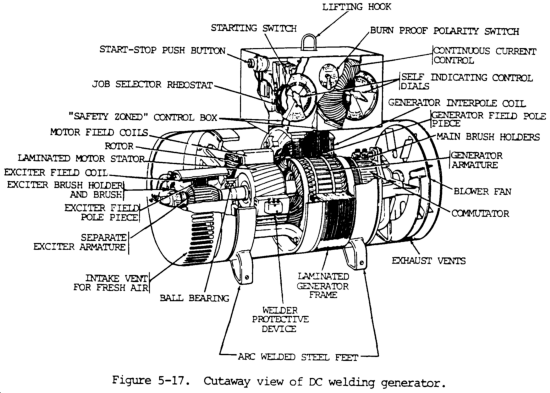
Figure 5-17. Cutaway view of DC welding generator
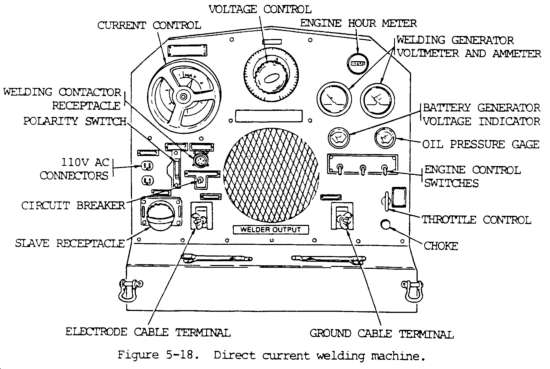
Figure 5-18. Direct current welding machine
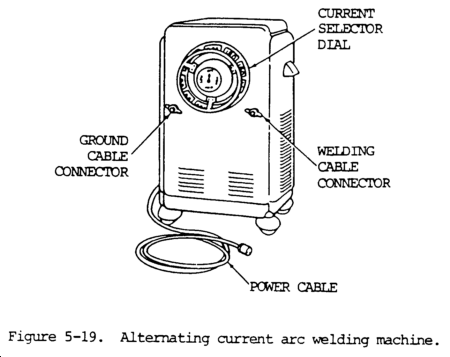
Figure 5-19. Alternating current arc welding machine
Figure 5-20. Gas tungsten-arc welding setup
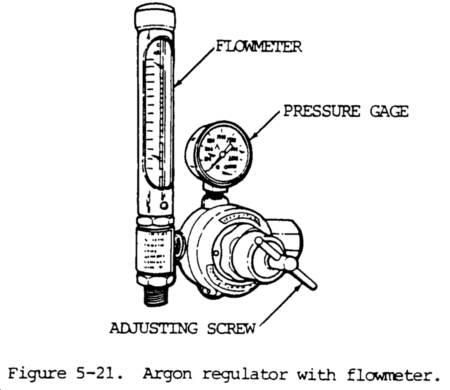
Figure 5-21. Argon regulator with flowmeter
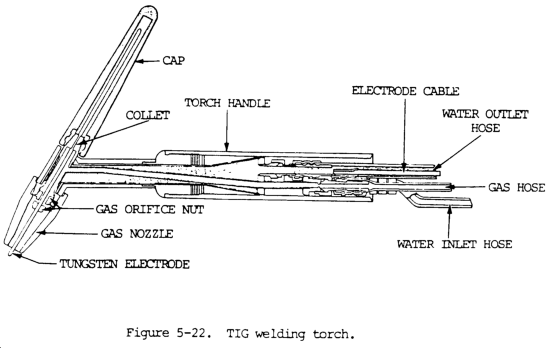
Figure 5-22. TIG welding torch
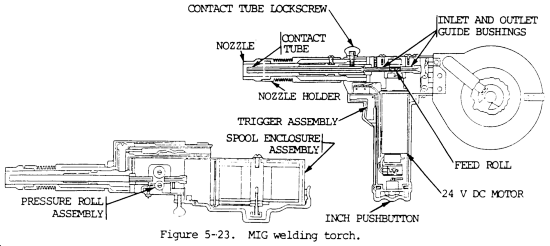
Figure 5-23. MIG welding torch
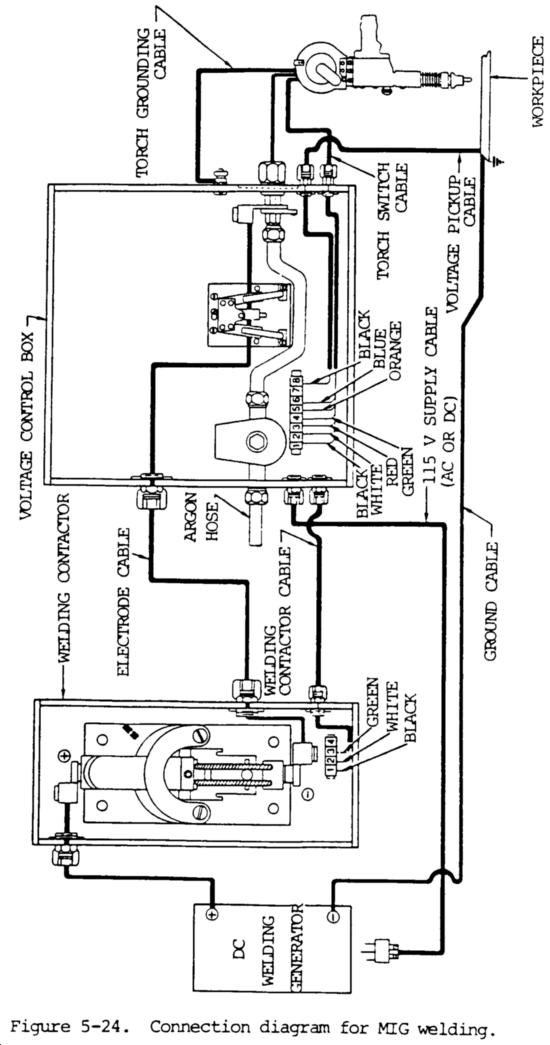
Figure 5-24. Connection diagram for MIG welding
Figure 5-25. Metal-arc welding electrode holders
Figure 5-26. Atomic hydrogen welding torch
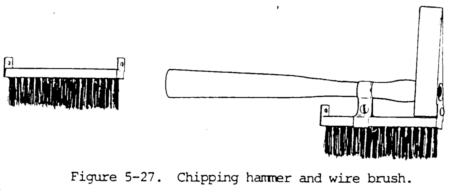
Figure 5-27. Chipping hammer and wire brush
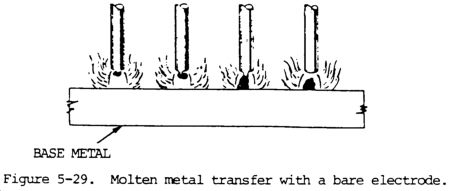
Figure 5-29. Molten metal transfer with a bare electrode
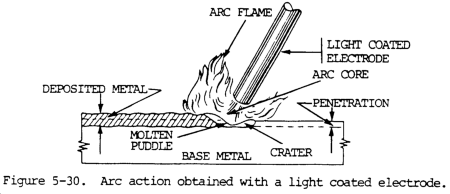
Figure 5-30. Arc action obtained with a light coated electrode
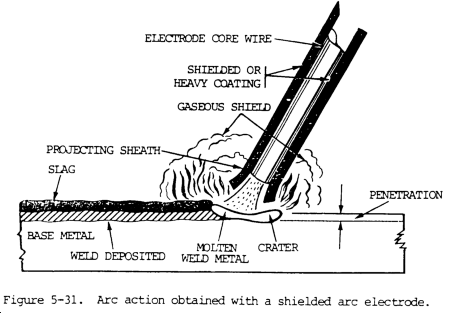
Figure 5-31. Arc action obtained with a shielded arc electrode
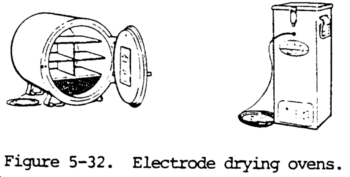
Figure 5-32. Electrode drying ovens
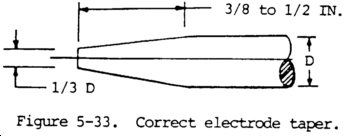
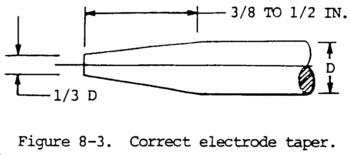
Figure 5-33. Correct electrode taper
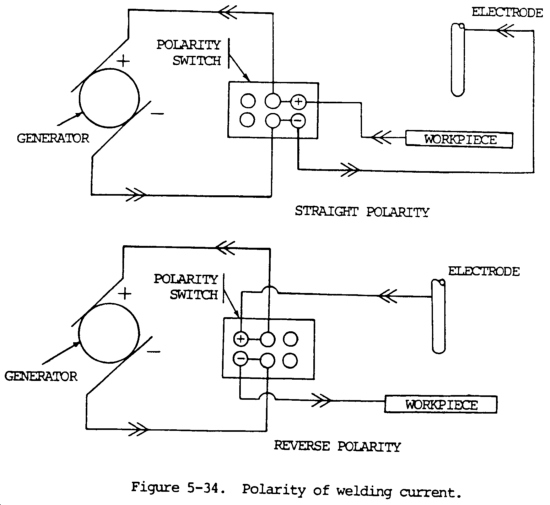
Figure 5-34. Polarity of welding current
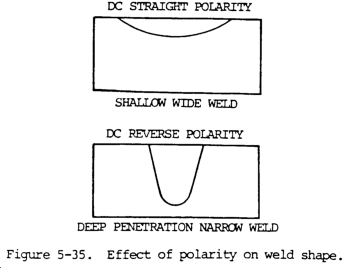
Figure 5-35. Effect of polarity on weld shape
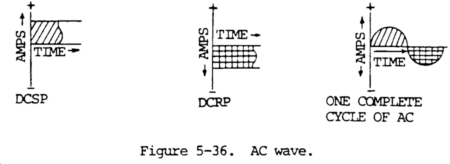
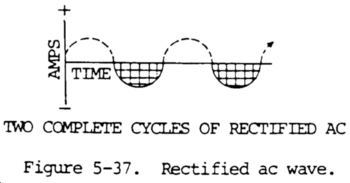
Figure 5-37. Rectified ac wave
Figure 5-38. Comparison of penetration contours
Figure 5-39. Resistance spot welding machine and accessories
Figure 5-40. Projection welding
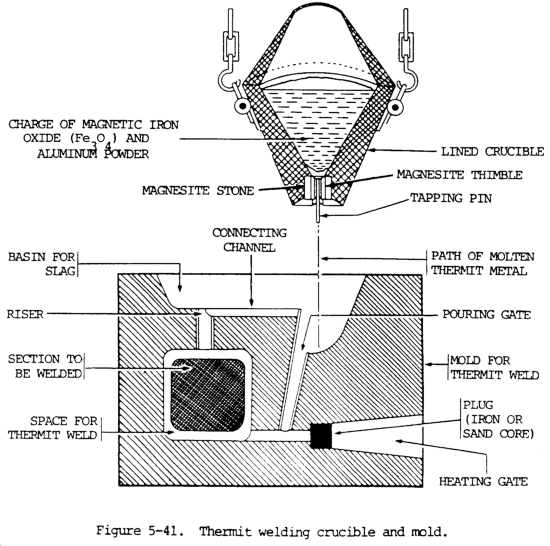
Figure 5-41. Thermit welding crucible and mold
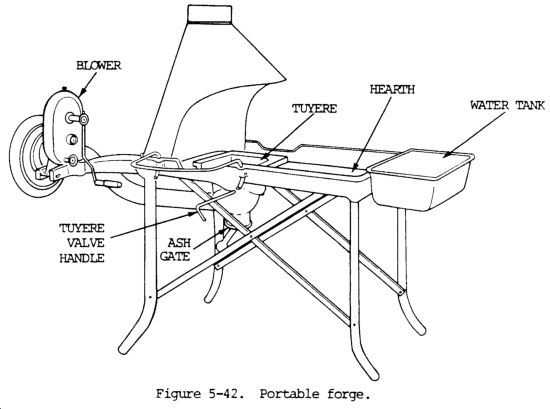
Figure 5-43. Blacksmith's anvil
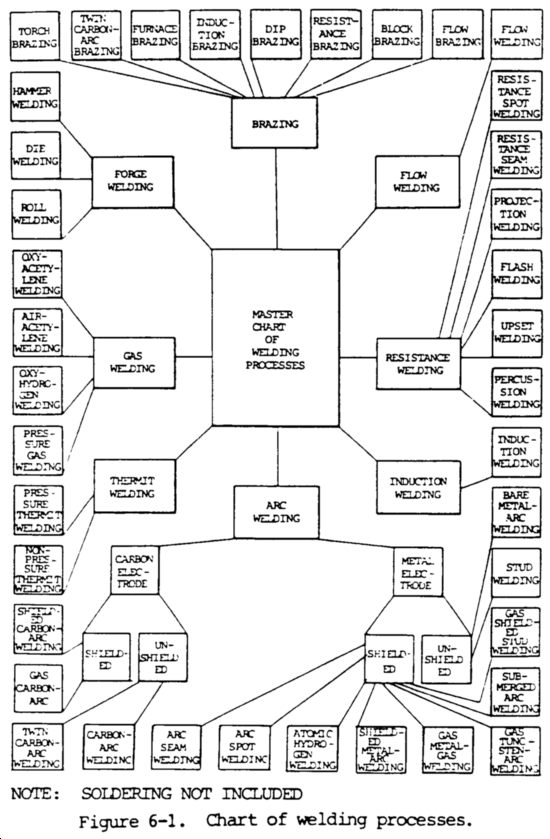
Figure 6-1. Chart of welding processes
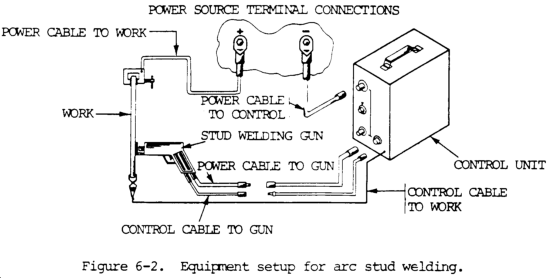
Figure 6-2. Equipment setup for arc stud welding
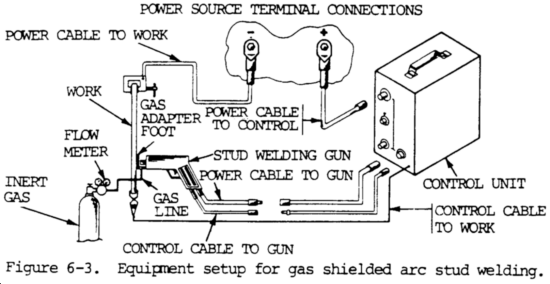
Figure 6-3. Equipment setup for gas shielded arc stud welding
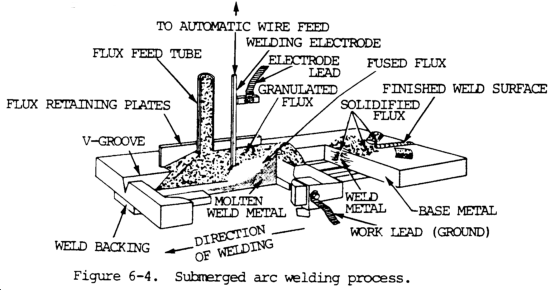
Figure 6-4. Submerged arc welding process
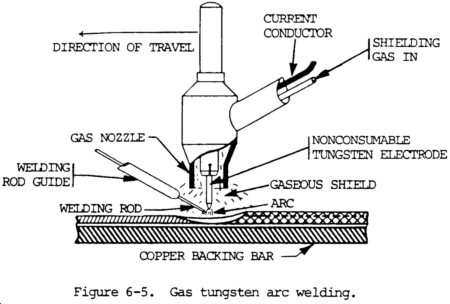
Figure 6-5. Gas tungsten arc welding
Figure 6-6. Gas metal arc welding
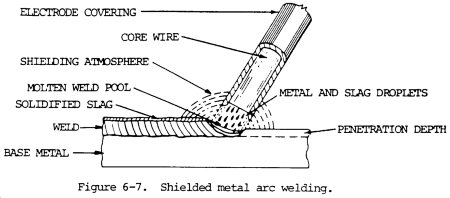
Figure 6-7. Shielded metal arc welding
Figure 6-8. Furnace brazing operation
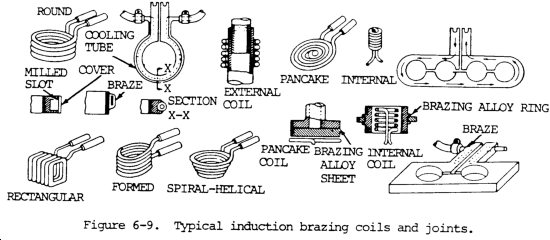
Figure 6-9. Typical induction brazing coils and joints
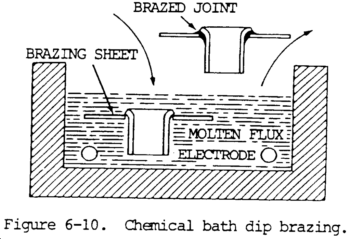
Figure 6-10. Chemical bath dip brazing
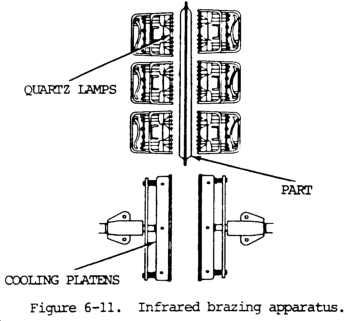
Figure 6-11. Infrared brazing apparatus
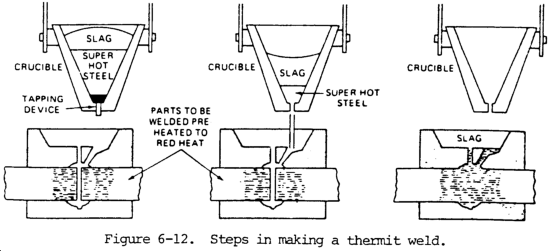
Figure 6-12. Steps in making a thermit weld
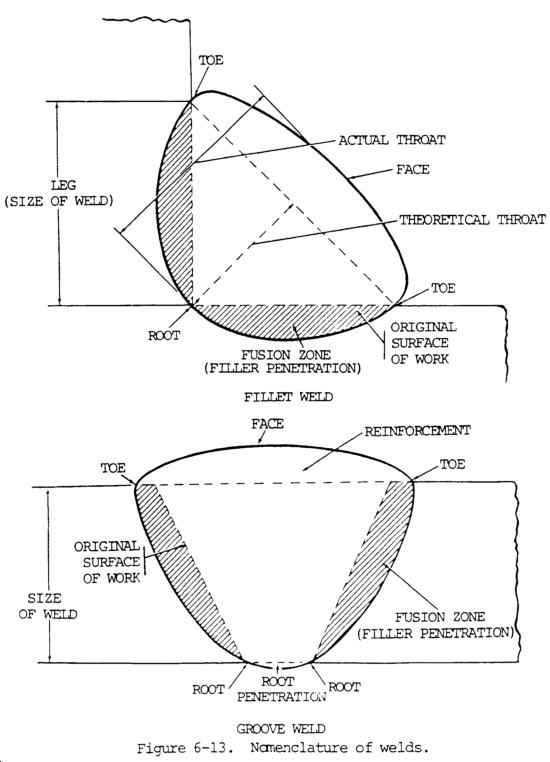
Figure 6-13. Nomenclature of welds
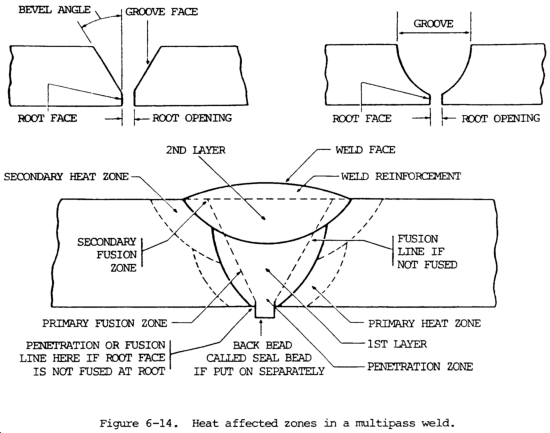
Figure 6-14. Heat affected zones in a multipass weld
Figure 6-15. Welding prodedure schedule - various welds
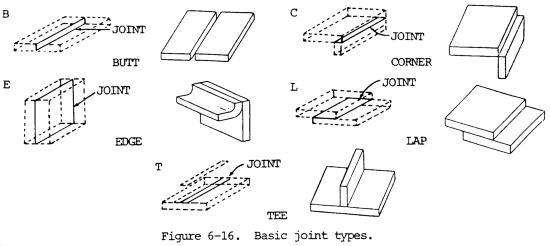
Figure 6-16. Basic joint types
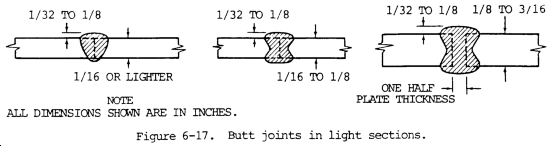
Figure 6-17. Butt joints in light sections
Figure 6-18. Butt joints in heavy sections
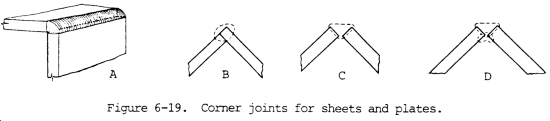
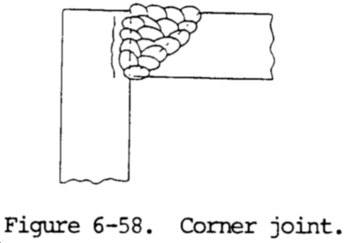
Figure 6-19. Corner joints for sheets and plates
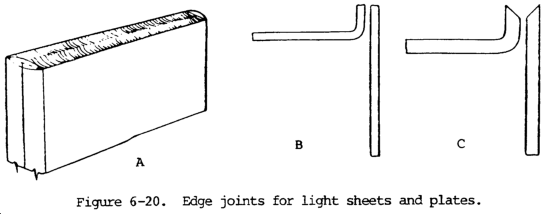
Figure 6-20. Edge joints for light sheets and plates
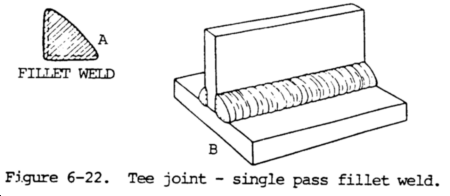
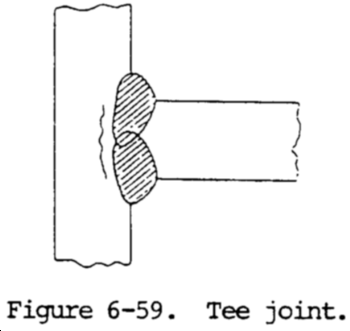
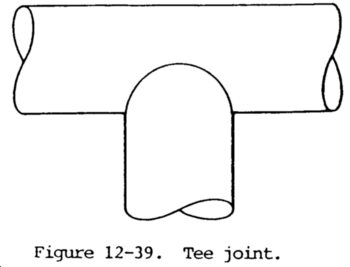
Figure 6-22. Tee joint-single pass fillet weld
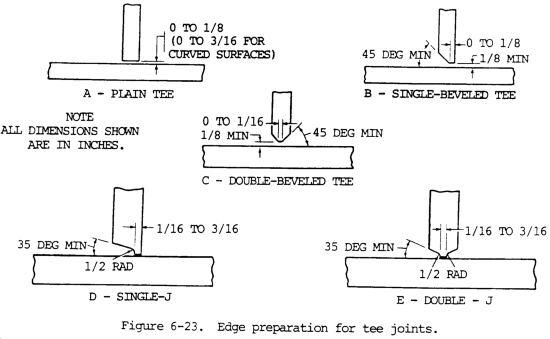
Figure 6-23. Edge preparation for tee joints
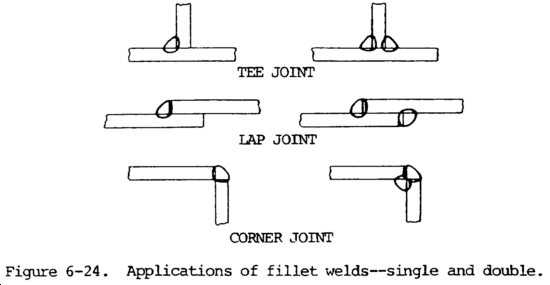
Figure 6-24. Applications of fillet welds - single and double
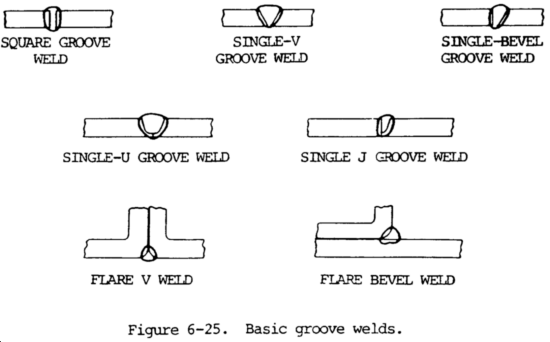
Figure 6-25. Basic groove welds
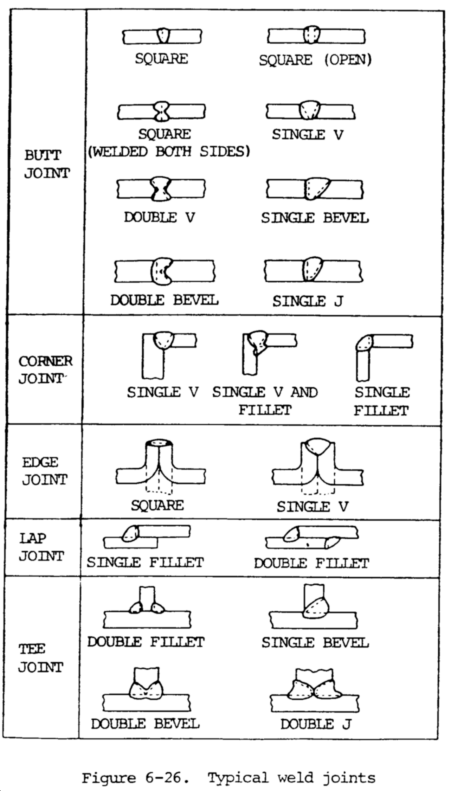
Figure 6-26. Typical weld joints
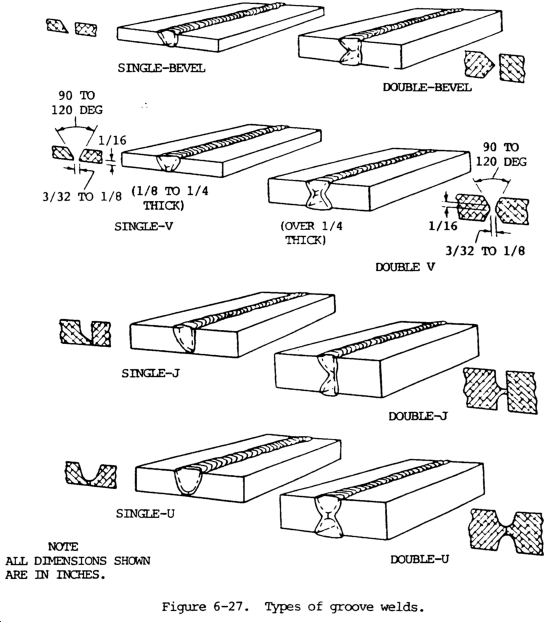
Figure 6-27. Types of groove welds
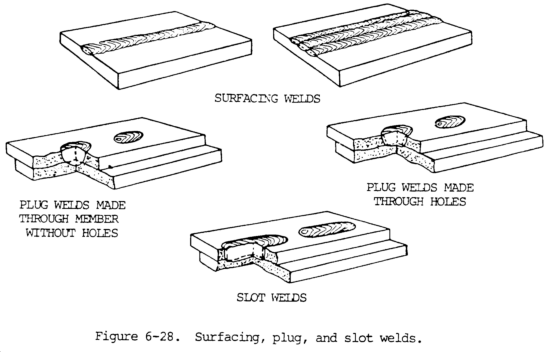
Figure 6-28. Surfacing, plug, and slot welds
Figure 6-29. Flash, seam, spot, and upset welds
Figure 6-30. Welding positions - groove welds - plate
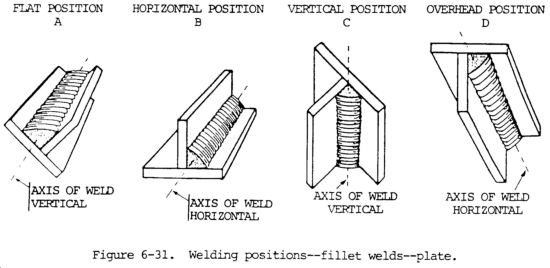
Figure 6-31. Welding positions - fillet welds - plate
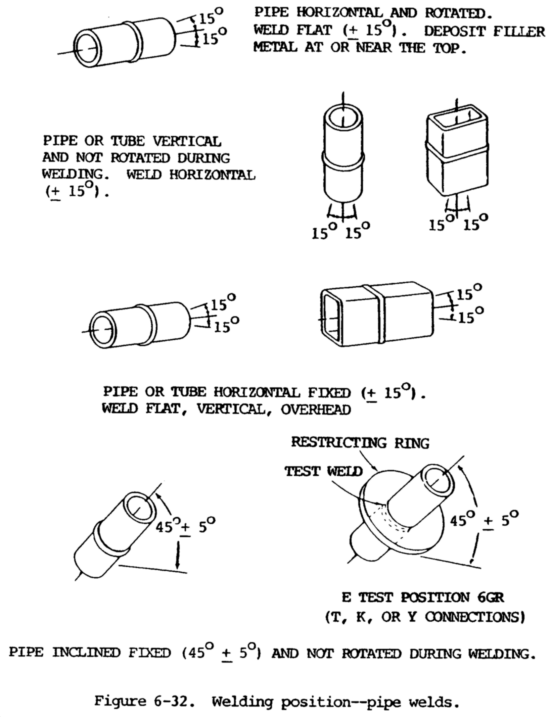
Figure 6-32. Welding positions - pipe welds
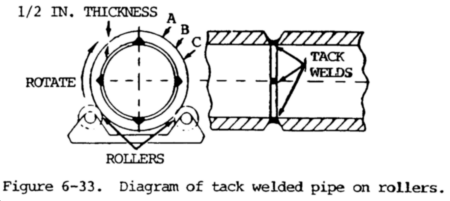
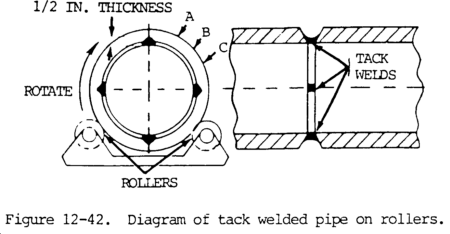
Figure 6-33. Diagram of tack welded pipe on rollers
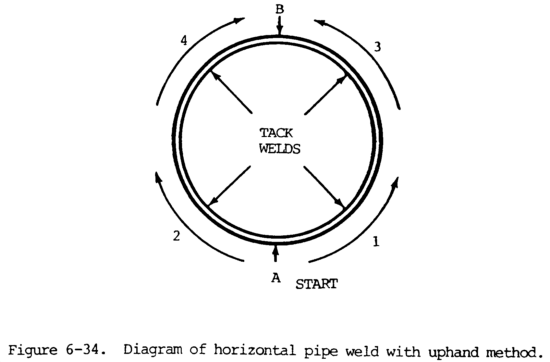
Figure 6-34. Diagram of horizontal pipe weld with uphand method
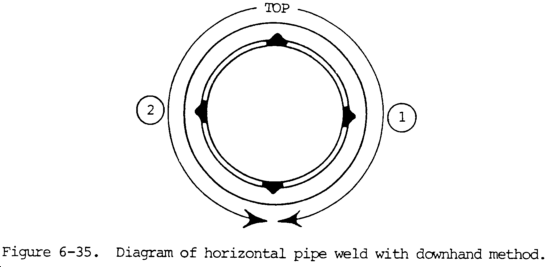
Figure 6-35. Diagram of horizontal pipe weld with downhand method
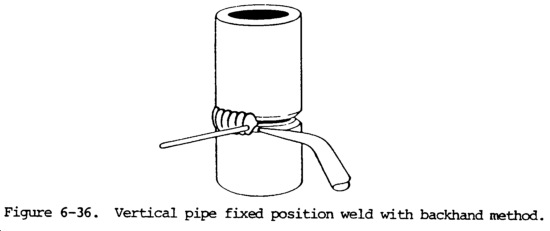
Figure 6-36. Vertical pipe fixed position weld with backhand method
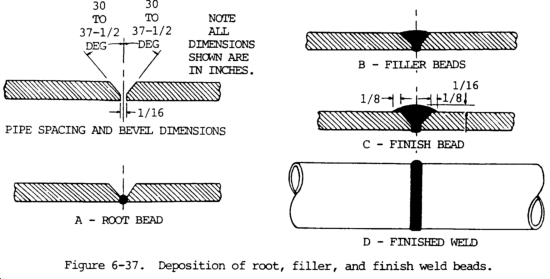
Figure 6-37. Deposition of root, filler, and finish weld beads
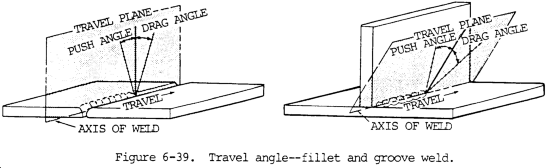
Figure 6-38. Work angle - fillet and groove weld
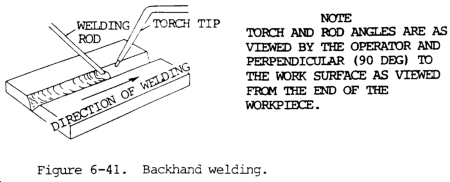
Figure 6-39. Travel angle - fillet and groove weld
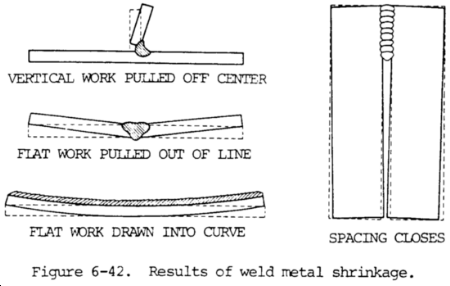
Figure 6-42. Results of weld metal shrinkage
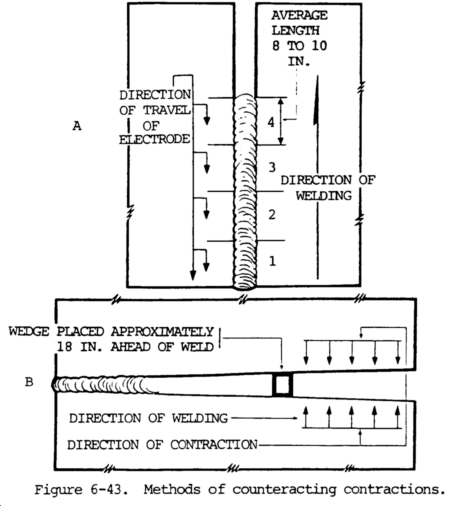
Figure 6-43. Methods of counteracting contractions
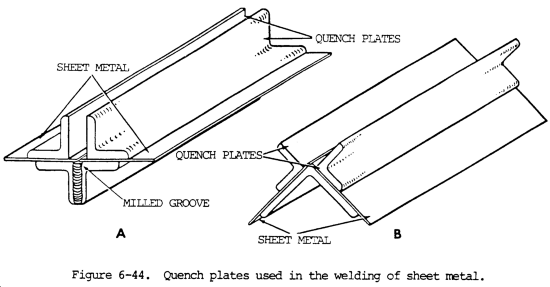
Figure 6-44. Quench plates used in the welding of sheet metal
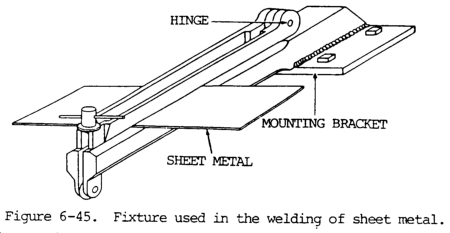
Figure 6-45. Fixture used in the welding of sheet metal
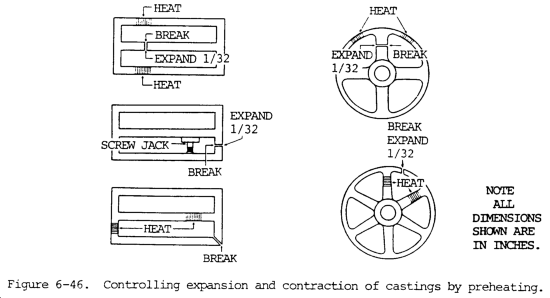
Figure 6-46. Controlling expansion and contraction of castings by preheating
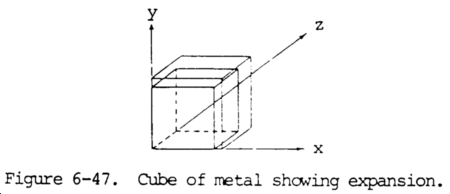
Figure 6-47. Cube of metal showing expansion
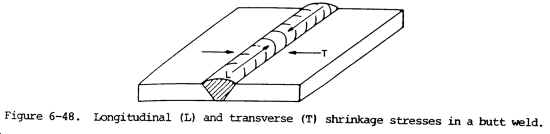
Figure 6-48. Longitudinal (L) and transverse (T) shrinkage stresses in a butt weld
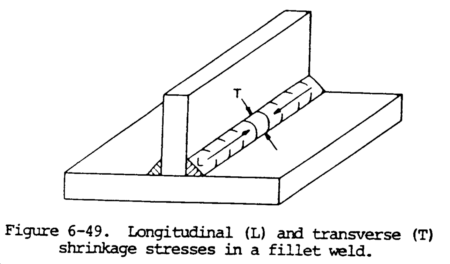
Figure 6-49. Longitudinal (L) and transverse (T) shrinkage stresses in a fillet weld
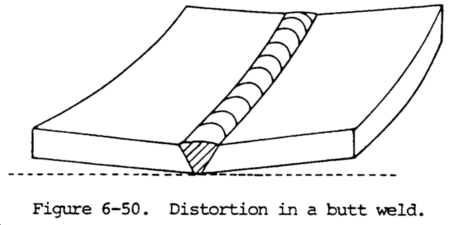
Figure 6-50. Distortion in a butt weld
Figure 6-51. Distortion in a fillet weld
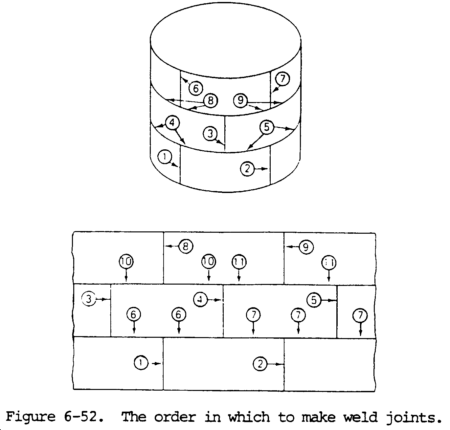
Figure 6-52. The order in which to make weld joints
Figure 6-53. Edge welded joint - residual stress pattern
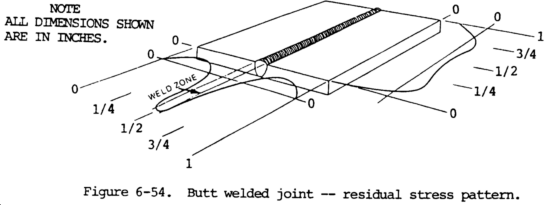
Figure 6-54. Butt welded joint - residual stress pattern
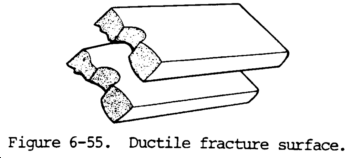
Figure 6-55. Ductile fracture surface
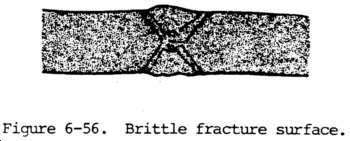
Figure 6-56. Brittle fracture surface
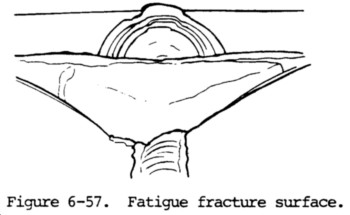
Figure 6-57. Fatigue fracture surface
Figure 6-60. Redesigned corner joint to avoid lamellar tearing
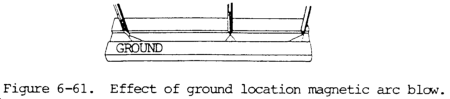
Figure 6-61. Effect of ground location on magnetic arc below
Figure 6-62. Unbalanced magnetic force due to current direction change
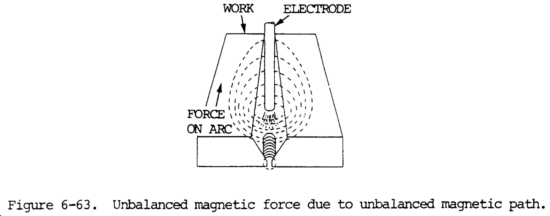
Figure 6-63. Unbalanced magnetic force due to unbalanced magnetic path
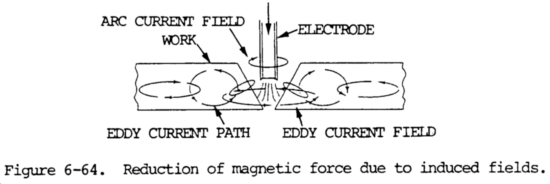
Figure 6-64. Reduction of magnetic force to induced fields
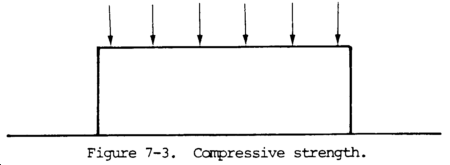
Figure 7-3. Compressive strength
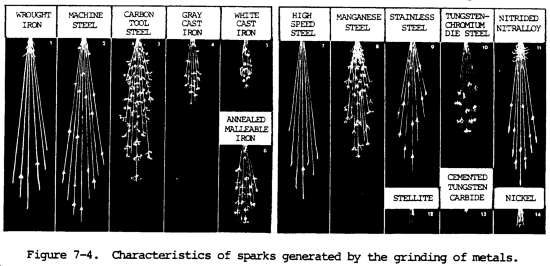
Figure 7-4. Characteristics of sparks generated by the grinding of metals
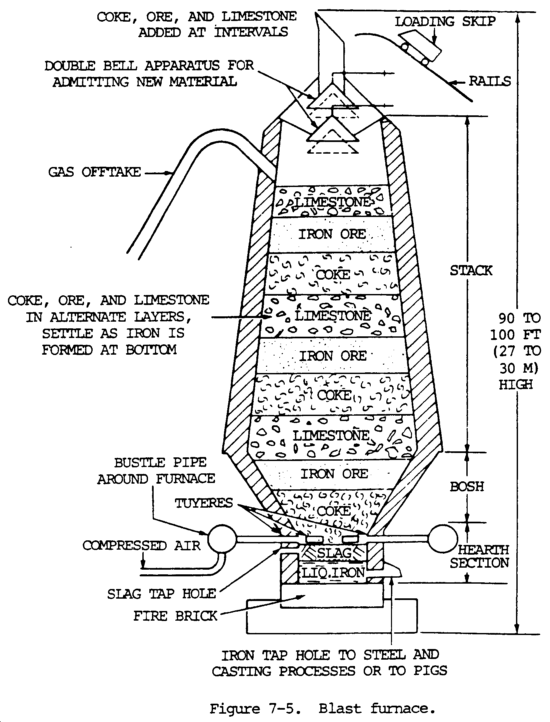
Figure 7-6. Conversion of iron ore into cast iron, wrought iron, and steel
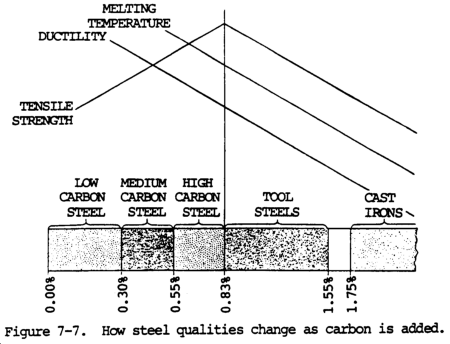
Figure 7-7. How steel qualities change as carbon is added
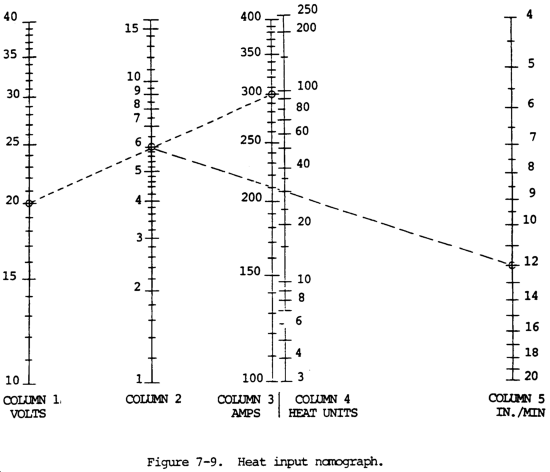
Figure 7-9. Heat input nomograph
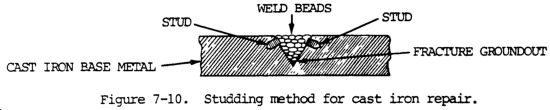
Figure 7-10. Studding method for cast iron repair
Figure 7-11. Joint design for aluminum plates
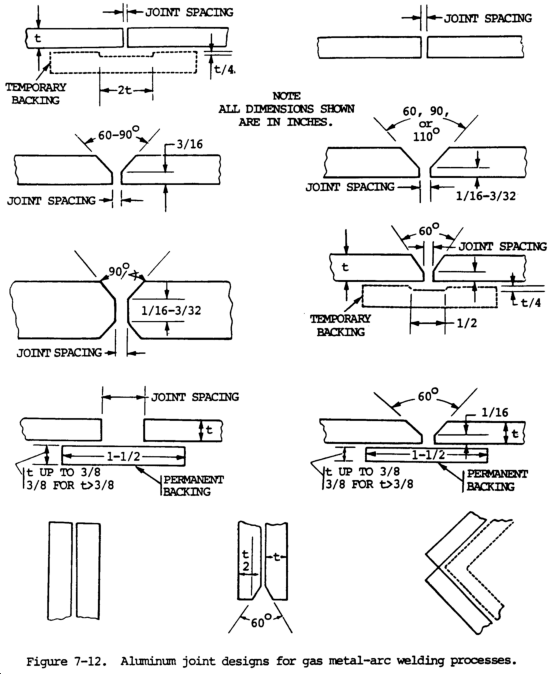
Figure 7-12. Aluminum joint designs for gas metal-arc welding processes
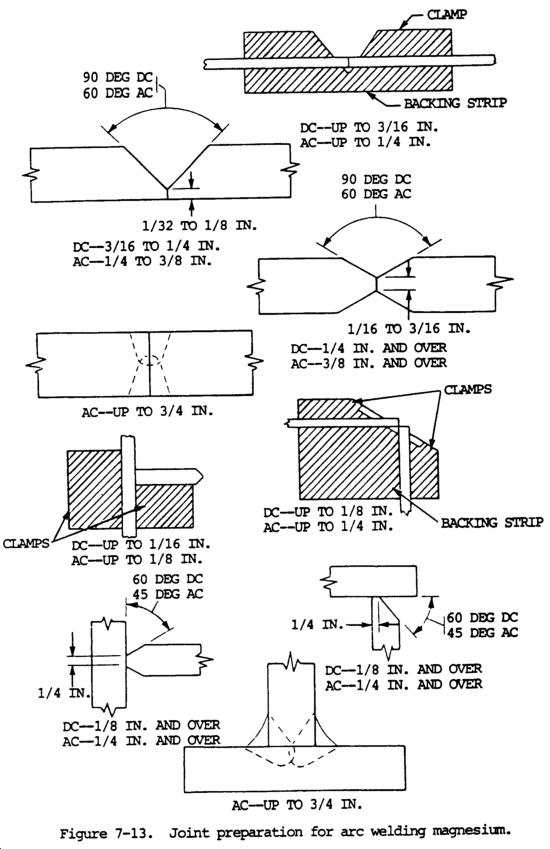
Figure 7-13. Joint preparation for arc welding magnesium
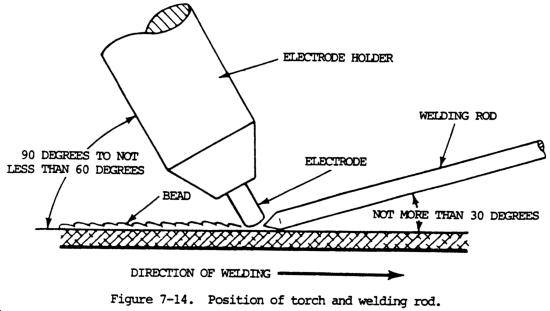
Figure 7-14. Position of torch and welding rod
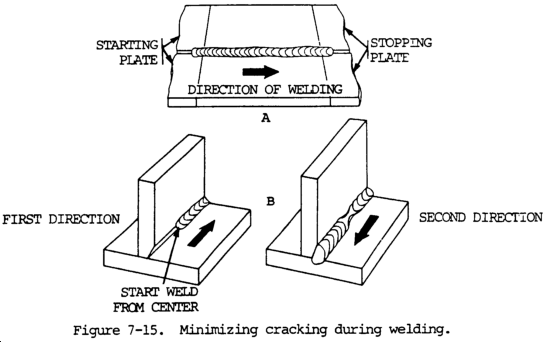
Figure 7-15. Minimizing cracking during welding
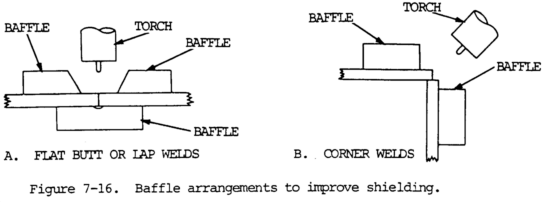
Figure 7-16. Baffle arrangements to improve shielding
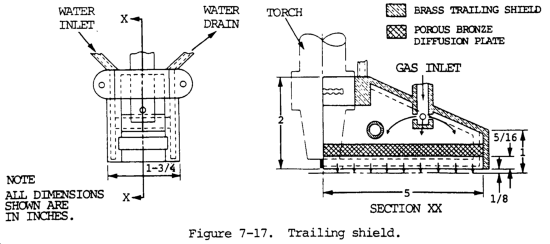
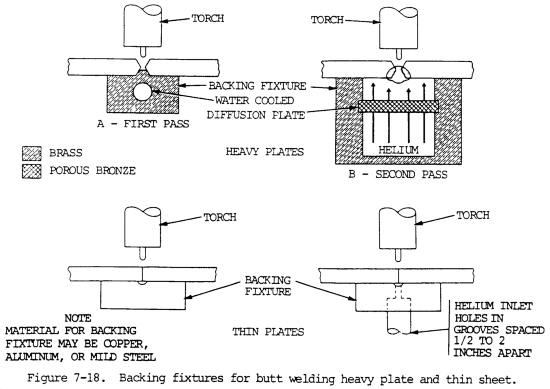
Figure 7-18. Backing fixtures for butt welding heavy plate and thin sheet
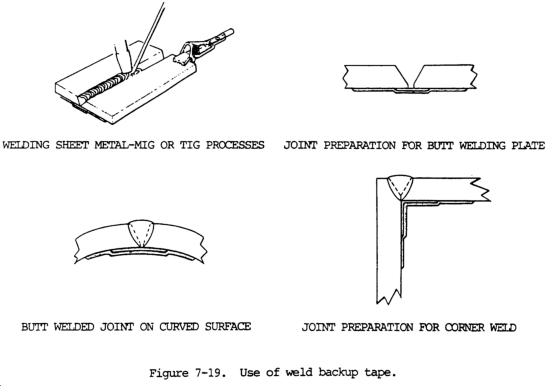
Figure 7-19. Use of weld backup tape
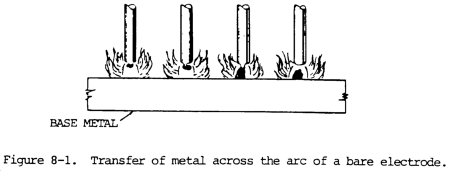
Figure 8-1. Transfer of metal across the arc of a bare electrode
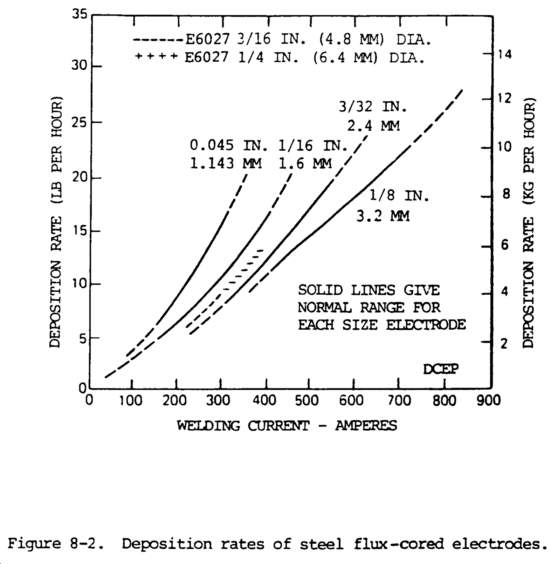
Figure 8-2. Deposition rates of steel flux-cored electrodes
Figure 8-3. Correct electrode taper
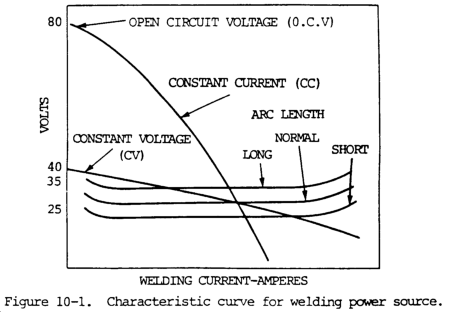
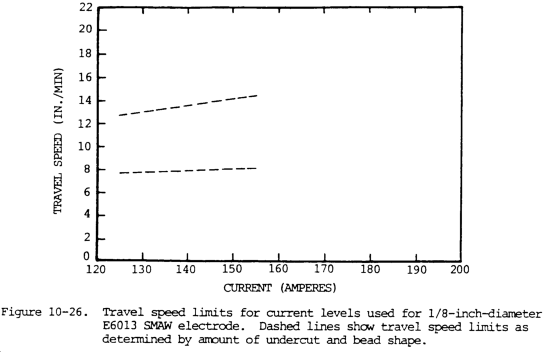
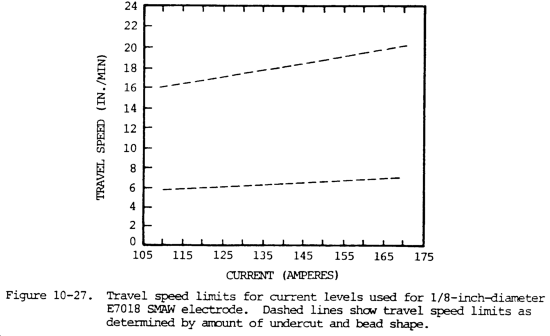
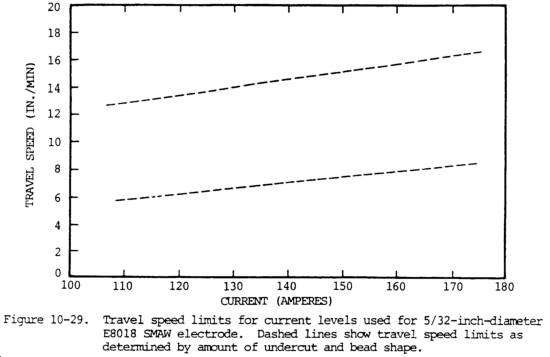
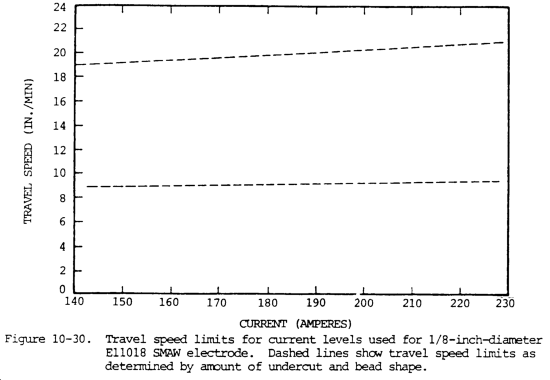
Figure 10-1. Characteristic curve for welding power source
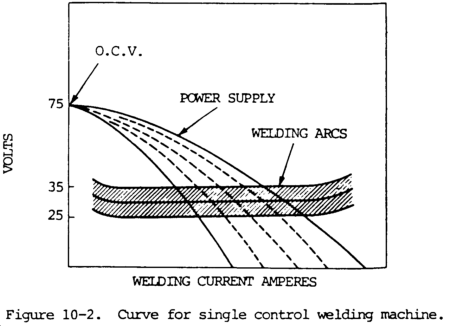
Figure 10-2. Curve for single control welding machine
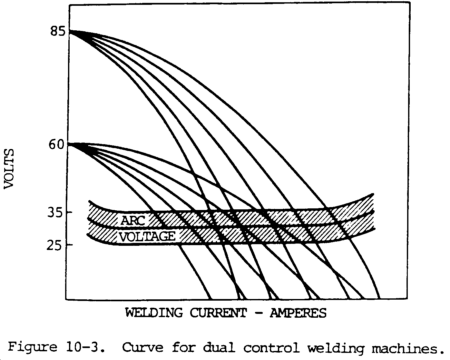
Figure 10-3. Curve for dual control welding machines
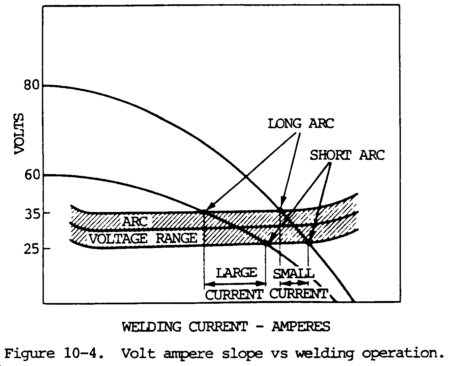
Figure 10-4. Volt ampere slope vs welding operation
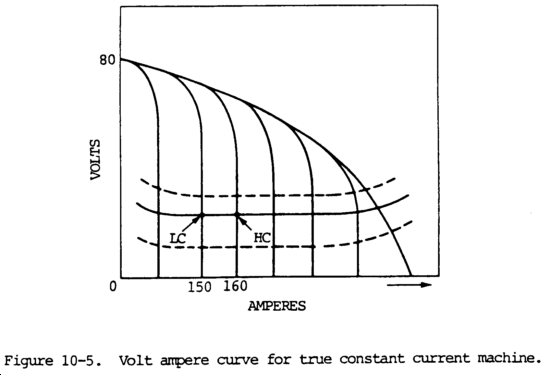
Figure 10-5. Volt ampere curve for true constant current machine
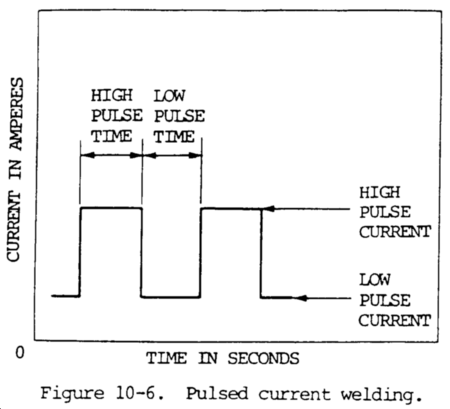
Figure 10-6. Pulsed current welding
Figure 10-7. Burn-off rates of wire vs current
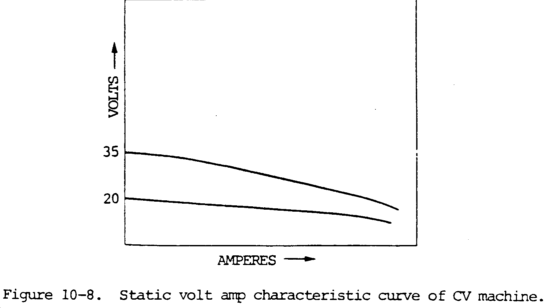
Figure 10-8. Static volt amp characteristic curve of CV machine
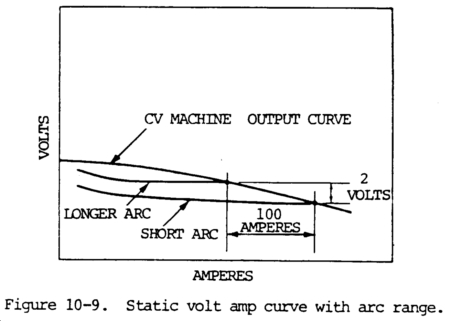
Figure 10-9. Static volt amp curve with arc range
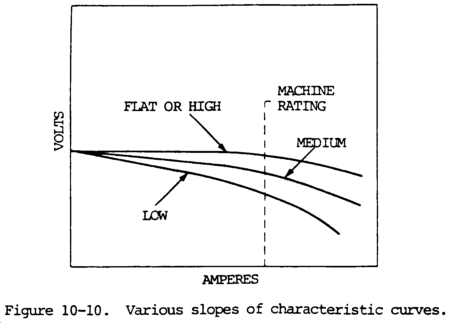
Figure 10-10. Various slopes of characteristic curves
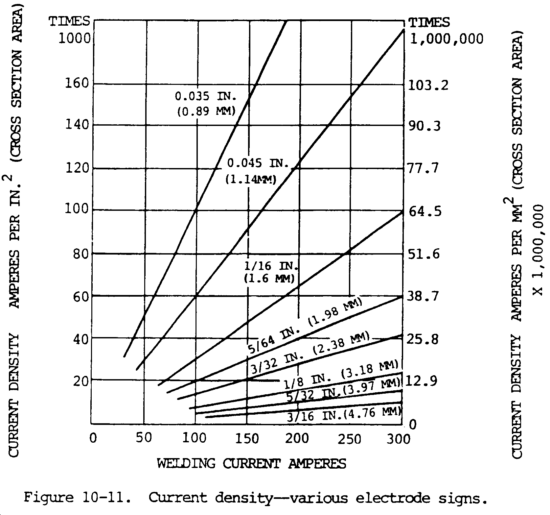
Figure 10-11. Current density - various electrode signs
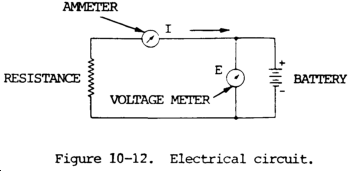
Figure 10-12. Electrical circuit
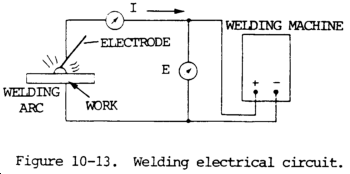
Figure 10-13. Welding electrical circuit
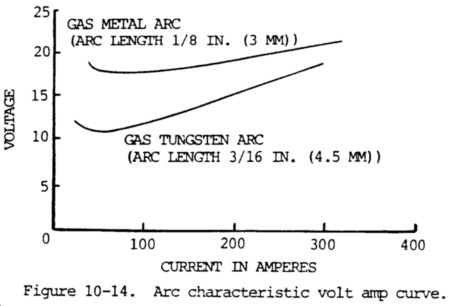
Figure 10-14. Arc characteristic volt amp curve
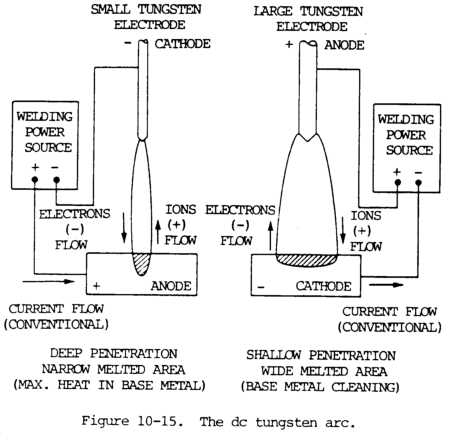
Figure 10-15. The dc tungsten arc
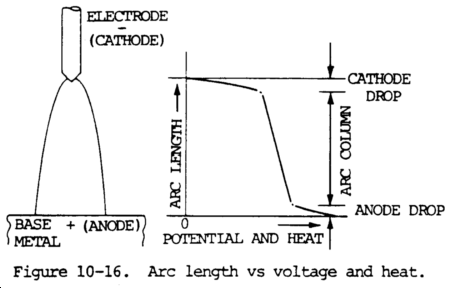
Figure 10-16. Arc length vs voltage and heat
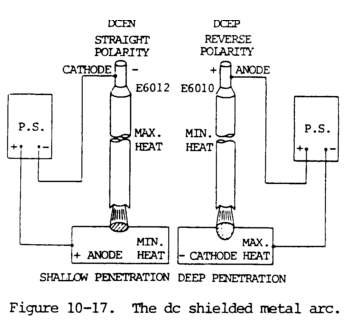
Figure 10-17. The dc shielded metal arc
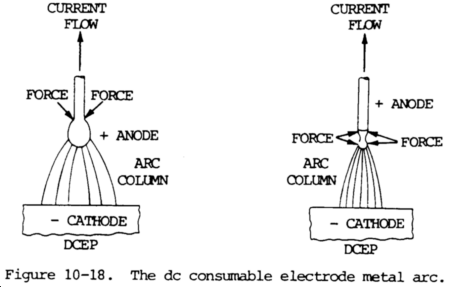
Figure 10-18. The dc consumable electrode metal arc
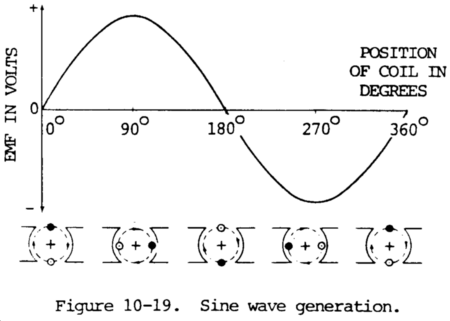
Figure 10-19. Sine wave generation
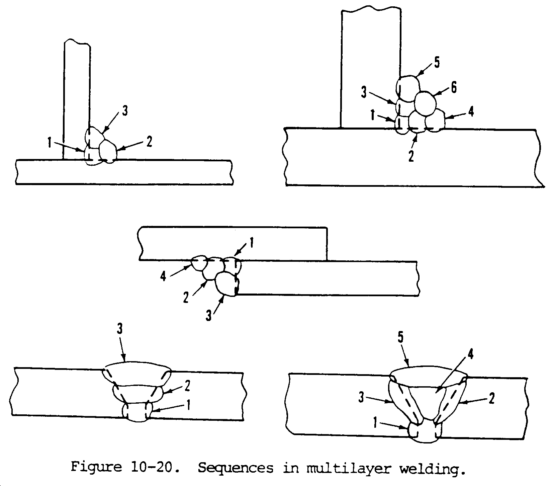
Figure 10-20. Sequences in multilayer welding
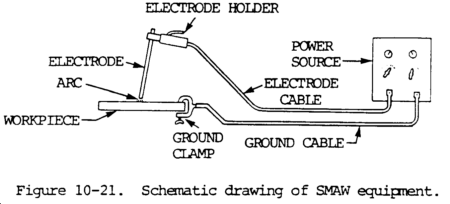
Figure 10-21. Schematic drawing of SMAW equipment
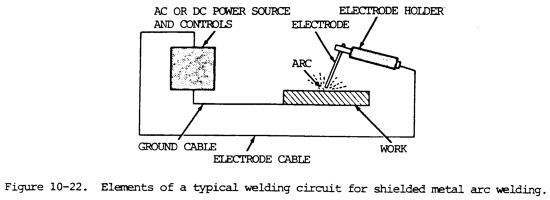
Figure 10-22. Elements of a typical welding circuit for shielded metal arc welding
Figure 10-23. Three types of free-flight metal transfer in a welding arc
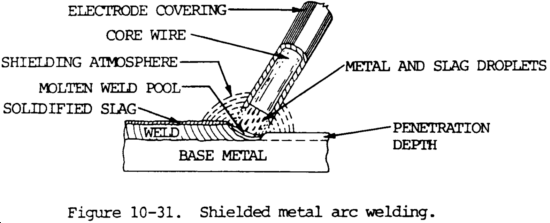
Figure 10-31. Shielded metal arc welding
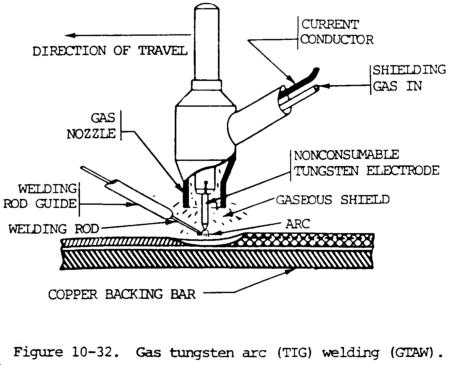
Figure 10-32. Gas tungsten arc (TIG) welding (GTAW)
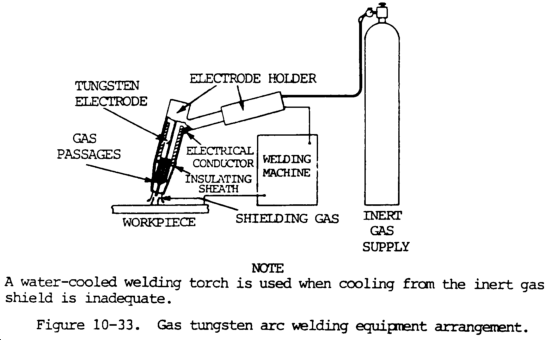
Figure 10-33. Gas tungsten arc welding equipment arrangement
Figure 10-34. Technique for manual gas tungsten arc (TIG) welding
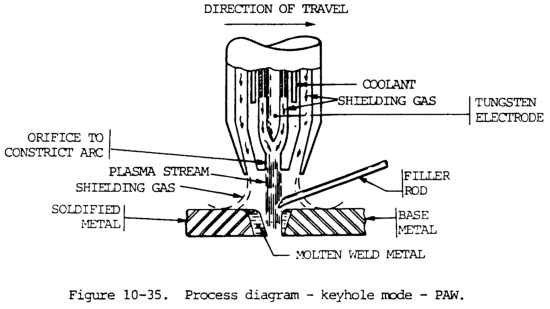
Figure 10-35. Process diagram - keyhole mode - PAW
Figure 10-36. Cross section of plasma arc torch head
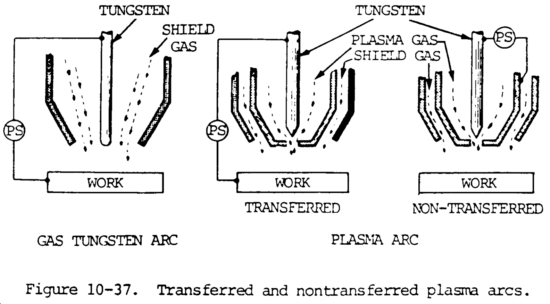
Figure 10-37. Transferred and nontransferred plasma arcs
Figure 10-38. Various joints for plasma arc
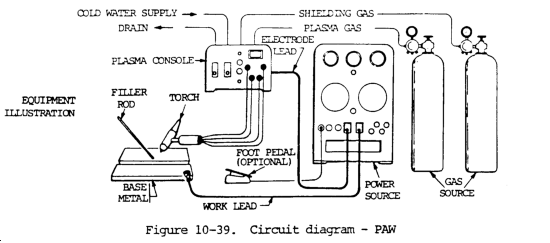
Figure 10-39. Circuit diagram - PAW
Figure 10-40. Quality and common faults
Figure 10-41. Deposition rates
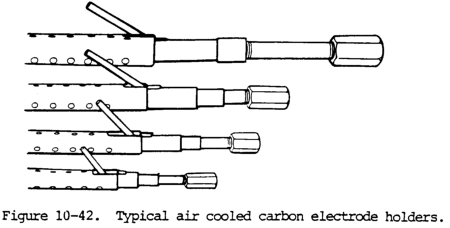
Figure 10-42. Typical air cooled carbon electrode holders
Figure 10-43. Process diagram - CAW
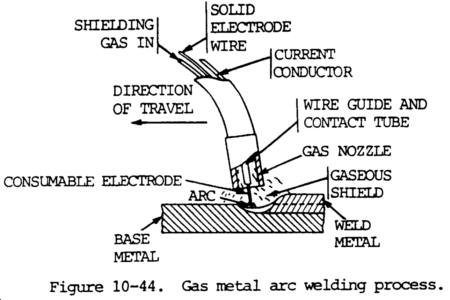
Figure 10-44. Gas metal arc welding process
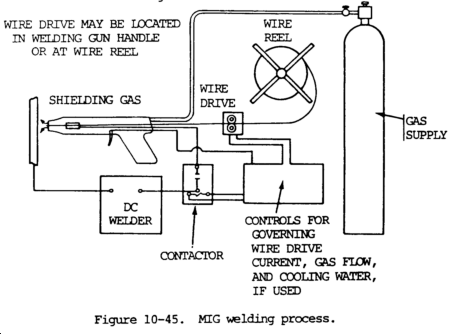
Figure 10-45. MIG welding process
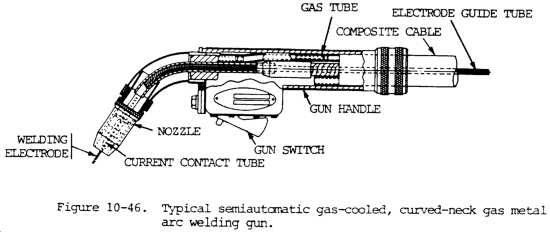
Figure 10-46. Typical semiautomatic gas-cooled, curved-neck gas metal arc welding gun
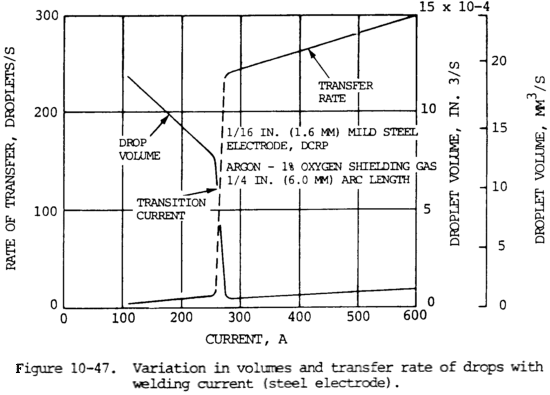
Figure 10-47. Variation in volumes and transfer rate of drops with welding current (steel electrode)
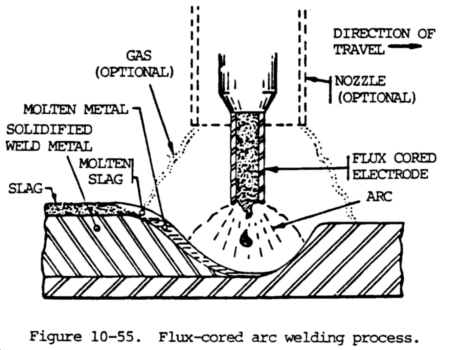
Figure 10-55. Flux-cored arc welding process
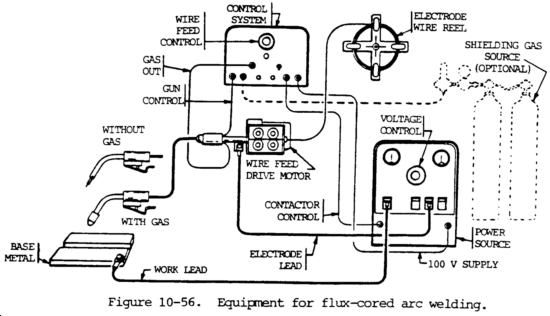
Figure 10-56. Equipment for flux-cored arc welding
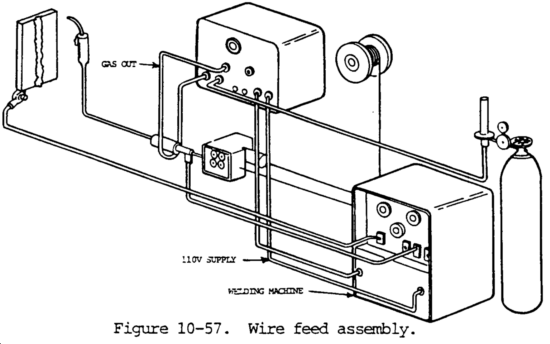
Figure 10-57. Wire feed assembly
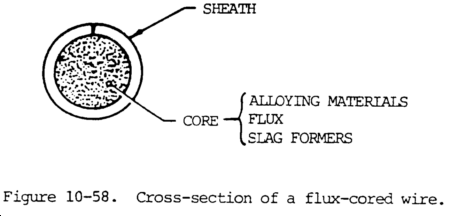
Figure 10-58. Cross-section of a flux-cored wire
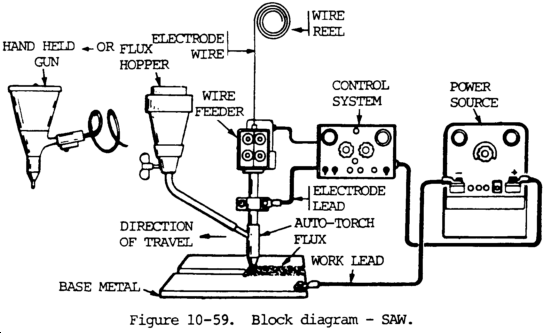
Figure 10-59. Block diagram - SAW
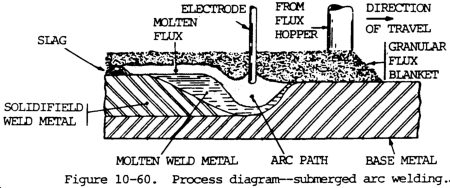
Figure 10-60. Process diagram - submerged arc welding
Figure 10-61. Weld joint designs for submerged arc welding
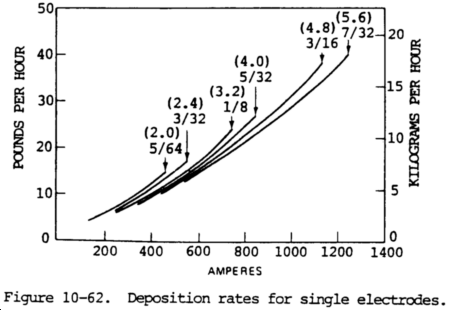
Figure 10-62. Deposition rates for singel electrodes
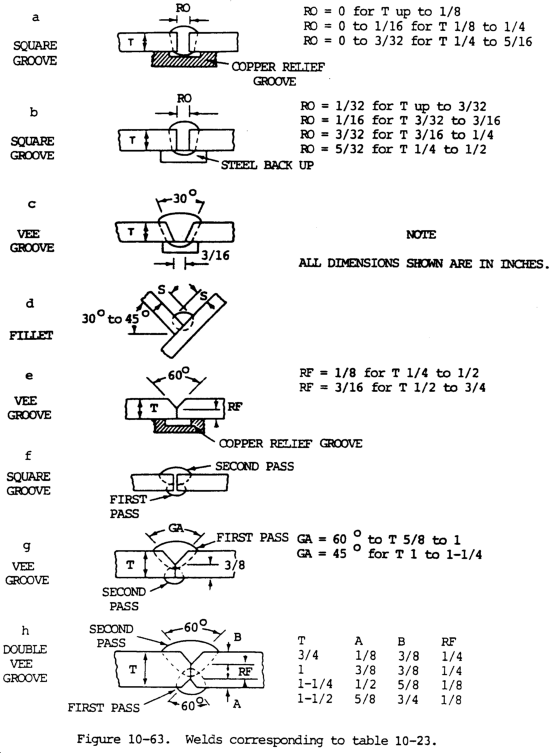
Figure 10-63. Welds corresponding to table 10-23
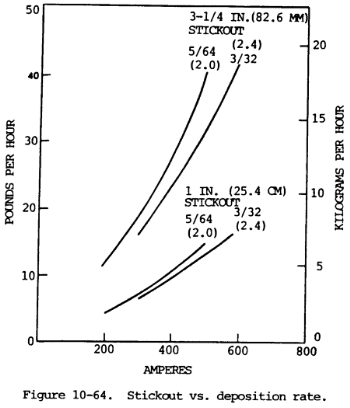
Figure 10-64. Stickout vs deposition rate
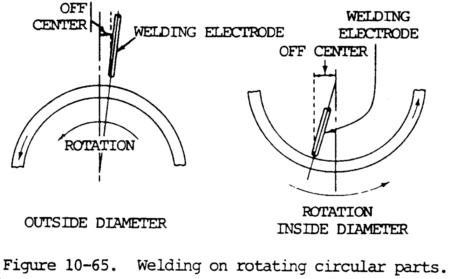
Figure 10-65. Welding on rotating circular parts
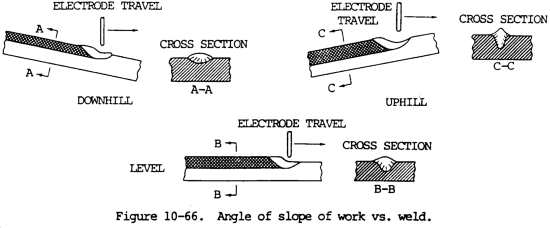
Figure 10-66. Angle of slope of work vs weld
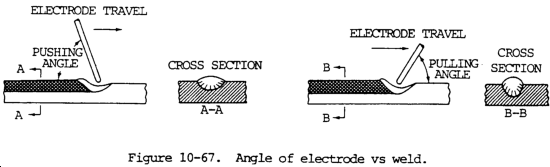
Figure 10-67. Angle of electrode vs weld
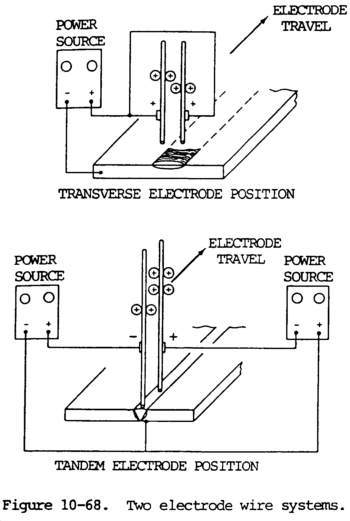
Figure 10-68. Two electrode wire systems
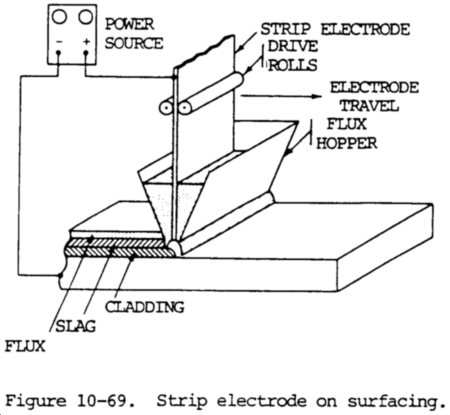
Figure 10-69. Strip electrode on surfacing
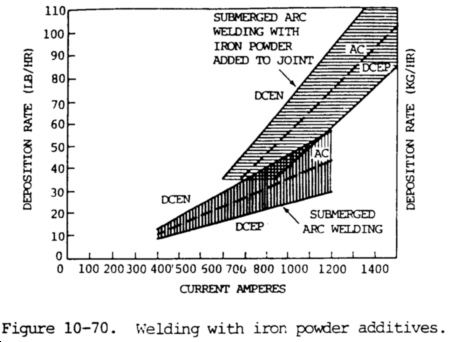
Figure 10-70. Welding with iron powder additives
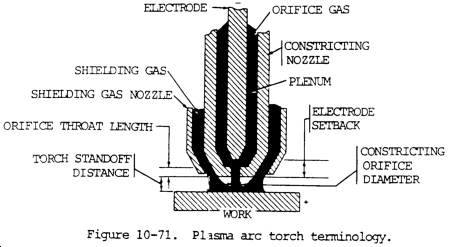
Figure 10-71. Plasma arc torch terminology
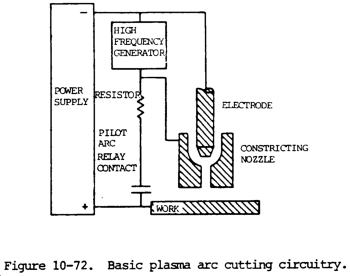
Figure 10-72. Basic plasma arc cutting circuitry
Figure 10-73. Dual flow plasma arc cutting
Figure 10-74. Water injection plasma arc cutting arrangement
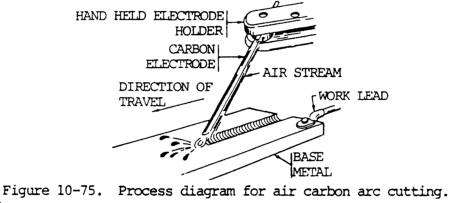
Figure 10-75. Process diagram for air carbon arc cutting
Figure 10-76. Air carbon arc cutting diagram
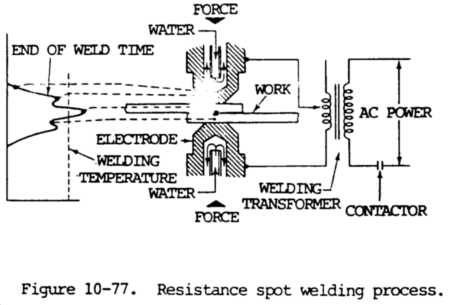
Figure 10-77. Resistance spot welding process
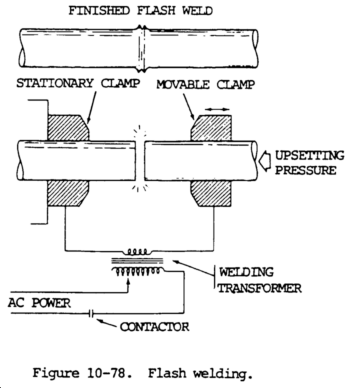
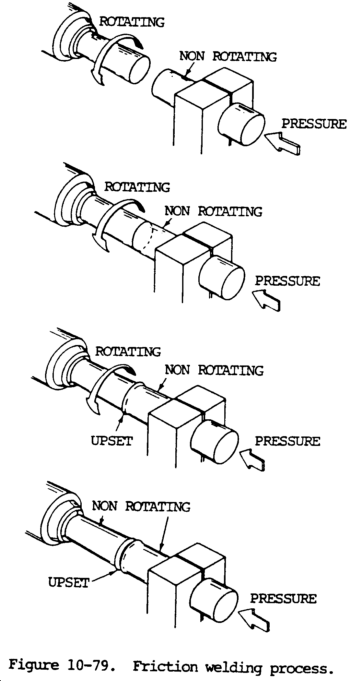
Figure 10-79. Friction welding process
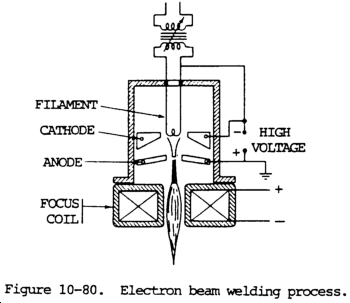
Figure 10-80. Electron beam welding process
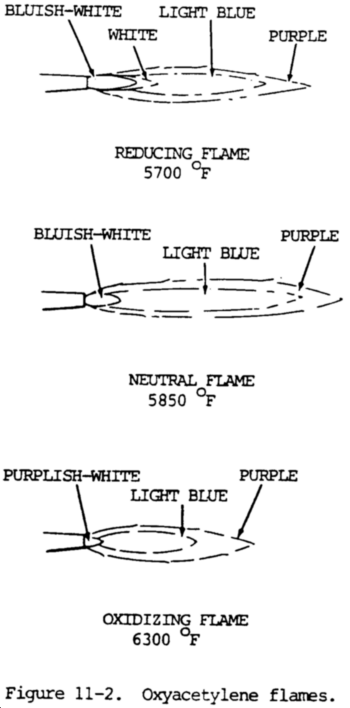
Figure 11-1. The temperature of the flame
Figure 11-2. Oxyacetylene flames
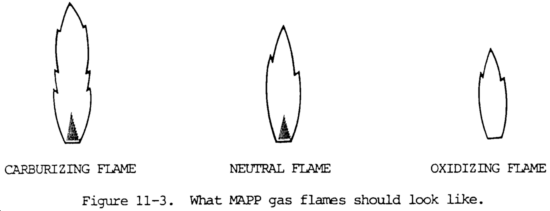
Figure 11-3. What MAPP gas flames should look like
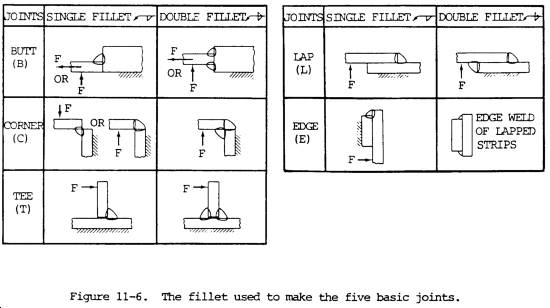
Figure 11-6. The fillet used to make the five basic joints
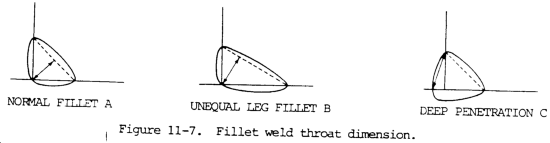
Figure 11-7. Fillet weld throat dimension
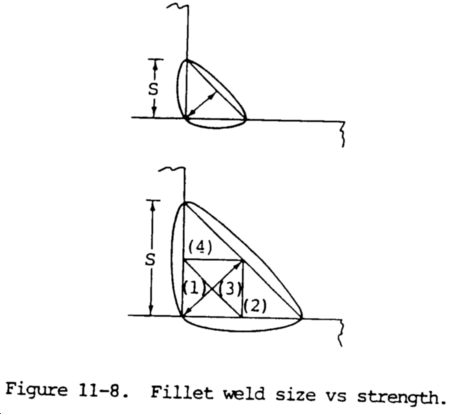
Figure 11-8. Fillet weld size vs strength
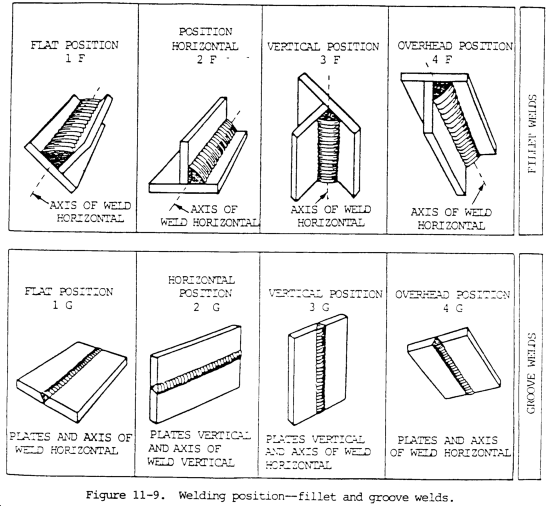
Figure 11-9. Welding position - fillet and groove welds
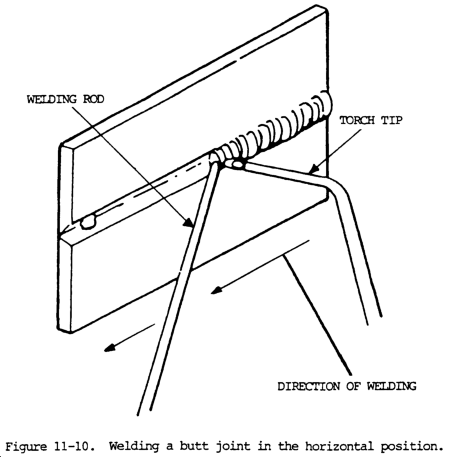
Figure 11-10. Welding a butt joint in the horizontal position
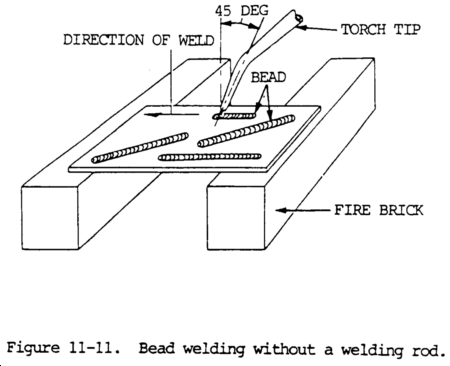
Figure 11-11. Bead welding without a welding rod
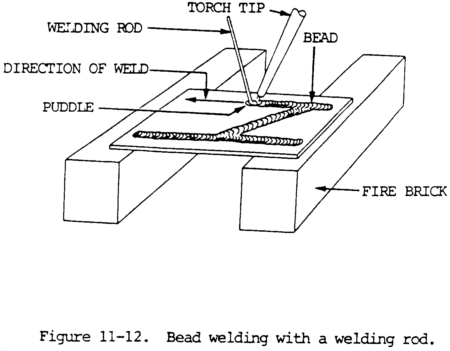
Figure 11-12. Bead welding with a welding rod
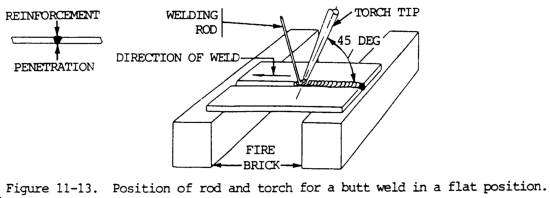
Figure 11-13. Position of rod and torch for a butt weld in a flat position
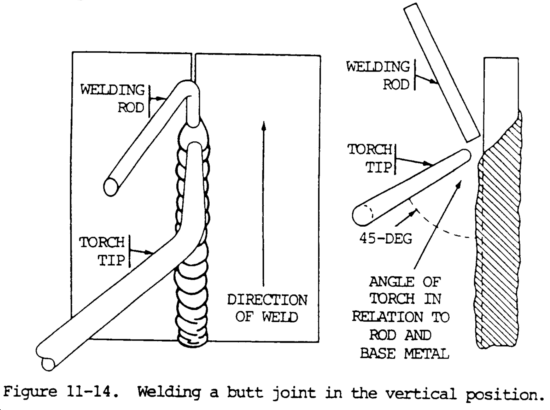
Figure 11-14. Welding a butt joint in the vertical position
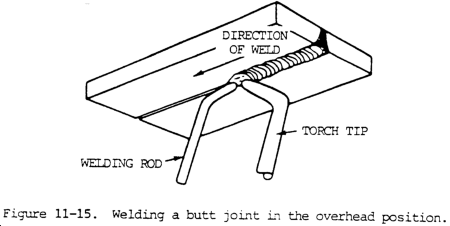
Figure 11-15. Welding a butt joint in the overhead position
Figure 11-16. Silver brazing joints
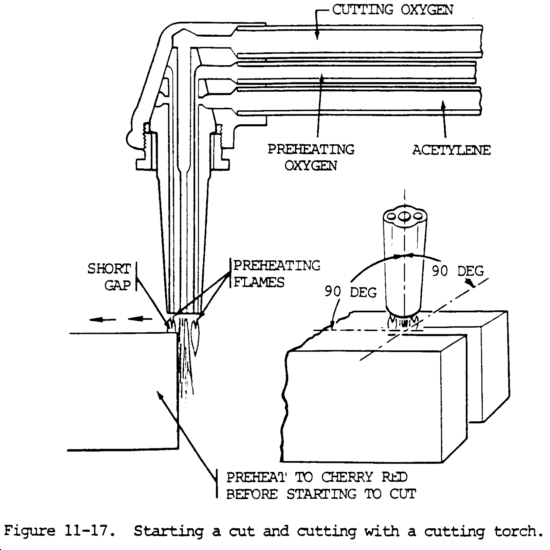
Figure 11-17. Starting a cut and cutting with a cutting torch
Figure 11-18. Procedure for oxyacetylene cutting of cast iron
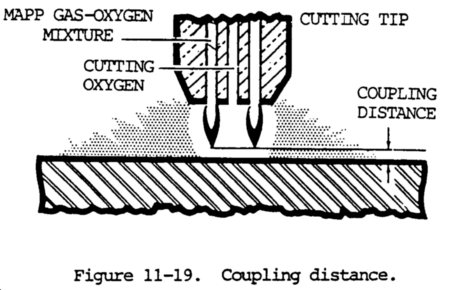
Figure 11-19. Coupling distance
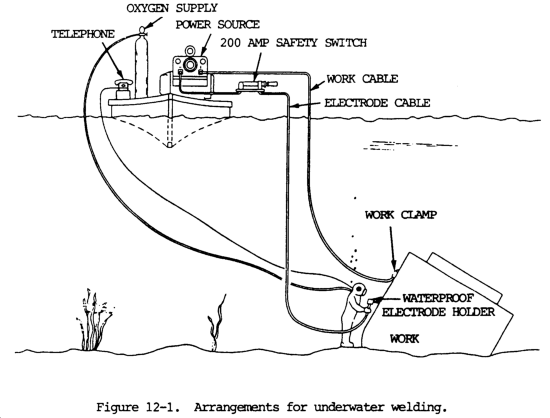
Figure 12-1. Arrangements for underwater welding
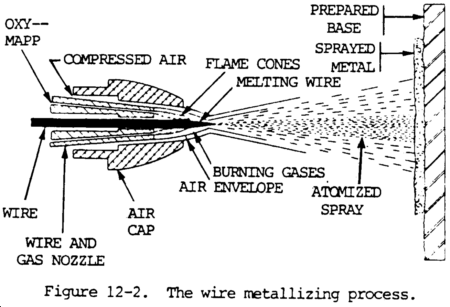
Figure 12-2. The wire metallizing process
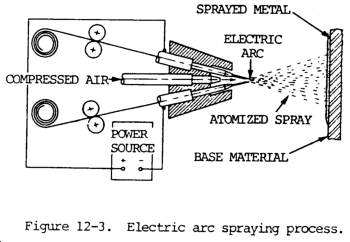
Figure 12-3. Electric arc spraying process
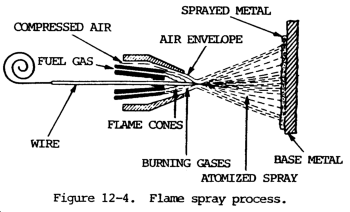
Figure 12-4. Flame spray process
Figure 12-5. Plasma spray process
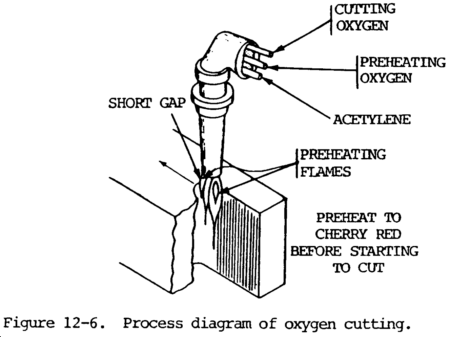
Figure 12-6. Process diagram of oxygen cutting
Figure 12-7. Manual oxygen cutting torch
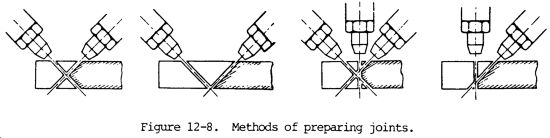
Figure 12-8. Methods of preparing joints
Figure 12-9. Procedure for oxyacetylene cutting of cast iron
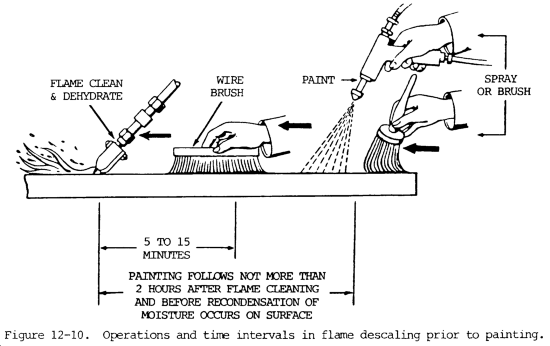
Figure 12-10. Operations and time intervals in flame descaling prior to painting
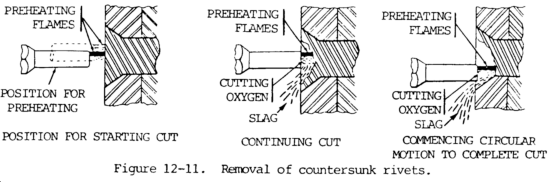
Figure 12-11. Removal of countersunk rivets
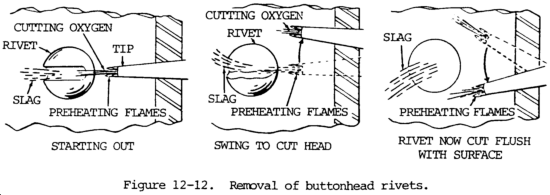
Figure 12-12. Removal of buttonhead rivets
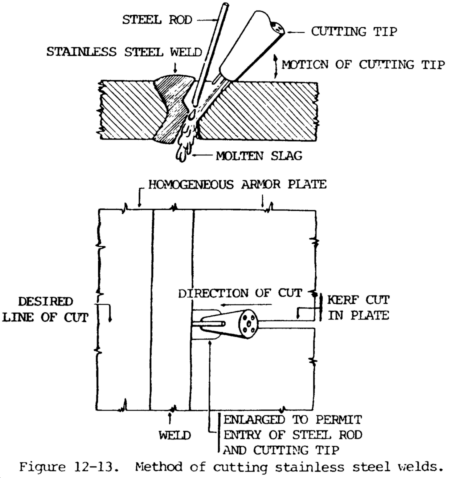
Figure 12-13. Method of cutting stainless steel welds
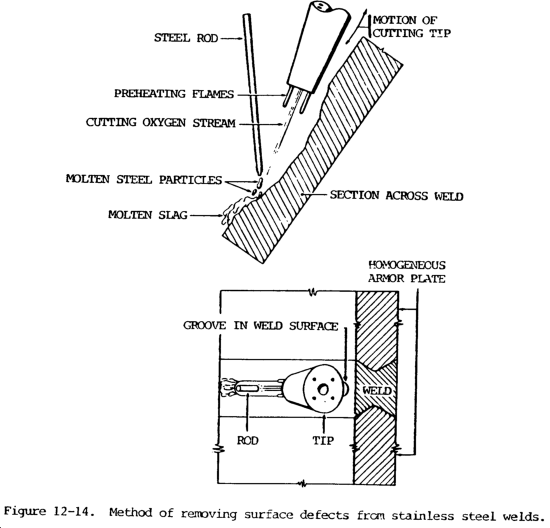
Figure 12-14. Method of removing surface defects from stainless steel welds
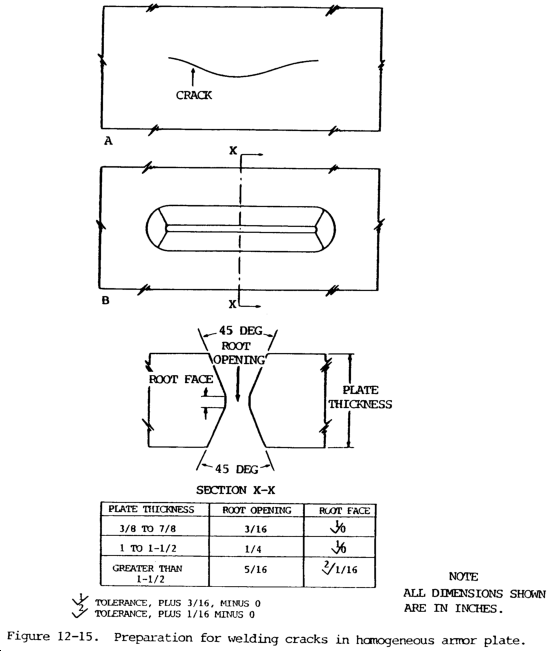
Figure 12-15. Preparation for welding cracks in homogenous armor plate
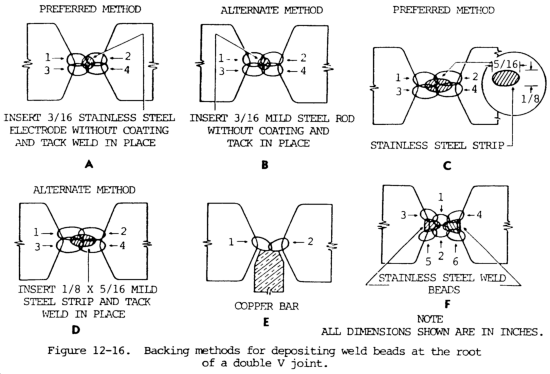
Figure 12-16. Backing methods for depositing weld beads at the root of a double V joint
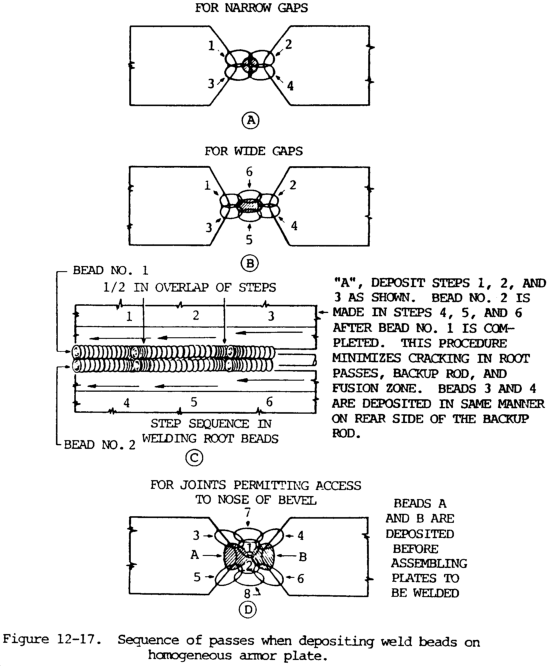
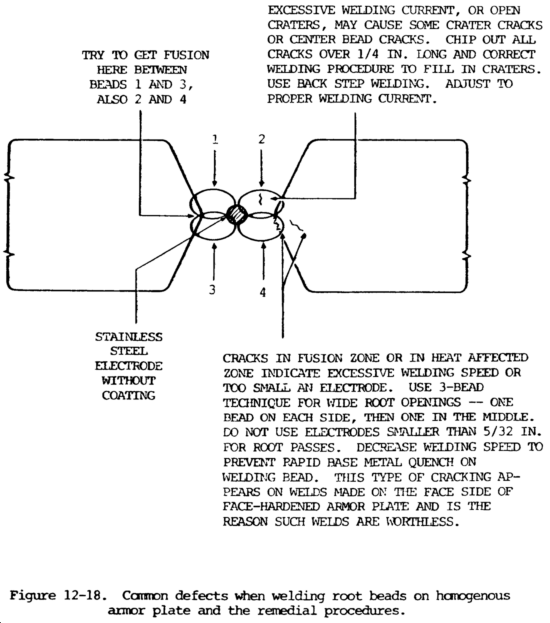
Figure 12-17. Sequence of passes when depositing weld beads on homogenous armor plate
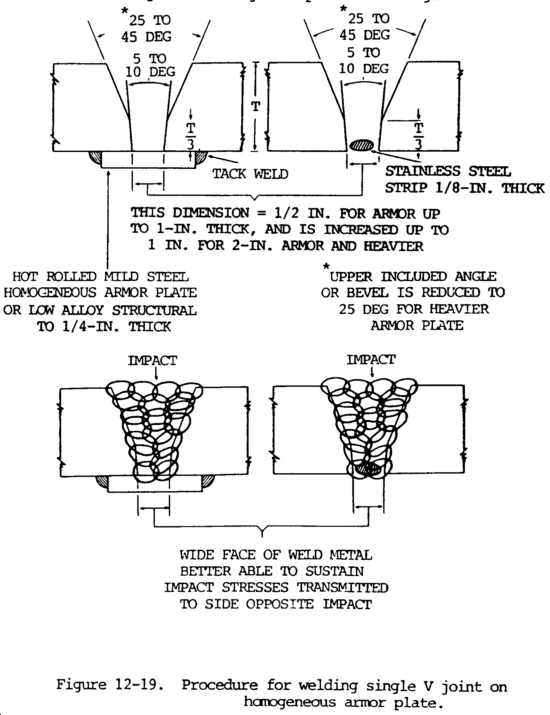
Figure 12-19. Procedure for welding single V joint on homogenous armor plate
Figure 12-20. Double V weld on homogenous armor plate
Figure 12-21. Butt strap welds on cracked armor plate
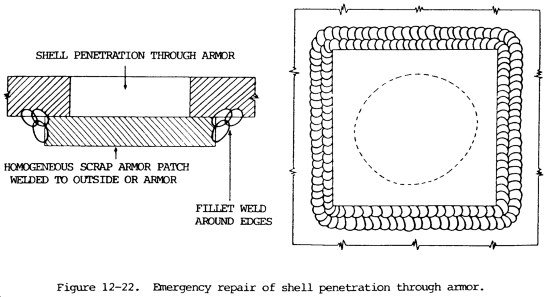
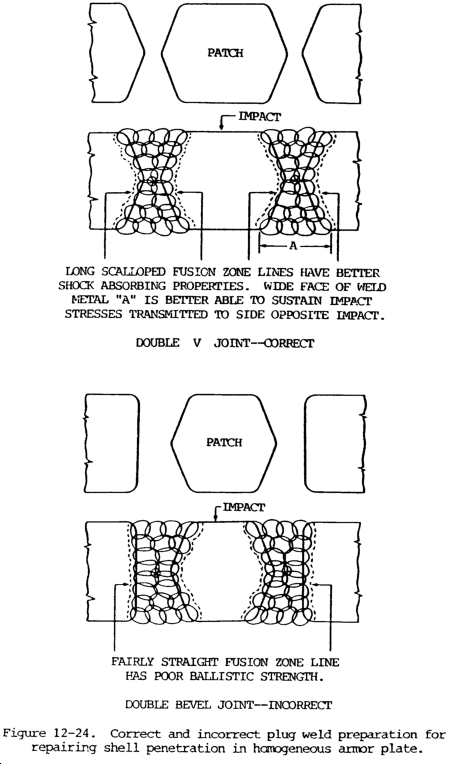
Figure 12-22. Emergency repair of shell penetration through armor
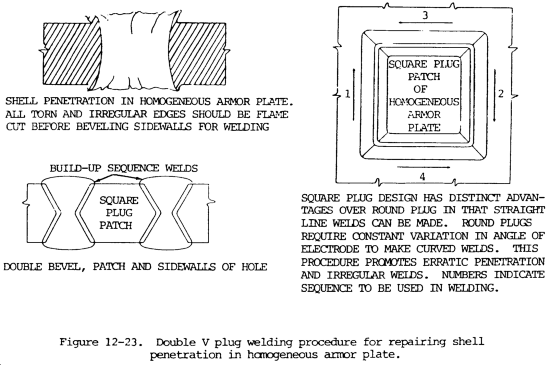
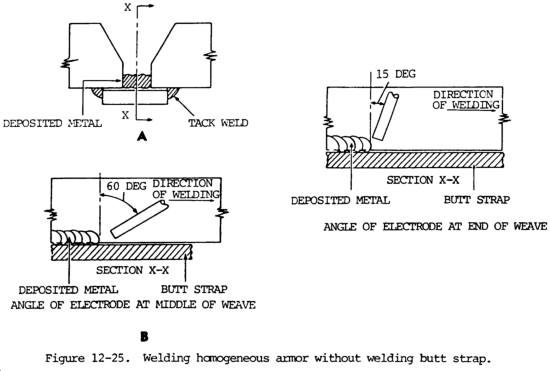
Figure 12-25. Welding homogenous armor without welding butt strap
Figure 12-26. Welding repair of gouges in surface of homogenous armor plate
Figure 12-27. Welding joint data for butt welds on face hardened armor
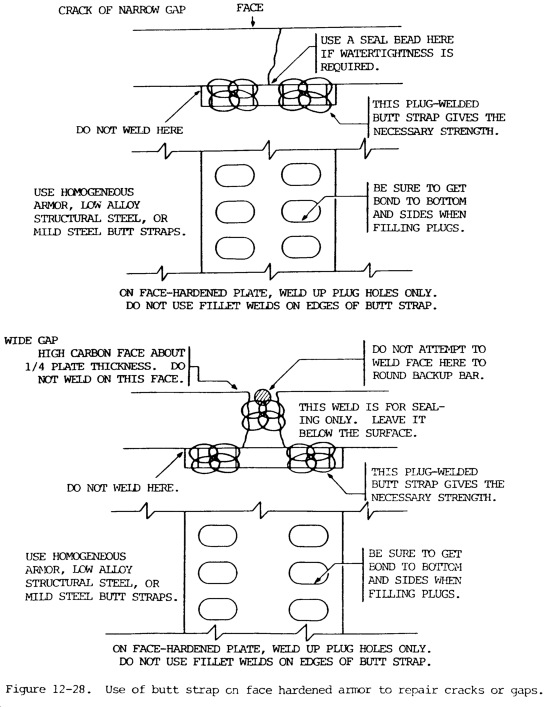
Figure 12-28. Use of butt strap on face hardened armor to repair cracks or gaps
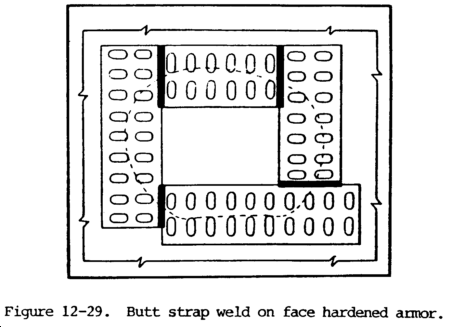
Figure 12-29. Butt strap weld on face hardened armor
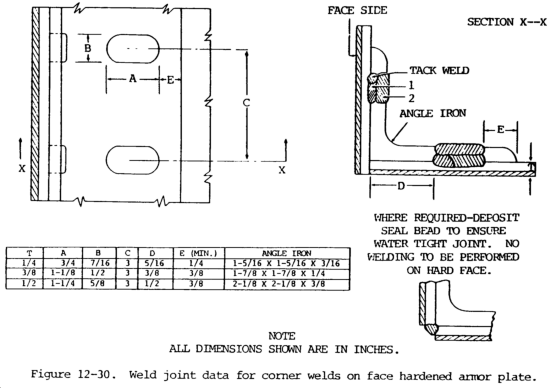
Figure 12-30. Weld joint data for corner welds on face hardened armor plate
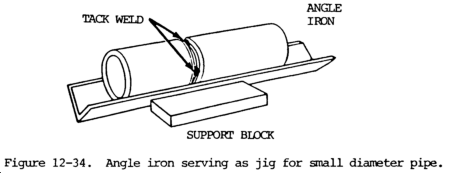
Figure 12-34. Angle iron serving as jig for small diameter pipe
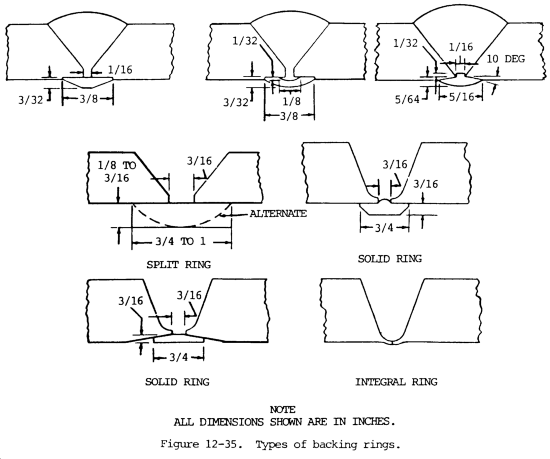
Figure 12-35. Types of backing rings
Figure 12-36. Template pattern, ell joint, first step
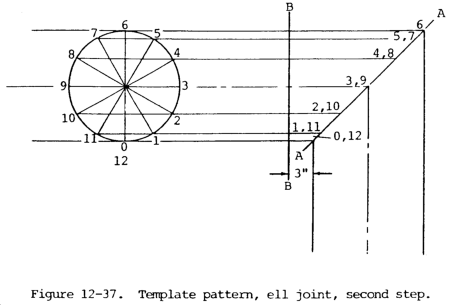
Figure 12-37. Template pattern, ell joint, second step
Figure 12-38. Template pattern, ell joint, third step
Figure 12-40. Template pattern, tee joint, first step
Figure 12-41. Template pattern, tee joint, second step
Figure 12-42. Diagram of tack welded pipe on rollers
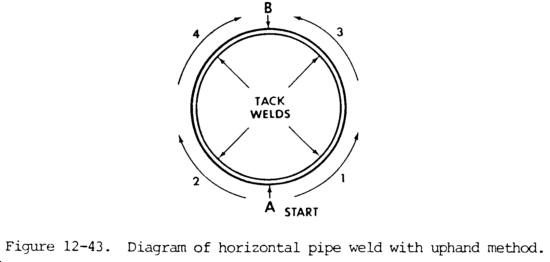
Figure 12-43. Diagram of horizontal pipe weld with uphand method
Figure 12-44. Diagram of horizontal pipe weld with downhand method
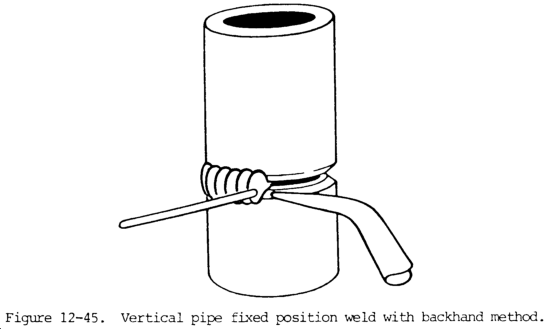
Figure 12-45. Vertical pipe fixed position weld with backhand method
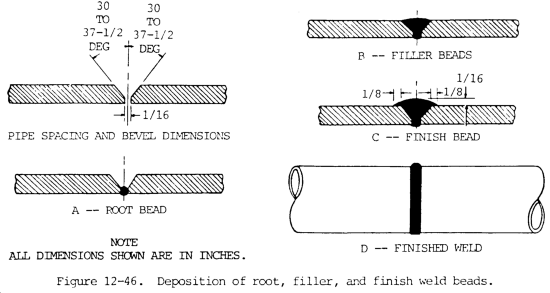
Figure 12-46. Deposition of root, filler, and finish weld beads
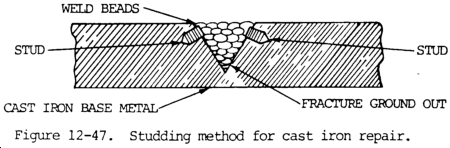
Figure 12-47. Studding method for cast iron repair
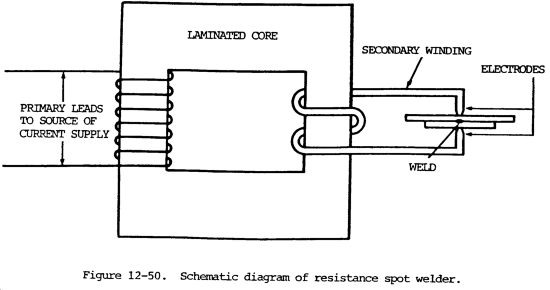
Figure 12-50. Schematic diagram of resistance spot welder
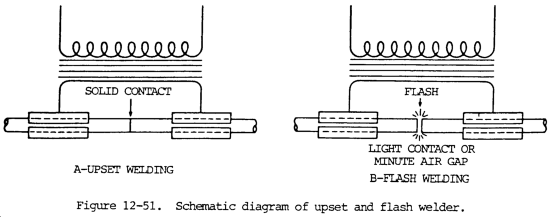
Figure 12-51. Schematic diagram of upset and flash welder
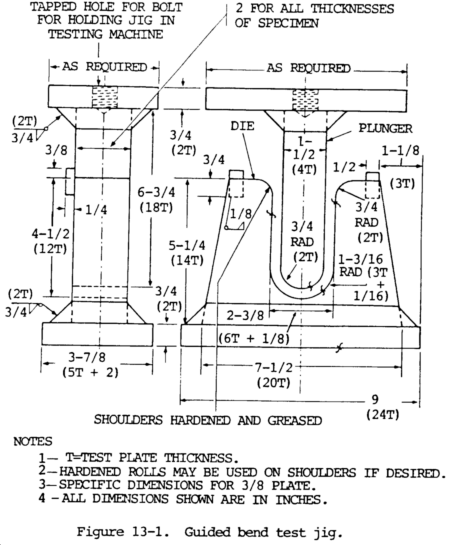
Figure 13-1. Guided bend test jig
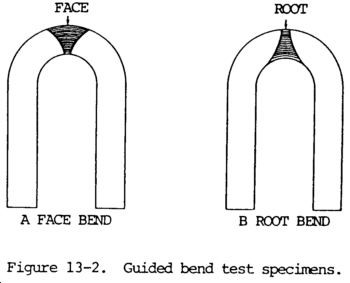
Figure 13-2. Guided bend test specimens
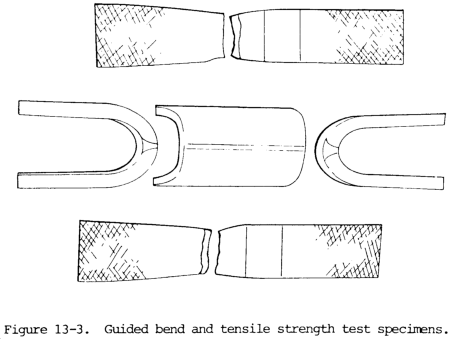
Figure 13-3. Guided bend and tensile strength test specimens
Figure 13-4. Free bend test of welded metal
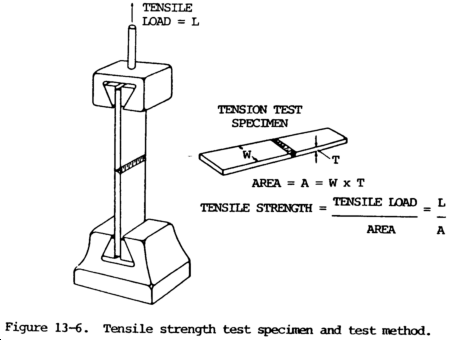
Figure 13-6. Tensile strength test specimen and test method
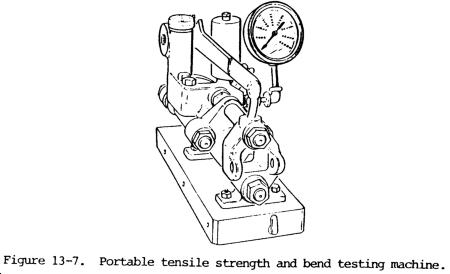
Figure 13-7. Portable tensile strength and bend testing machine
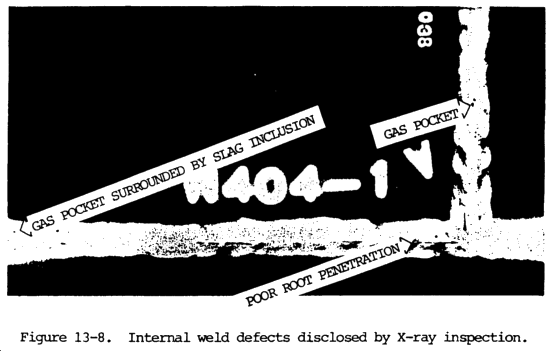
Figure 13-8. Internal weld defects disclosed by X-ray inspection